


SB-S-IMPRZA/10W6v2_INSTR_SKU#011218
SB-S-IMPRZA/10W6v2_INSTR_SKU#011218
CONGRATULATIONS
You have completed the installation for this model!
Please refer to the Power Recommendation section for an
amplifier recommendation and basic set-up help.
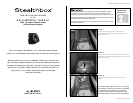
STEP 6
Carefully guide the socket cup set screw through the cuts
made in the carpeting and the enlarged hole.
From under the vehicle, apply supplied fender washer, flat
washer, lock washer and hex nut onto the exposed socket
cup set screw and secure.
Note: For added protection it is recommended that
you apply a bead of silicone between the vehicle and
the fender washer. After the bolt assembly is tightly
secured, it is also recommended that vehicle under-
coating material is applied to the exposed assembly.
STEP 5
Place the Stealthbox® into the trunk. Run speaker wire
from the amplifier location to the Stealthbox® and attach
to the terminal.
Check the woofer for proper operation.
Thread in the supplied socket cup set screw into the bottom
of the Stealthbox®, leaving 1-1/2-inches exposed.
STEP 4
Flip the thin carpet back into place. Feel for the hole enlarged
in STEP 3 and cut the thin carpet at the hole.
Place the heavy carpet flooring back into the trunk. Feel for
the hole enlarged in STEP 3 and cut the flooring at the hole.
Page 3 • JL Audio, Inc 2006
All specifications are subject to change without notice. “JL Audio®” and the JL Audio logo, “Stealthbox” and the Stealthbox logo are registered
trademarks of JL Audio, Inc. “Ahead of the Curve” and its respective logo is a trademark of JL Audio, Inc.
JLA-SKU#011218-11-12-200
JLA-SKU#011218-11-12-200
6
6
• Printed in USA • ©2005 JL Audio, Inc. • U.S. PATENTS: #5,734,734 #5,949,898 #6,118,884 #6,229,902
#6,243,479 #6,294,959 #6,501,844 #6,496,590 #6,441,685 #5,687,247 #6,219,431 #6,625,292 #D472,891 #D480,709 Other U.S. & Foreign
patents pending. For more detailed information please visit us online at www.jlaudio.com.
(954) 443-1100
www.jlaudio.com
10369 NORTH COMMERCE PARKWAY • MIRAMAR, FLORIDA • 33025 • USA
INCLUDED HARDWARE
(1)
(1)
3/8-inch-16 x 2-1/4-inch Socket Cup Set Screw
3/8-inch-16 x 2-1/4-inch Socket Cup Set Screw
(1)
(1)
3/8-inch -16 Hex Nut
3/8-inch -16 Hex Nut
(1)
(1)
3/8-inch USS Flat Washer
3/8-inch USS Flat Washer
(1)
(1)
3/8-inch x 2-inch Fender Washer
3/8-inch x 2-inch Fender Washer
(1)
(1)
3/8-inch Split Lock washer
3/8-inch Split Lock washer
SPECIFICATIONS
Enclosure Type:
Acoustic Suspension (sealed)
Acoustic Suspension (sealed)
Driver Type:
10W6v2-D4
10W6v2-D4
Nominal Impedance:
2 ohms mono
2 ohms mono
Continuous Power Handling:
400 Watts
400 Watts
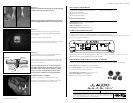
POWER RECOMENDATION
JL Audio recommends using a high quality amplifier such as the JL Audio A1400.
The diagram below shows the recommended crossover, infrasonic filter and equalizer settings for the A1400 when
being used to power your Stealthbox
®
.
Bass Boost Controls
Input Voltage
Low
|
High
CH 1 (Left)
Input Sens. LP Filter
Filter Freq. (Hz)
40
45
55
65
80
100
200
Bass Boost
Remote
Bass Port
Power Protect
CH 2 (Right)
Pre-Outs
The JL Audio A1400 is a very versatile audio component. Please consult the owner’s manual for even more
detailed information about installing and tuning this amplifier.
MID/HIGH FREQUENCY DRIVER FITMENT
A variety of JL Audio coaxial and component systems will fit in the factory speaker locations of you vehicle.
Front Speaker Size / Location:
6.5-inch / Front Doors*
6.5-inch / Front Doors*
Fits JL Audio Models: TR, VR & XR650-CXi, TR,VR,XR,ZR650-CSi
*All speakers require spacers for installation
*All speakers require spacers for installation
Rear Speaker Size / Location:
6.5-inch / Rear Deck*
6.5-inch / Rear Deck*
Fits JL Audio Models:
TR, VR & XR650-CXi
TR, VR & XR650-CXi
*All speakers require spacers for installation
*All speakers require spacers for installation
STEALTHBOX WALL
THREADED INSERT
VEHICLE SHEET METAL
FENDER WASHER
SOCKET CUP SET SCREW
LOCK WASHER
FLAT WASHER
HEX NUT
SILCONE SEALANT