


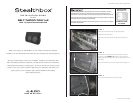

STEALTHBOX WALL
VEHICLE SHEET METAL
THREADED INSERT
LOCK WASHER
FLAT WASHER
SOCKET CUP SET SCREW
HEX NUT
FENDER WASHER
Continued on Next Page
SB-T-TACDC/10W1v2_INSTR_SKU#011238
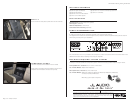
S T E P 7
The supplied wax square is to be placed onto the rear wall,
just to the right of the second mount as in the picture.
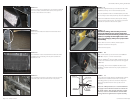
S T E P 6
The Stealthbox® is to be inserted from the back side of the
modified panel. If necessary, trim the panel to allow the
Stealthbox® to fit.
S T E P 5
Remove the ribs that are located on the back side of the
storage bin.
S T E P 4
The top cut line runs straight across. The line does not follow
the corner crease, as like the other cut lines. This top line is
1/2-inch in front of the corner crease.
Page 2 • JL Audio, Inc 2007
S T E P 9
Note: Before drilling, make sure that you are not
going to be drilling into any gas lines, brake lines,
transmission lines, electrical wiring, transfer case (4x4
vehicles) or anything else that might cause a reduc-
tion in your weekly pay. Always wear eye protection
when drilling!
With a drill and a 1/2-inch drill bit, drill through the
impression made in the wax square.
Remove the wax square.
S T E P 1 1
From under the vehicle, place the supplied fender washers,
flat washers, lock washers and then hex nut onto the
protruding socket cup set screw and secure. Adjust the
amount of exposed thread on each cup set screw if
necessary.
Note: For added protection, it is recommended that
you apply a bead of silicone between the vehicle and
the fender washer. After the bolt assembly is tightly
secured, it is also recommended that vehicle under-
coating material is applied to the exposed assembly.
S T E P 1 0
Back out the socket cup set screw that was installed in
STEP 8, to expose 1 1/4-inch of the threads.
Place the Stealthbox
®
with the plastic panel back into the
mount area. Guide the socket cup set screw through the
drilled hole.
Run speaker wire from the amplifier’s location to the
Stealthbox
®
location and check for proper operation of
the woofer.
S T E P 8
Thread the supplied socket cup screw into the rear of the
Stealthbox®, leaving 1/4-inch of the threads exposed.
Place the Stealthbox® with the modified plastic panel into
the mounting location and press firmly onto the Stealthbox®.
Remove the Stealthbox® with the plastic panel carefully,
leaving the wax square in place. The socket cup set screw
will leave an impression onto the wax square.
(1)
(2)