


➔➔
➔➔➔
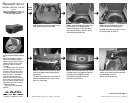
STEP 7: There is a large L-bracket that is already
mounted to the rear of the Stealthbox®.This L-
bracket needs to be unmounted, flipped around and
remounted.The picture above shows the large L-
bracket properly mounted, with the woofer facing
down.
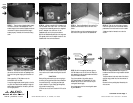
STEP 11: To access this mounting location; enter
the vehicle via the driver’s side rear passenger door,
lift up the flooring that is laying on the second row
seat.
Place a supplied 1/4” Flat Washer onto the
8mmx35mmx1.25” Hex Bolt.
Line up the angle bracket mounting hole to the fac-
tory bolt hole. Place the bolt assembly through the
angle bracket and thread into the factory bolt hole.
Do not tightly secure.
Cont.
From
Previous
Page
Continued on Next Page ➔
➔
STEP 8: a)Place a supplied 3/8” lock washer and
3/8” flat washer onto a
3/8”-16x1-1/4” hex bolt.
Using this bolt assembly, secure the supplied
small L-bracket onto the front of the
Stealthbox®, as is in the picture above.
b)With the Stealthbox® placed into the cargo area.
Run speaker wire from the amplifier location to the
Stealthbox’s® wire terminal and secure.
STEP 12: With Stealthbox loosely mounted in the
front, use the rear L-bracket mounting hole as a drill
guide.
*CAUTION*
Before drilling, make sure that you are not going to
be drilling into any gas lines, brake lines, transmission
lines, electrical wiring or anything else that might
cause a reduction in your weekly pay.Always wear
eye protection when drilling.
With the use of a 3/8” drill bit and drill. Drill out the
floor.
➔
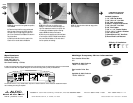
VEHICLE'S FLOOR
LOCK WASHER
HEX HEAD BOLT
FLAT WASHER
HEX NUT
FLAT WASHER
L-BRACKET FROM STEALTHBOX
FENDER WASHER
STEP 13: With the supplied hardware, place a
3/8” Flat Washer onto the 3/8” hex bolt. Place the
bolt assembly through the angle bracket and drilled
hole, from inside the vehicle.
From the underside of the vehicle, place a
3/8” Fender Washer, 3/8” Flat Washer, 3/8” Lock
Washer and the 3/8”-16 Hex Nut onto the pro-
truding bolt. Secure tightly.
Now, tightly secure the front mounting bolt assem-
bly, from STEP11.
STEP 14: Not pictured: Place the spare tire,
hardboard and hold down wing threaded rod back
into place.
The picture above is the under side of the driver’s
side rear cargo pocket floor, that was removed in
STEP2.
Remove the three positing tabs, indicated by the
white arrows.
STEP 9: Place the Stealthbox® into position.The
speaker terminal needs to face to the front of the
vehicle.
Position the factory wiring harness around the out-
side of the front right corner of the Stealthbox®.
STEP 10: Tuck the rear of the factory harness
under the right rear corner.The harness needs to
pass between the woofer and the rear L-bracket.
*Make sure that the harness is not under the
woofer*.
SB-N-MURAN/10W1v2, JL AUDIO, Inc 2006
Sheet SKU#011197 Revision1/18/2006
Page 2
www.jlaudio.com
➔
➔
➔
➔