


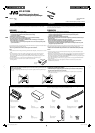

4
D
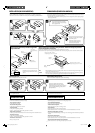
Other external component / Komponen eksternal lainnya
CAUTION
:
Before connecting the external components, make sure that the unit is turned off.
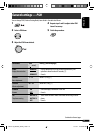
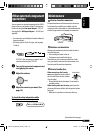
Connecting the external components / Menyambung komponen eksternal
JVC CD changer
CD changer JVC
3.5 mm stereo mini plug
Steker mini stereo 3.5 mm
• Set “EXT IN” for the external input setting (See page 16 of the INSTRUCTIONS.) /
Aturlah
“EXT IN” untuk pengaturan
input eksternal (Lihat halaman 16 dari BUKU PETUNJUK.)
• Set “CHANGER” for the external input setting (See page 16 of the INSTRUCTIONS.) /
Aturlah “CHANGER” untuk pengaturan input eksternal (Lihat halaman 16 dari BUKU PETUNJUK.
)
iPod is a trademark of Apple Computer, Inc., registered in the U.S. and other countries.
iPod adalah merek dagang dari Apple Computer, Inc., terdaftar di
Amerika Serikat dan di
negara-negara lain.
JVC CD changer, Apple iPod, or JVC D. player / JVC CD changer, Apple iPod atau JVC D. player
F
E
CD changer jack
Konektor CD changer
External component
Komponen eksternal
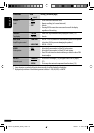
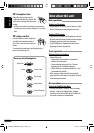
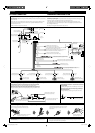
Connecting the external amplifier / Penyambungan penguat eksternal
You can connect an amplifier to upgrade your car stereo system.
• Connect the remote lead (blue with white stripe) to the remote lead of the other equipment so that it
can be controlled through this unit.
• Disconnect the speakers from this unit, connect them to the amplifier. Leave the speaker
leads of this unit unused.
Anda dapat menyambungkan penguat untuk meningkatkan sistem stereo mobil anda.
• Sambungkan ujung jauh (biru dengan strip putih) ke ujung jauh dari peralatan lain sehingga dapat
dikontrol melalui alat penerima ini.
• Putuskan sambungan speaker-speaker dari alat penerima ini, sambungkan ini ke penguat.
Biarkan ujung speaker dari alat penerima ini tidak digunakan.
Rear speakers
Speaker-speaker belakang
JVC Amplifier
Penguat JVC
Remote lead
Ujung jauh
Y-connector
*
3
Konektor Y *
3
Remote lead (blue with white stripe)
Ujung jauh (biru dengan strip putih)
To the remote lead of other equipment or
automatic antenna if any
Ke ujung jauh dari peralatan lain atau antena
otomatis jika ada
Front speakers
Speaker-speaker depan
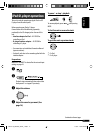
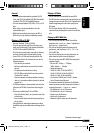
Connecting the monitor / Menyambung monitor
KV-MR9010
9-INCH WIDESCREEN MONITOR *
3
MONITOR LAYAR LEBAR 9 INCI *
3
Apple iPod
Apple iPod
JVC D. player
JVC D. player
CD changer jack
Konektor CD changer
*
3
Tidak disediakan untuk alat penerima ini.
*
4
Kabel sinyal (tidak disediakan untuk alat penerima ini).
*
5
Pasangkan dengan kuat kabel tanah ke bodi besi atau ke casis dari mobil—pada tempat yang tidak dilapisi cat
(jika dilapisi cat, hilangkan cat sebelum memasang kabel). Kegagalan melakukan ini mungkin menyebabkan
kerusakan pada alat penerima tersebut.
*
6
Penyambung sinyal disediakan untuk CD changer anda.
*
7
Adapter Jalur Masukan KS-U57 (tidak disediakan untuk alat penerima ini).
*
8
Adapter Masukan AUX KS-U58 (tidak disediakan untuk alat penerima ini).
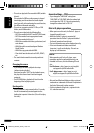
You can connect these components as illustrated below. The iPod or D. player can be connected using
an interface adapter (not supplied)—KS-PD100 (for iPod) or KS-PD500 (for D. player).
Anda bisa menyambungkan komponen-komponen ini seperti yang diilustrasikan di bawah. iPod atau
D. player bisa disambungkan dengan mengunakan adaptor antarmuka (tidak disediakan)—KS-PD100
(untuk iPod) atau KS-PD500 (untuk D. player).
Video cord *
3
Kabel video *
3
or / atau
or / atau
External component
Komponen eksternal
External component
Komponen eksternal
*
3
Not supplied for this unit.
*
4
Signal cord (not supplied for this unit).
*
5
Firmly attach the ground wire to the metallic body or to the chassis of the car—to the place uncoated with paint
(if coated with paint, remove the paint before attaching the wire). Failure to do so may cause damage to the
unit.
*
6
Connecting cord supplied for your CD changer.
*
7
Line Input Adapter KS-U57 (not supplied for this unit).
*
8
AUX Input Adapter KS-U58 (not supplied for this unit).
or
atau
or / atau
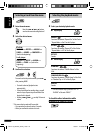
Rear side
Sisi belakang
PERINGATAN:
Sebelum menyambungkan komponen eksternal, pastikan bahwa alat penerima sudah dimatikan.
Instal3-4_SV3305_007A_1.indd 4Instal3-4_SV3305_007A_1.indd 4 1/11/07 10:52:57 AM1/11/07 10:52:57 AM