INSTRUCTIONS
2– EN
Do not use the following discs:
Warped disc Sticker and sticker residue Stick-on label
Unusual shape
Single CD—8 cm (3-3/16”) disc
C-thru Disc (semi-transparent disc)
Transparent or semi-transparent
parts on its recording area
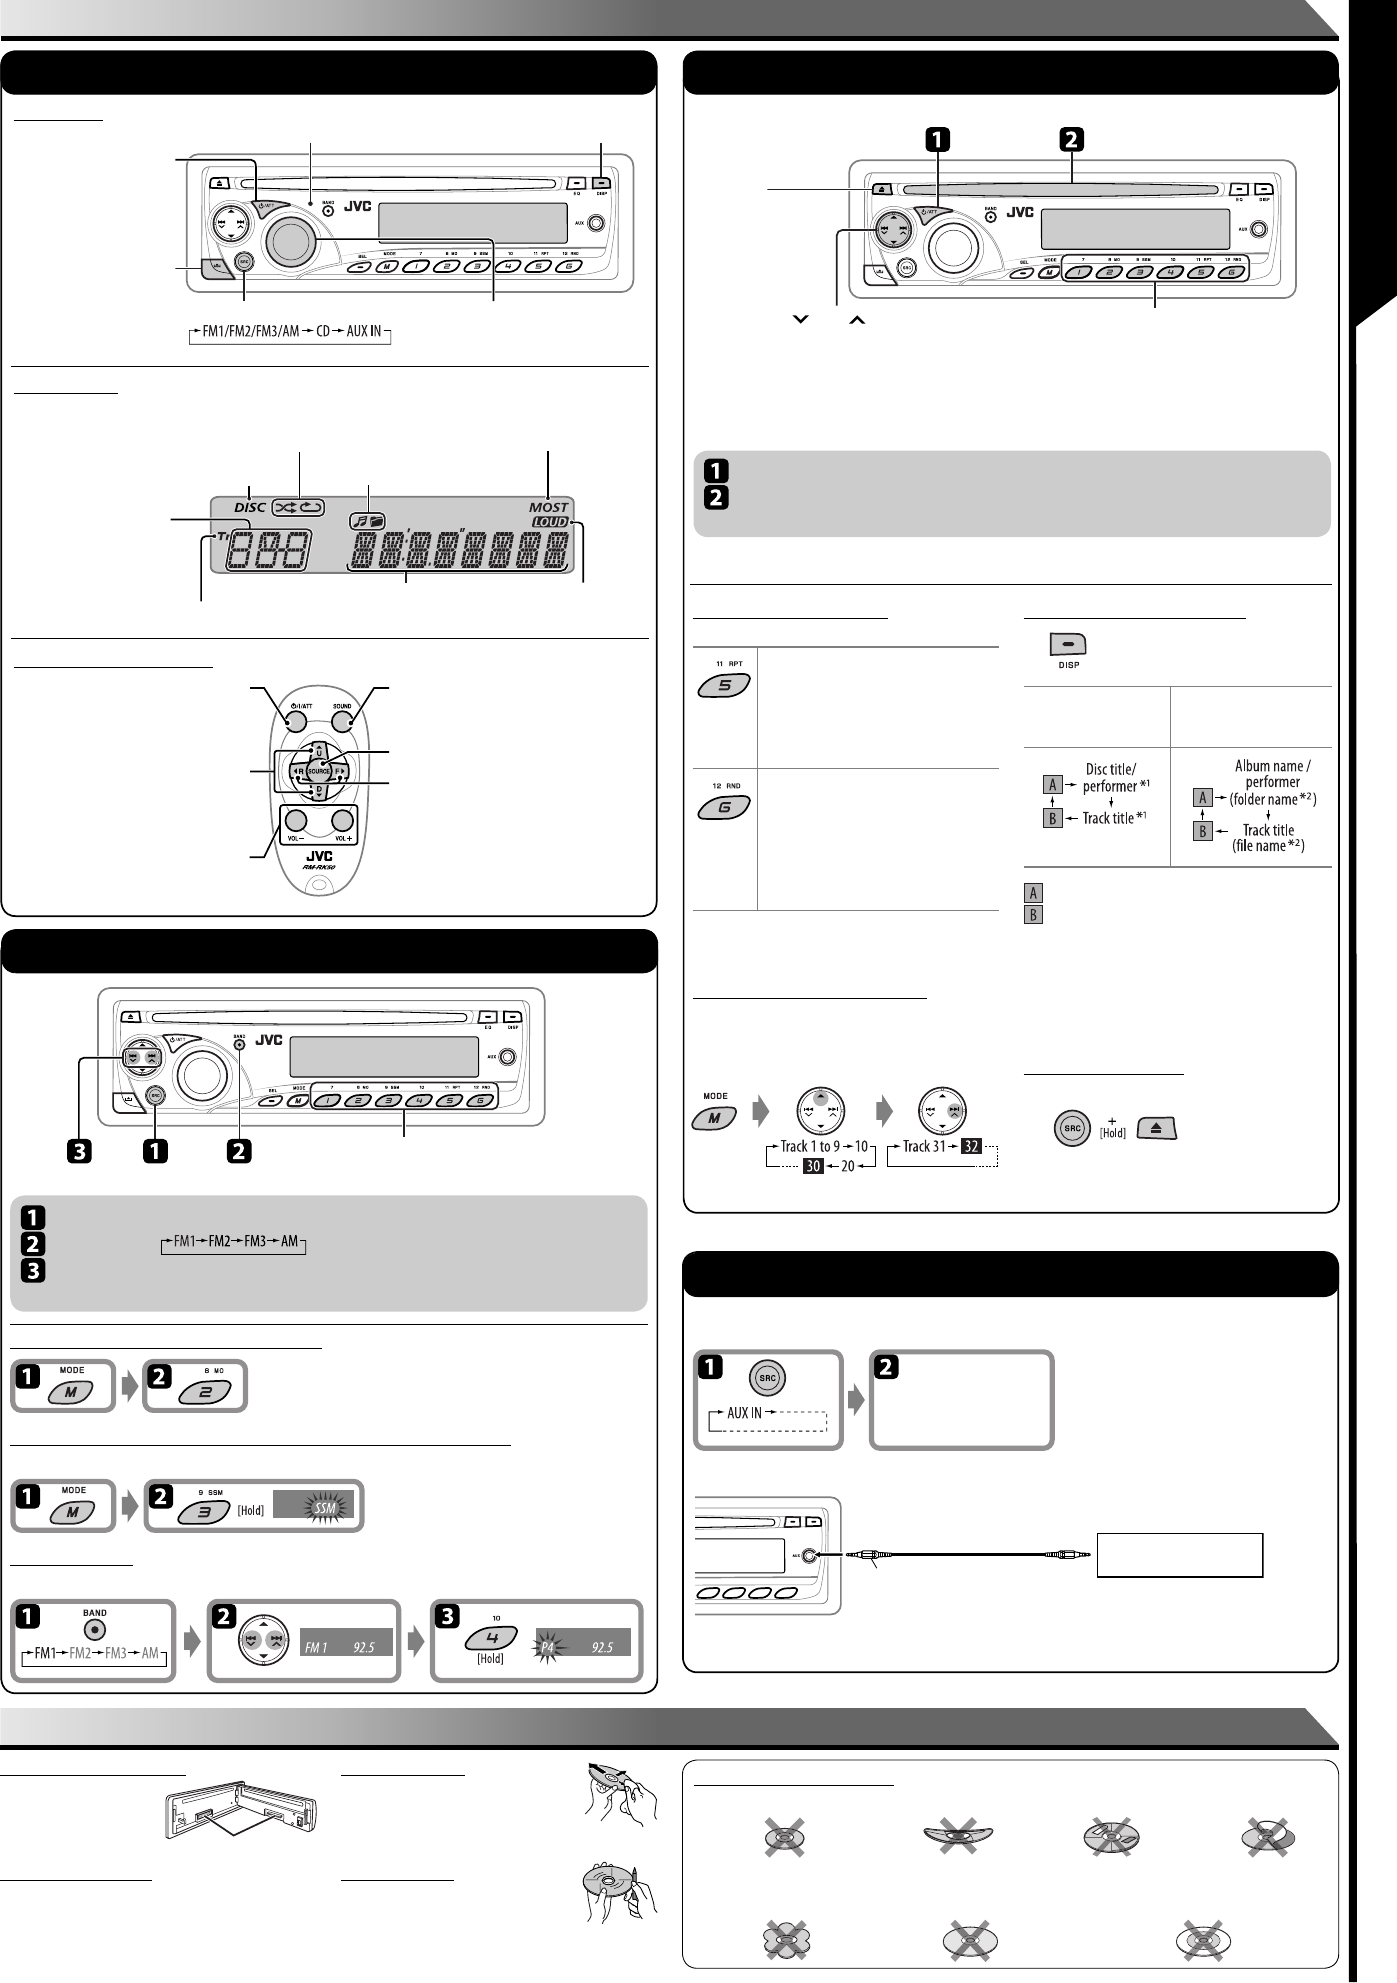
FM station automatic presetting —SSM (Strong-station Sequential Memory)
You can preset six stations for each band.
When an FM stereo broadcast is hard to receive
Select the source.
• Turn on the power.
• Turn off the power [Hold].
• Attenuate the sound (if the
power is on).
Volume control.
Detach the panel.
Check the current clock time/other information.
See also “CLK DISP“ of “General settings—PSM.”
Control panel
Radio operations
Select preset station.
• You can also use 5 / ∞ to select preset station.
Manual presetting
Example: Storing the FM station of 92.5 MHz into preset number 4 of the FM1 band.
Display window
Playback mode indicator
• Source display
• Track number
• Folder number
(for MP3/WMA discs)
• Volume level indicator
• Time countdown indicator
Main display (time,
playback information)
LOUD (loudness)
indicator
Tr (track) indicator
• Turns the power on if pressed briefly or
attenuates the sound when power is on.
• Turns the power off if pressed and held.
• Changes the FM/AM bands with 5 U.
• Changes the preset stations with D ∞.
• Changes the folders of MP3/WMA discs.
• Adjusts the volume level.
• Selects the sound mode
(iEQ: intelligent equalizer).
• Selects the source.
• Searches for stations if pressed briefly.
• Fast-forwards or reverses the track if
pressed and held.
• Changes the track of the disc if pressed
briefly.
Select “FM/AM.”
Select the bands.
Search for a station—Auto Search.
Manual Search: Hold either one of the buttons until “M” flashes on the display, then press it repeatedly.
Remote sensor
DO NOT expose to strong light.
Reception improves, but the stereo effect will be lost.
• MO indicator lights up.
To restore the stereo effect, repeat the same procedure.
Stereo mini plug (not supplied)
Portable audio player, etc.
Turn on the connected
component and start
playing the source.
External component operations
You can connect an external component to the AUX (auxiliary) input jack on the control panel.
Disc operations
Selecting the playback modes
After pressing M MODE, press the following buttons to...
TRK RPT : Plays the current track
repeatedly.
FLDR RPT* : Plays all tracks of the current
folder repeatedly.
RPT OFF : Cancels.
FLDR RND* : Plays all tracks of the current
folder, then the tracks of the
next folder at random.
ALL RND : Plays all tracks of the current
disc at random.
RND OFF : Cancels.
* Only for MP3/WMA.
Skipping a track quickly during play
• For MP3/WMA disc, you can skip a track within the
same folder.
Example: Select track 32
Changing the display information
While playing an audio
CD or CD Text
While playing an MP3 or
a WMA disc
: Clock with the current track number
: The elapsed playing time with the current track
number
*
1
If the current disc is an audio CD, “NO NAME” appears.
*
2
If an MP3/WMA file does not have tags or “TAG DISP” is
set to “TAG OFF,” folder name and file name appear.
Prohibiting disc ejection
You can lock a disc in the loading slot.
To cancel the prohibition, repeat the same procedure.
Turn on the power.
Insert disc.
All tracks will be played repeatedly until you change the source or eject the disc.
Eject disc.
• Press SRC to
listen to another
playback source.
[Press] Select track (for CD) or folder* (for MP3/
WMA) number (01 – 06).
[Hold] Select track (for CD) or folder* (for MP3/
WMA) number (07 – 12).
* Folders are required to assigned with 2-digit
numbers at the beginning.
•
4 / ¢
[Press] Go to the next or previous track.
[Hold] Fast-forwards or reverses the track.
• 5 / ∞ : Go to the next or previous folder
(for MP3/WMA discs).
Disc indicator
Basic operations
To keep discs clean
Wipe in a straight line from center of disc to
edge. Do not use liquid cleaners, thinners, or
benzene.
To play new discs
Remove any rough areas from the inner and
outer edges of the disc.
MAINTENANCE
How to clean the connectors
Wipe the connectors with
a cotton swab or cloth
moistened with alcohol.
Moisture condensation
Moisture may condense on the lens inside the unit. Eject
the disc and leave the unit turned on for a few hours until
the moisture has evaporated.
Connectors
Remote controller—RM-RK50
Disc information indicators
• MO: Lights up in monaural mode.
• ST: Lights up when receiving an FM stereo
broadcast with sufficient signal strength.
OPERATIONS
EN_KD-R210[J]f.indd 2EN_KD-R210[J]f.indd 2 14/8/09 2:50:18 PM14/8/09 2:50:18 PM
