184 mm
53 mm
!"#$
• !"#$%12V !"#$%&'(
!
!"#$%
!
!
• !"#$%&' ()*+,-./01
!"#$%&'!()*+",-./
!"#$%& '()*+,-.#/0
JVC !"#$%&'()*+,-.
!"#$%&'()*+
!"
!"
!
1
!" !"#$%&'()*
!"#$%&' !"#$%
* !"#$%&'()*+,&-./0
2
!"#
3
!"#$%&'()&*+
1 !"#
!"#$%&'()*+,-
!
2 !"#$%&'(%)*+,-./
!"#$%&'()*+,
3
!"#$
!"#$%&'()*+,#
!"#$
4
!"#$%&'()
* !"#$%&'()*+,-./0
!"#$%&'()"*+,-./
5
!"#$%&&'()*+,-.
!"#$%&'(
6
!"#$%&'()%*+,-./
7
!"#$ %&'()*+,-./
8
!"#$%&' !#()*+,-
!"#
9
!"#$
J
V
C
GET0067-002A
[U]
1101HISFLEJEIN
EN, CH, TH, AR
ENGLISH
• This unit is designed to operate only on 12V DC,
NEGATIVE ground electrical systems.
INSTALLATION (IN-DASH
MOUNTING)
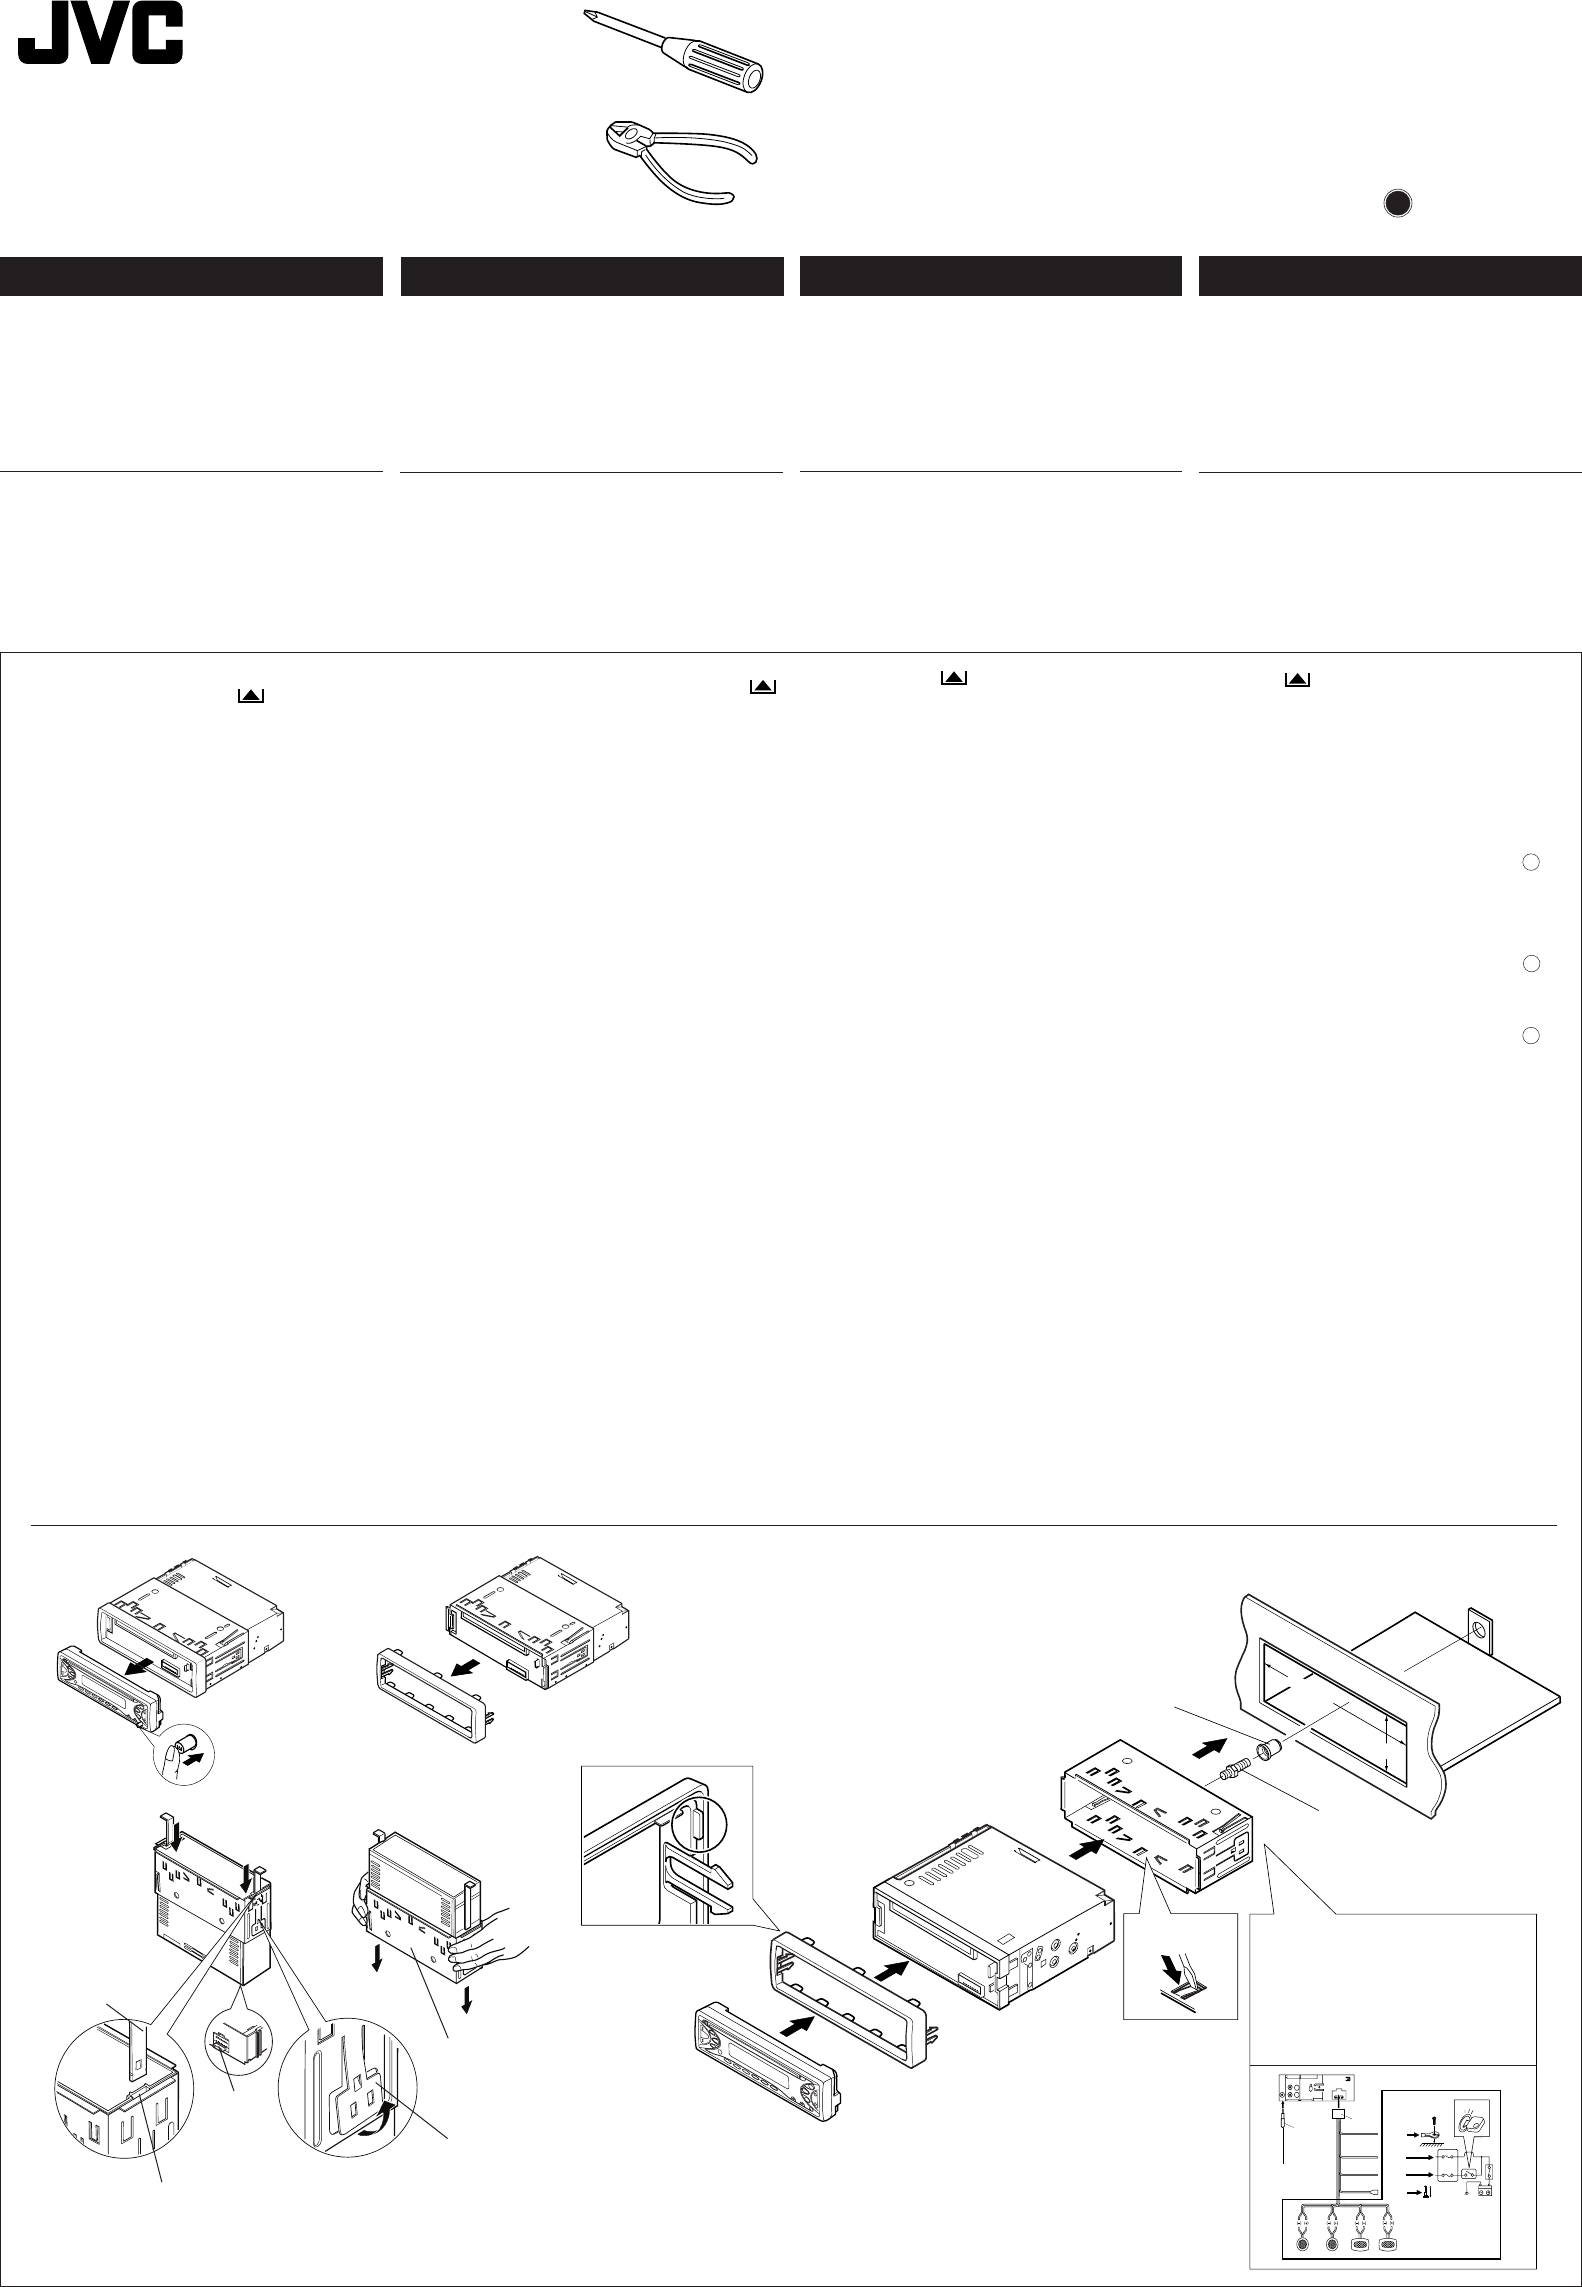
• The following illustration shows a typical installation.
However, you should make adjustments
corresponding to your specific car. If you have any
questions or require information regarding installation
kits, consult your JVC car audio dealer or a company
supplying kits.
KD-S685/S585
Installation/Connection Manual
°“√µ‘¥µ—Èß/§ŸË¡◊Õ°“√µ‘¥µ—Èß
O²O²
O²O²
O²
ÒÒ
ÒÒ
Ò
ØVOd²« ULOKFð VØVOd²« ULOKFð V
ØVOd²« ULOKFð VØVOd²« ULOKFð V
ØVOd²« ULOKFð V
qOu²«qOu²«
qOu²«qOu²«
qOu²«
1
Before mounting: Press (Control Panel
Release button) to detach the control panel if
already attached.
* When shipped from the factory, the control panel
is packed in the hard case.
2
Remove the trim plate.
3
Remove the sleeve after disengaging the sleeve
locks.
1 Stand the unit.
Note: When you stand the unit, be careful not
to damage the fuse on the rear.
2 Insert the 2 handles between the unit and the
sleeve, as illustrated, to disengage the sleeve
locks.
3 Remove the sleeve.
Note: Be sure to keep the handles for future
use after installing the unit.
4
Install the sleeve into the dashboard.
* After the sleeve is correctly installed in the
dashboard, bend the appropriate tabs to hold
the sleeve firmly in place, as illustrated.
5
Fix the mounting bolt to the rear of the unit’s body
and place the rubber cushion over the end of the
bolt.
6
Do the required electrical connections explained
on the back of this instructions.
7
Slide the unit into the sleeve until it is locked.
8
Attach the trim plate so that the projection on the
trim plate is fixed to the left side of the unit.
9
Attach the control panel.
10
2
8
9
1
3
Handle
§—π∫—ߧ—∫
WU*«
Lock Plate
·ºËπ‚≈À–¬÷¥ (Lock Plate)
XO³¦²« W×OH
Sleeve
ª≈Õ°ÀÿÈ¡
w«u« qJON«
Fuse
ø‘«Ï
“uOH«
7
4
Trim plate
·ºËπ‚≈À–¢Õ∫·µËß
WM¹e« WŠu
6
5
See the back page for electrical
connections.
¥Ÿ°“√‡™◊ËÕ¡‚¥¬„™È‰øøÈ“„πÀπÈ“À≈—ß
qł« s WOHK)« W×HB« dE½«
dNJ« öOu²«ÆWOzUÐ
Dashboard
·ºßÀπÈ“ª—∑¡Ï
…—UO« uKÐUð
Slot
√ËÕß„™È”À√—∫æ—π≈«¥
oýÒdOG
Sleeve
ª≈Õ°ÀÿÈ¡
w«u« qJON«
Rubber cushion
¬“ß°—π°√–·∑°
WOÞUD*« …uA(«
Mounting bolt
≈—°ª√–°Õ∫
VOd²« —UL
wÐdŽwÐdŽ
wÐdŽwÐdŽ
wÐdŽ
•—UOð WDÝ«uÐ jI qLFO “UN'« «c¼ rLbI
w???zU???Ðd???N??? d???ýU???³??
DCW???L???E???½« ¨X???u??? ±≤ ¨
ÆVUÝ i¹—Qð WOzUÐdN
ðð
ðð
ð
dd
dd
d
OO
OO
O
VV
VV
V
««
««
«
''
''
'
NN
NN
N
UU
UU
U
““
““
“
®®
®®
®
œœ
œœ
œ
««
««
«
šš
šš
š
qq
qq
q
‡‡
‡‡
‡
ðð
ðð
ð
UU
UU
U
ÐÐ
ÐÐ
Ð
KK
KK
K
uu
uu
u
««
««
«
OO
OO
O
UU
UU
U
——
——
—
……
……
…
©©
©©
©
•O??³??¹ÒW??I??¹d??Þ w??U??²??« w??×??O??{u??²??« r??Ýd??« s??
q?L?Ž p?O?K?Ž V−¹ ¨p– l ÆWOU¦*« VOd²«
w?²?« …—U?O??« Ÿu½ oÐUDð ö¹bFð9²K?JN?UÆ
«–« UÊ ¼M?U„ «Ý²H?U—« «Ë ŠUłW *F?KuU?
Ð?Bu?’ «œË« «²?d?OV?¨ ¹d?łv «Ý²?A?U?—…
u“Ÿ «ôłNe… «BuðOW KOU—« U—W
JVC
«Ë «AdW «*u“ŽW Nc… «ôœË«Æ
±
³³
³³
³
qq
qq
q
ÐÐ
ÐÐ
Ð
bb
bb
b
¡¡
¡¡
¡
««
««
«
²²
²²
²
dd
dd
d
OO
OO
O
VV
VV
V
∫∫
∫∫
∫ «{Gj «d“®“— %d¹d
uŠW «²×Jr© s «łq Bq uŠW «²×JrÆ
*ŽMb «A×s s «*BMl¨ - Ë{l uŠW «²×Jr
œ«šq «BMbË‚Æ
≤≤
≤≤
≤«½eŸ uŠW «e¹MWÆ
≥≥
≥≥
≥«½eŸ «NOJq «u«w ÐFb Bq ¦³²U «NOJq
«u«wÆ
±«Ën «'NU“ ÐAJq ŽLuœÍÆ
öö
öö
ö
ŠŠ
ŠŠ
Š
EE
EE
E
WW
WW
W
∫∫
∫∫
∫ ŽMb ðuOn «'NU“¨ ðQb s ŽbÂ
ðCd— «Ë «ðö· «HOu“ «*ułuœ w? «'NW
«)KHOW s «'NU“Æ
≤«œšq??? «*??U???²???5?? Ð5??? «'N???U??“ Ë«N???O???J??q???
«u?«w¨ L?U ¼u? ³5? w «A?Jq?¨ HB?q
¦³²U «NOJq «u«wÆ
≥«½eŸ «NOJq «u«wÆ
öö
öö
ö
ŠŠ
ŠŠ
Š
EE
EE
E
WW
WW
W
∫∫
∫∫
∫ ¹dłw «;UEW ŽKv «*UU s
«łq «ôݲFLU‰ ôŠIU ÐFb ðdOV «'NU“Æ
¥¥
¥¥
¥—V «NOJq «u«w œ«šq ðUÐKu «OU—…Æ
*ÐFb? ðdO?V «NO?Jq? «u«w K?OU? œ«šq ðUÐK?u
«OU—… ÐA?Jq ×O`¨ «ŁM?w «_MW ÐAJq?
MUÝV ²¦³OX «NOJq «u«w ÐAJq ×Jr
w «*JUÊ «B×O`¨ LU ¼u ³5 w «AJqÆ
µµ
µµ
µŁ³ÒX LU— «²dOV ÐU'NW «)KHOW s ¼OJq
«'N?U?“ ËÐF?b? –p? {l? «(A?u?… «*D?U?ÞO?W? u?‚
½NU¹W «*LU—Æ
∂∂
∂∂
∂
«ŽLq «²uOö «JNdÐUzOW «*DKuÐW LU ¼u
AdËÕ šKn ¼cÁ «²FKOLUÆ
∑∑
∑∑
∑«œšq «'N?U“ œ«šq? «NOJ?q «u?«w Š²v? ¹¦³?X
ÐAJq ×O`Æ
∏∏
∏∏
∏ —ÒV uŠW «e¹MW Ð×OY ¹²r ð¦³OX «M²u¡
«*ułuœ ŽKv uŠW «e¹MW ŽKv «'U½V «ô¹d
K−NU“Æ
ππ
ππ
π—ÒV uŠW «²×JrÆ
*
4
‰∑¬
• ™ÿ¥ª√–°Õ∫™ÿ¥π’ȉ¥È√—∫°“√ÕÕ°·∫∫¡“‡æ◊ËÕ„™Èß“π°—∫
√–∫∫°√–·‰øøÈ““¬¥‘π¢—È«≈∫°√–·µ√ß
12 ‚«≈∑Ï
°“√µ‘¥µ—Èß (°“√ª√–°Õ∫·ºßÀπÈ“ª—∑¡Ï‡¢È“)
• ¿“æµ—«Õ¬Ë“ßµËÕ‰ªπ’È·¥ß∂÷ß°“√µ‘¥µ—Èß·∫∫∑—Ë«‰ª լ˓߉√°Áµ“¡
§ÿ≥§«√ª√—∫·µËß„ÀȇÀ¡“–¡°—∫√∂¢Õߧÿ≥‡Õß À“°§ÿ≥¡’
ª—≠À“À√◊ÕµÈÕß°“√¢ÈÕ¡Ÿ≈‡°’ˬ«°—∫™ÿ¥µ‘¥µ—Èß °√ÿ≥“ª√÷°…“
°—∫ºŸÈ¢“¬‡§√◊ËÕ߇’¬ß√∂¬πµÏ JVC ¢Õß∑Ë“πÀ√◊Õ∫√‘…—∑
∑’Ë®”ÀπË“¬™ÿ¥µ‘¥µ—Èßπ’È
1
°ËÕπª√–°Õ∫ °¥ªÿË¡ (ª≈¥·ºß§«∫§ÿ¡)
‡æ◊ËÕÕÕ°®“°·ºß§«∫§ÿ¡
* ‡¡◊ËÕº≈‘µ¿—≥±Ï∂Ÿ°ËßÕÕ°¡“®“°‚√ßß“π ·ºßÀπÈ“ª—¥®–
∫√√®ÿ‰«È„π≈—ß·¢Áß
2
∂Õ¥·ºËπ‚≈À–¢Õ∫·µËßÕÕ°
3
∂Õ¥ª≈Õ°ÀÿÈ¡ÕÕ°À≈—ß®“°ª≈¥∑’Ë≈ÁÕ§ª≈Õ°ÀÿÈ¡ÕÕ°·≈È«
1 ®—∫™ÿ¥ª√–°Õ∫µ—Èߢ÷Èπ
À¡“¬‡Àµÿ : ‡¡◊ËÕ§ÿ≥µ—Èß™ÿ¥ª√–°Õ∫¢÷Èπ √–«—ß
լ˓∑”„ÀÈø‘«Ï∫√‘‡«≥Ë«π∑È“¬‡’¬À“¬
2 „˧—π∫—ߧ—∫
2 Õ—π√–À«Ë“ß™ÿ¥ª√–°Õ∫°—∫ª≈Õ°ÀÿÈ¡ (¥—ß¿“æ)
‡æ◊ËÕª≈¥∑’Ë≈ÁÕ§ª≈Õ°ÀÿÈ¡ÕÕ°®“°°—π
3 ª≈¥ª≈Õ°ÀÿÈ¡ÕÕ°
À¡“¬‡Àµÿ : √–¡—¥√–«—ß„Àȧ—π∫—ߧ—∫“¡“√∂„™Èß“π‰¥ÈµËÕ‰ªÀ≈—ß
®“°µ‘¥µ—Èß™ÿ¥ª√–°Õ∫·≈È«
4
µ‘¥µ—Èߪ≈Õ°ÀÿÈ¡≈ß„π·ºßÀπÈ“ª—∑¡Ï
* À≈—ß®“°µ‘¥µ—Èߪ≈Õ°ÀÿÈ¡≈ß„π·ºßÀπÈ“ª—∑¡Ïլ˓ß∂Ÿ°µÈÕß·≈È« ¥—¥
√ËÕß„ÀÈ‚§ÈßæÕ¥’∑’˪≈Õ°ÀÿÈ¡®–∂Ÿ°¬÷¥‰«Èլ˓߷πËπÀπ“ (¥—ß¿“æ)
5
µ‘¥≈—°ª√–°Õ∫∫√‘‡«≥¥È“πÀ≈—ß‚§√ߢÕß™ÿ¥ª√–°Õ∫·≈–«“߬“ß
°—π°√–·∑°‰«È∫πË«πª≈“¬¢Õß≈—°
6
‡™◊ËÕ¡‚¥¬„™È‰øøÈ“„π®ÿ¥∑’˵ÈÕß°“√
¥—ß∑’ˉ¥ÈÕ∏‘∫“¬„πË«π∑È“¬¢Õߧ”·π–π”π’È
7
‡≈◊ËÕπ™ÿ¥ª√–°Õ∫≈ß„πª≈Õ°ÀÿÈ¡®π‡¢È“°—π‰¥ÈæÕ¥’
8
„Ë·ºËπª√–¥—∫ ‚¥¬„ÀÈ¢Õ∫¢Õß·ºËπª√–¥—∫¬÷¥µ‘¥·πËπ
°—∫¥È“π´È“¬¢Õߺ≈‘µ¿—≥±Ï
9
µËÕ‡¢È“°—∫·ºß§«∫§ÿ¡
10
1
2
3
1
2
3
4
5
Instal.KD-S685/S585[U]-5 13/12/01, 11:34 am1


