


1
LVT1372-010A
[EX, EU]
ENGLISH
This unit is designed to operate on 12 V DC, NEGATIVE ground electrical systems. If your
vehicle does not have this system, a voltage inverter is required, which can be purchased at
JVC IN-CAR ENTERTAINMENT dealers.
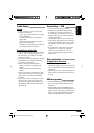
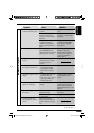
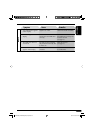
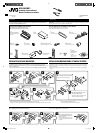
Parts list for installation and connection
The following parts are provided for this unit.
After checking them, please set them correctly.
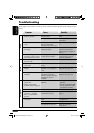
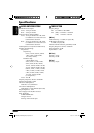
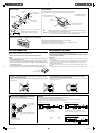
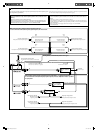
INSTALLATION (IN-DASH MOUNTING)
The following illustration shows a typical installation. If you have any questions or require
information regarding installation kits, consult your JVC IN-CAR ENTERTAINMENT dealer or a
company supplying kits.
• If you are not sure how to install this unit correctly, have it installed by a qualified technician.
FRANÇAIS
Cet appareil est conçu pour fonctionner sur des sources de courant continu de 12 V à masse
NEGATIVE. Si votre véhicule n’offre pas ce type d’alimentation, il vous faut un convertisseur de tension,
que vous pouvez acheter chez un revendeur d’autoradios JVC.
Liste des pièces pour l’installation et raccordement
Les pièces suivantes sont fournies avec cet appareil.
Après vérification, veuillez les placer correctement.
J
Handles
Poignées
F
Washer (ø5)
Rondelle (ø5)
G
Lock nut (M5)
Ecrou d’arrêt (M5)
H
Mounting bolt (M5 x 20 mm)
Boulon de montage (M5 x 20 mm)
I
Rubber cushion
Amortisseur en caoutchouc
A / B
Hard case/Control panel
Etui de transport/Panneau de
commande
C
Sleeve
Manchon
D
Trim plate
Plaque d’assemblage
E
Power cord
Cordon d’alimentation
L
Remote controller
Télécommade
M
Battery
Pile
INSTALLATION (MONTAGE DANS LE TABLEAU DE BORD)
L’illustration suivante est un exemple d’installation typique. Si vous avez des questions ou avez besoin
d’information sur des kits d’installation, consulter votre revendeur d’autoradios JVC ou une compagnie
d’approvisionnement.
• Si l’on n’est pas sûr de pouvoir installer correctement cet appareil, le faire installer par un technicien
qualifié.
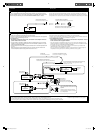
Do the required electrical connections.
Réalisez les connexions électriques.
*
1
When you stand the unit, be careful not to damage the fuse on the rear.
*
1
Lorsque vous mettez l’appareil à la verticale, faire attention de ne pas endommager le fusible situé sur l’arrière.
Bend the appropriate tabs to hold
the sleeve firmly in place.
Tordez les languettes appropriées pour
maintenir le manchon en place.
*
2
Fit the protrusions outside the unit.
*
2
Fixez les protubérances à l’extérieur de l’appareil.
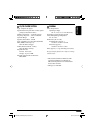
Removing the unit
Before removing the unit, release the rear section.
Retrait de l’appareil
Avant de retirer l’appareil, libérer la section arrière.
Insert the two handles, then pull
them as illustrated so that the unit
can be removed.
Insérez les deux poignées, puis tirez
de la façon illustrée de façon à retirer
l’appareil.
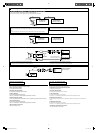
N
CD-ROM
(Image Converter:
Color Ver. 2.0)
CD-ROM
(Image Converter:
Color Ver. 2.0)
KD-SHX851
Installation/Connection Manual
Manuel d’installation/raccordement
0405MNMMDWJEIN
EN, FR
K
DC/DC converter
Convertisseur CC/CC
Install1-3_SHX851[EU_EX]f.indd 1Install1-3_SHX851[EU_EX]f.indd 1 05.4.8 3:26:33 PM05.4.8 3:26:33 PM