


10
|
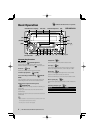
DPX-MP5110U/DPX-MP4110/DPX-MP3110
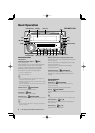
General Operation
Display Switching
Changing displayed information on each source
following;
In Tuner source
Information Display
Frequency “FREQ”
Clock “Clock”
Graphic “Graphic”
In CD & External disc source
Information Display
Disc title “D-Title”
Track title (In External disc source) “T-Title”
Play time & Track number “P-Time”
Clock “Clock”
Graphic “Graphic”
In Audio file source
Information Display
Music title & Artist name “Title”
Album name & Artist name “Album”
Folder name “Folder”
File name “File”
Play time & Music number “P-Time”
Clock “Clock”
Graphic “Graphic”
In Tape source
Information Display
Play time (Tape counter) “Counter”
Clock “Clock”
Graphic “Graphic”
In Standby/ Auxiliary input source
Information Display
Source name “SRC Name”
Clock “Clock”
Graphic “Graphic”
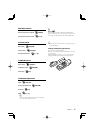
1 Enter Switching Display mode
Press the [38] button for at least 1 second.
“DISP SEL” is displayed.
2 Select the Display item
Push the Control knob towards up or down.
3 Exit Switching Display mode
Press the [38] button.
⁄
• When you select the clock display, the display setting of
each source will be changed to the clock display.
• If the selected display item does not have any
information, alternative information is displayed.
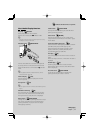
User Color Setting
Adjust the illumination color with R(Red), G(Green),
B(Blue) setting. Adjusted set value is memorized in
the <Illumination color Select> of User setting area.
1 Select the item to adjust and select “USER”
See step1 to step3 of <Illumination Color Select>
(page 9) for detail.
2 Enter the RGB adjusting mode
Press the Control knob for at least 1 second.
3 Select the color to adjust
Push the Control knob towards right or left.
Adjust the blinking color.
4 Adjust the RGB Color
Turn the Control knob.
5 Exit the RGB adjusting mode
Press the Control knob.