


12
|
English
General features
Audio Setup
Setting the Sound system, such as Cross over
Network.
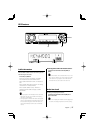
1 Select the source to adjust
Press the [SRC] button.
2 Enter Audio Setup mode
Press the [VOL] knob for at least 1 second.
3 Select the Audio Setup item to adjust
Press the [VOL] knob.
Each time you press the knob, the item to be
adjusted alternates between the items shown in
the table below.
4 Setup the Audio item
Turn the [VOL] knob.
Adjustment Item Display Range
Front High Pass Filter*
1
"HPF" Through/40/60/80/100/120/
150/180/220 Hz
Rear High Pass Filter*
1
"HPR" Through/40/60/80/100/120/
150/180/220 Hz
Low Pass Filter*
1,2
"LPF" 50/60/80/100/120/Through
Hz
Subwoofer Phase*
1,2,3
"PHAS" Reverse (180°)/ Normal (0°)
Volume offset "V-OFF" –8 — ±0
Loudness "LOUD" OFF/ON
• Volume offset: Sets each source’s volume as a
difference from the basic volume.
• Loudness: Compensates for low and high tones
during low volume.
• *
1
Function of the KDC-W6534U.
• *
2
You can control this item when <Switching preout>
(page 30) is set to "SWPRE SW".
• *
2
You can control this item when <Subwoofer
Output> (page 12) is set to "SW ON".
• *
3
You can control this item when Low Pass Filter is not
set to Through.
5 Exit Audio Setup mode
Press the [VOL] knob for at least 1 second.
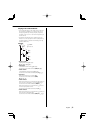
Speaker Setting
Fine-tuning so that the System Q value is optimal
when setting the speaker type.
1 Enter Standby
Press the [SRC] button.
Select the "STANDBY" display.
2 Enter Speaker Setting mode
Press the [VOL] knob.
3 Select the Speaker type
Turn the [VOL] knob.
Each time you turn the knob, the setting
alternates between the settings shown in the
table below.
Speaker type Display
OFF "SP OFF"
For 5 & 4 in. speaker "SP 5/4"
For 6 & 6x9 in. speaker "SP 6*9/6"
For the OEM speaker "SP OEM"
4 Exit Speaker Setting mode
Press the [VOL] knob.
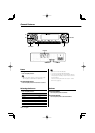
Function of the KDC-W6534U
Subwoofer Output
Turning the Subwoofer output ON or OFF.
Push the Control knob toward [AM] for at
least 2 seconds.
Each time you push the knob, Subwoofer output
switches ON and OFF.
When it is ON, "SW ON" is displayed.
• You can control this function when <Switching
preout> (page 30) is set to "SWPRE SW".