


3
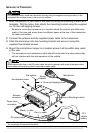
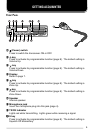
INSTALLING THE TRANSCEIVER
For passenger safety, install the transceiver securely using the supplied mounting bracket, so the
transceiver will not break loose in the event of a collision.
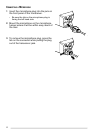
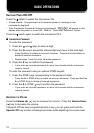
1 Mark the position of the holes in the dash by using the mounting bracket as a
template. Drill the holes, then attach the mounting bracket using the supplied
5 x 16 mm self-tapping screws.
• Be sure to mount the transceiver in a location where the controls are within easy
reach of the user and where there is sufficient space at the rear of the transceiver
for cable connections.
2 Connect the antenna and the supplied power cable to the transceiver.
3 Slide the transceiver into the mounting bracket and secure it using the
supplied hex-headed screws.
4 Mount the microphone hanger in a location where it will be within easy reach
of the user.
• The microphone and microphone cable should be mounted in a place where they
will not interfere with the safe operation of the vehicle.
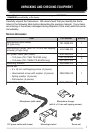
When replacing the fuse in the DC power cable, be sure to replace it with a fuse of the same value.
Never replace a fuse with one that is rated with a higher value.
Note: The microphone is supplied only with K type models; it is not supplied with M type models.
The model type is marked on the carton.
Hex-headed screw
DC power cable
Mounting bracket
Antenna
connector
Power input
connector
Fuse
Black (–) cable
Red (+) cable
12 V
vehicle
battery
Microphone
5 x 16 mm self-tapping screw
Spring
washer
Flat washer