


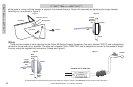

The tweeter can be mounted one of three ways:
flush, surface and angled mounting. For flush
mounting applications, please refer to the illustration
in Figure 3 and 4. Mount the tweeter as high up on
the door and as far forward as possible without
interference from the dashboard. Choose a flat
location on the door with space behind the panel to
allow room for the mounting nut.
After checking the clearances, cut the appropriate
mounting hole diameter in the door panel. Place the
Installation
5
Installation
Tweeter Mounting
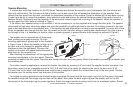
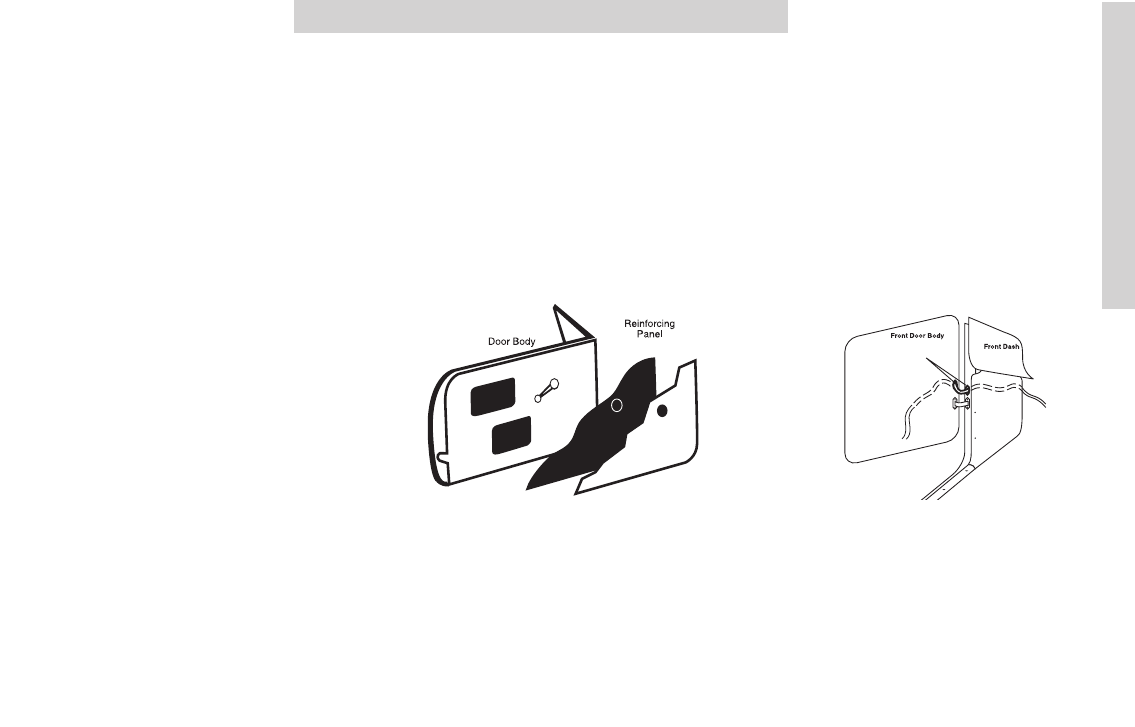
If custom door mounting locations for the KS-Series Tweeters are desired, be careful to avoid interference from the window and
door lock mechanisms. The first step is to find a location on the door panel that will accept the dimensions of the speaker. Then
remove the door panel from the door, and check for operational clearance of the window. Cycle the window all the way down and up.
If metal must be cut to mount the speakers, avoid structural metal and braces. An optional reinforcing panel (thin piece of wood or
Medium Density Fiberboard) may be necessary if the door panel cannot support the mounting of the speaker. Mount the speaker to
the door panel and door body as outlined in Figure 1.
If the factory door speaker wiring is not available, it will be necessary to run the supplied wire through the door jamb. The speaker
wire should be kept away from sharp edges and avoid the possibility of getting pinched by the door. An existing grommet in the door
jamb is the ideal place to run the speaker wire. If the factory hole and grommet do not exist or are inaccessible, you must drill a hole
to run the speaker wire through the door jam. Be careful not to drill into other wiring or existing door mechanisms. Any time a wire is
run through a hole, it is necessary to insert a rubber or plastic grommet to protect the wire from damage as outlined in Figure 2.
Figure 1 Figure 2
To Crossover
Stagger Holes
For Wiring &
Use Grommets
(When Factory Holes and
Grommets are not Available)
(Optional)
Door Panel
Kick Panel
mounting nut behind the door panel. Feed the wire through the door and body panels. Mount the tweeter by screwing the tweeter onto
the mounting nut.
For surface mounting applications, remove the tweeter face plate by screwing it off and install the supplied smaller face plate. Use
the surface mount cup as a template and drill a 7/64” (2.8 mm) hole in the center for attaching the cup to the door and a 5/16”
(7.9 mm) hole for the wires. A #8 flathead sheet metal screw is supplied to attach the surface mount cup to the door panel. Position
the tweeter over the surface mount cup and press it into position.
For angled mounting applications use the back angle ring behind the panel and the front angle ring in front of the panel, and place
the tweeter through the front angle ring and then into the panel. Next place the back angle ring over the tweeter and line up the
narrow part of the front angle ring for proper operation. Attach the longer tweeter mounting nut but do not completely tighten. Rotate
KS-Series Tweeters