


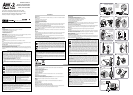

Instrument name Clip Attachment Illustration
Remarks
Large Small Guitar
location
Trumpet / Cornet Main tube A1
Bell (top) A1
Trombone
Mouthpiece receiver
Bell (top right) A2 *1
Horn Single First tube A3
Double F slide
Tube Mouth pipe A4
Euphonium Bell A5
Flute — — — *2 *3
Oboe Bell body A6
E
Clarinet Bell joint area
B
Clarinet Bell A7
Bass clarinet (B
) Blowing tube
Bassoon Wing joint area A8
Soprano saxophone
Bell
Alto Saxophone Neck / Main tube A9
Tenor saxophone Neck
Baritone saxophone
Bell
Violin Head B1
Viola Head B1
Cello Tailpiece B2
Contrabass Tailpiece B2
Guitar Head B3
Ukulele Head B3
Banjo Head B3
Mandolin Head B3
Music Stand — — — As desired C1 *3
Recommended locations for attachmentParts of the AW-2 and what they do
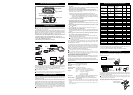
Internal mic
Note name indicator
Reference pitch indicator
High(+) indicator
Pure major third, Pure minor third
Input indicator
Input select button
Clip attachment slot
Light button
CALIB buttons
Power button
Battery cover
Installing the battery
Turn the power switch off before you install or replace the battery. The battery in-
cluded with the AW-2 is for the purpose of verifying that the unit operates correctly,
and may not have a very long life.
When the battery begins to run low, the liquid crystal display (in particular
the meter movement) will become fainter and the backlight will become
dimmer. The AW-2 will continue to operate for a while longer, but tuning
will become less accurate. Replace the battery as soon as possible.
1. With the ball of your thumb, lightly press the battery cover located on
the back of the AW-2, turn it counter-clockwise, and remove it.
2. Replace the battery, being sure to observe the correct polarity so that
the "+" side of the battery is visible.
3. Turn the battery cover clockwise to reattach it.
Attaching the included clip
Ye s
No
Meter surface
Attach
Remove
Large Clip
Small Clip
Guitar Clip
Joint
Firmly press the clip all the way into the attachment slot, making sure that
it's oriented correctly. To remove the clip, grasp the AW-2, and remove the
clip by pressing it at the location marked in the illustration.
Do not attempt to insert anything other than the included clip. Doing so may dam-
age the connector or other parts.
Do not attempt to remove the clip by pulling the jaws of the large clip or the guitar
clip. Doing so may cause the joint to come apart, or may damage the clip.
Where to attach the clip
You can use this tuner to tune woodwind, brass, and string instruments,
but the recommended location for attaching the tuner to your instrument
when using the PIEZO of the included clip will depend on the type of in-
strument you are using.
Refer to the table on the other side of this sheet and to the illustrations at the
right, and attach the tuner in the recommended location. Depending on the
conditions of use, you may also be able to tune with the tuner attached in a
different location. You can also switch the input to the internal mic (MIC)
and attach the tuner to a music stand rather than to your instrument. If
you've selected the internal mic, you can also use the tuner without the clip.
Please carefully attach the AW-2 to your instrument. Leaving the AW-2 attached
for a long time may hurt the instrument surface.
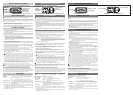
Tuning procedure
1.
Press the power button. The power will turn on/off each time you press
this button.
If the power is left on for approximately 20 minutes without any sound
being input, it will turn off automatically.
2. If necessary, press the illumination button to set the backlight.(*
M
)
Each time you press the illumination button, the setting will cycle be-
tween soft → auto → unlit → soft ...
Soft: To conserve battery life, the illumination will remain low.
Auto: The backlight will light brightly when sound is input or when a
button is operated. When there has been no input or button op-
eration for approximately ten seconds, the backlight will change
to the "Soft" level of brightness.
Unlit: The backlight will not light.
3. Use the input select button to choose the sound input. (Refer to "Rec-
ommended locations for attachment")
The setting will alternate between MIC and PIEZO each time you press the
button.(
*
M
)
4. If you want to change the reference pitch (calibration), press the CALIB
[ ] or [ ] button.
You can adjust this over a range of 410 Hz...480 Hz in 1 Hz steps.(*
M
)
5. Play a single note on your instrument.
The display will show the name of the note closest to the pitch detected.
Tune your instrument to the correct pitch so that the desired note name
appears.
6. Once again play a single note on your instrument, and adjust the tun-
ing so that the center segment of the meter is lit.
The right (+) indicator will light if the pitch is too high, and the left (-)
indicator will light if the pitch is too low.
You have the option of reversing the direction of the AW-2’s meter between left
and right, but in our explanation here we will assume that the High (+) indicator
is located at the right side.
If you want to tune to a pure major third (-13.7 cents) or pure minor third
(+15.6 cents) above a certain note, adjust the pitch to the pure major or mi-
nor third marks in the meter.
For example if you want to tune to a pure major third (-13.7 cents) above A
(0 cents), make the note name indicator read C
, and tune so that the meter
indicates the left [ ]. Alternatively, if you want to tune to a pure minor
third (+15.6 cents) above A (0 cents), make the note name indicator read C,
and tune so that the meter indicates the right [ ].
Avoid letting the mic pick up any extraneous sound while tuning.
Even if the pitch is within the range of detection, it may not be possible to detect the
pitch of an instrumental sound that contains large numbers of overtones or that has
a rapid decay (e.g., very low or very high notes on a piano).
Reverse the meter display (Reverse function)*
M
When turning the power on, hold down the power button for one second or
longer (the backlight will blink twice). Each time you perform this opera-
tion, the High (+) indication will be exchanged between left and right.
Select the position that feels most natural for the instrument to which you've
attached the AW-2.
Specifications
Scale: 12-note equal temperament
Range(sine wave): A0 (27.50 Hz)–C8 (4186 Hz)
Precision: +/-1 cent
Reference pitch: 410...480 Hz (1 Hz steps)
Dimensions: 58 mm (W) x 26 mm (D) x 12.6 mm (H)
2.28’’ (W) x 1.02’’(D) x 0.50’’ (H) (AW-2 only)
Weight: AW-2 17.4 g/0.61 oz. (including battery)
Clip 17.7 g/0.62 oz. (large)
3.7 g/0.13 oz. (small)
12.7 g/0.45 oz. (clip)
Battery life: approximately 150/75/20 hours (backlight: unlit/soft/
auto, tuner continuously operating, A4 input)
Included items: CR2032 lithium battery (3V) for checking operation
Instrument clip
*
M
Settings are remembered even when the power is off. However, settings will be initialized
when you replace the battery (default: CALIB=440 Hz, PIEZO, right side High, backlight
is unlit).
• Specifications and appearance are subject to change without notice for the sake of im-
proving the product.
*1Use the reverse function.
*2Instead of attaching the AW-2 to the instrument, place the AW-2 in a loca-
tion for convenient viewing and use the internal mic.
*3 Press the input select button to switch to the internal mic (MIC).
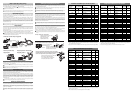
About the included clips
The AW-2 and the clip damage may occur if you apply excessive force to
any other movable portion or joint, or attempt to move it beyond its in-
tended range of motion.
Large Clip
Small Clip
Guitar Clip
Examples of using the joint
Range of movement
approximately 100°
Range of
movement 360°
By swapping the position of the guitar clip's joint socket (A) and non-slip
cover (B), you can obtain a greater degree of freedom in how you attach the
guitar clip to your instrument.
In order to swap the position of the joint socket (A) and cover (B), you will need to
remove the rubber insert that is inside (C). After you've made the change, replace
the insert firmly in its original position.
Rotate the joint to
attach or detach it
Changing the position of the guitar clip's joint socket
A
B
C