


Page 9 Page 2
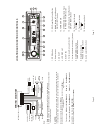
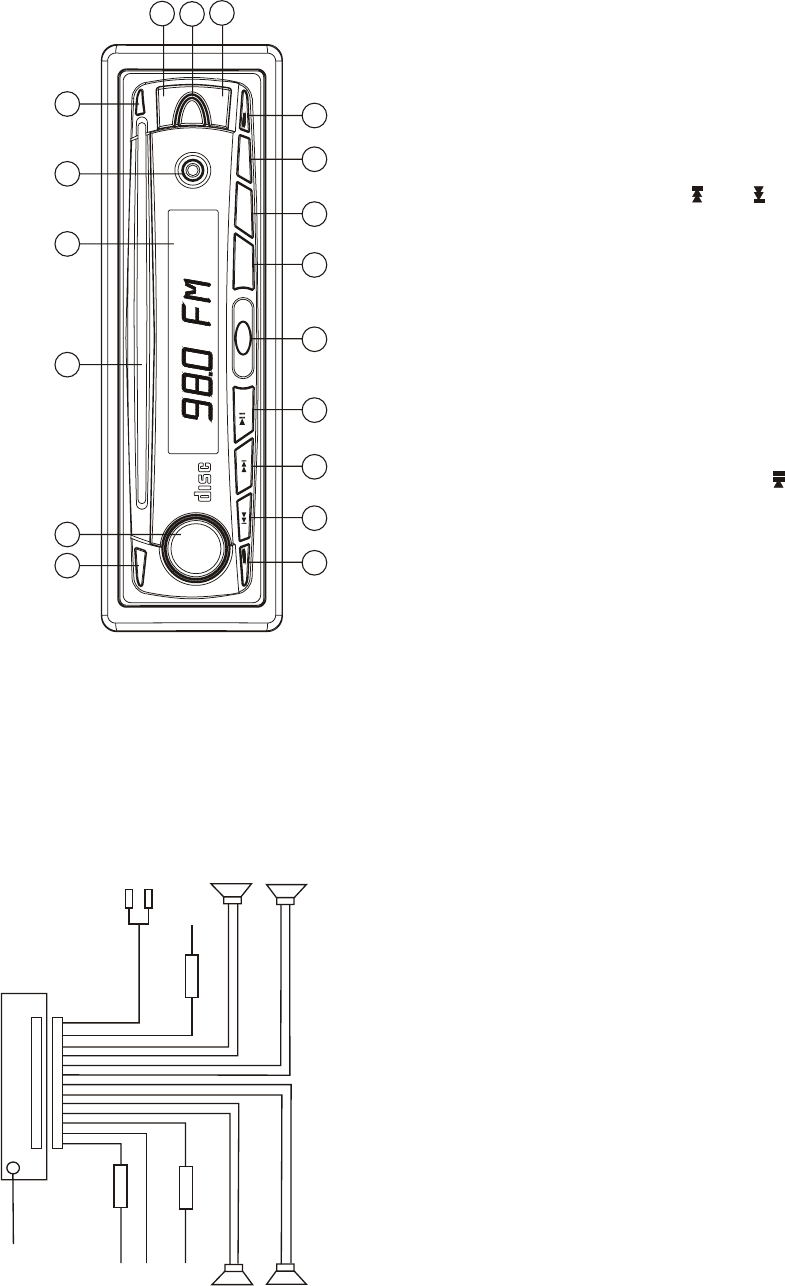
LOCATION AND FUNCTION OF CONTROLS
1. OPEN button
2. Power button
3. CD SLOT
4. LCD DISPLAY
5. EJECT key
6.
7.
8. MODE(MOD) button &
LOUDNESS(LOU) button
9. Mute(MU) button &
button
Volume up/menu up(+) button
Volume down/menu down(-) button
PAUSE,PLAY( )
10. Audio select(SEL) button
11. EQ (Preset Equalizer) Button
12. BAND Button & Track Repeat
13.
16. Track up/fast forward
button( )
17. Track down/reverse
button( )
18. Auxiliary input jack
ON/OFF(RPT) button
TUNING KNOB
14. STEREO/MONO button & Track
INTRO ON/OFF (INT) button
15. LOC/DX button & Track Random
ON/OFF (RDM) Button
WIRING DIAGRAM
+
+
+
+
FUSE 7A
YELLOW
ANTENNA PLUG
CONSTANT B+
BLACK(GND)
WHITE
WHITE/BLACK
GREEN/BLACK VIOLET/BLACK
GRAY/BLACK
GRAY
VIOLET
GREEN
FUSE 0.5A
-
-
-
-
BLUE AUTO ANT
RED R
WHITE L
FUSE 0.5A
IGNITION SWITCH
RED (B+)
RCA LINE OUTPUT
Note:
1. Make sure you use a speaker with 4 ohm load impedance
2. Make sure the auto antenna wire (Blue) does NOT come into contact with
the vehicle chassis.
CAUTION:
In order to protect power IC from being burnt out during installation the car stereo,
it is necessary to follow the steps below to connect the wires during installation:
Step 1: Connect the ground wire (Black);
Step 2: Connect all speaker wires and power antenna wire (Blue):
Left speaker Right speaker
Front speaker: White (+) White/Black (-)
Rear speaker: Violet (+) Violet/Black (-)
Step 3: RCA Line Out (R- Red/ L-White).
Step 4: Connect Back up (Yellow) and Acc wire (Red)
Gray (+) Gray/Black (-)
Green (+) Green/Black (-)
1
3
4
5
6
7
815
11
14
13
17
FRONT
REAR
RIGHT
FRONT
REAR
LEFT
SPEAKER SPEAKER
18
16
2
12
10
9
+
_
+
FM
Detachable Front Panel Car Radio & CD Player
OPEN
TUNE
EQ
/MU
POWER
MOD/LOU
ST/INT
BND/RPT
LOC/RDM
AUX IN
SEL
EJECT
COMPACT
DIGITAL AUDIO
+