


13
ENG
ENGLISH
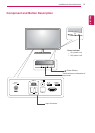
ASSEMBLING AND PREPARING
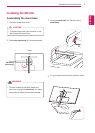
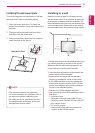
Installing the wall mount plate
This monitor supports the specification of the stan-
dard wall mount plate or compatible device.
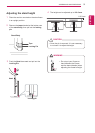
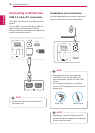
1
Place the screen face down. To protect the
screen from scratches, cover the surface with a
soft cloth.
2
Place the wall mount plate onto the monitor
and align it with the screw holes.
3
Using a screwdriver, tighten the four screws to
attach the plate to the monitor.
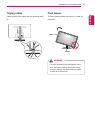
y
The wall mount plate is sold separately.
y
For more information on installation, refer to
the wall mount plate's installation guide.
y
Be careful not to use excessive force when
mounting the wall mount plate, as this can
damage the monitor's screen.
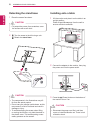
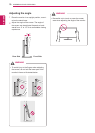
Wall Mount Plate
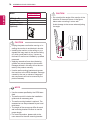
NOTE
To install the monitor to a wall, attach a wall mount-
ing bracket (optional) to the back of the monitor.
Make sure that the wall mounting bracket is se-
curely fixed to the monitor and to the wall.
1 Use the screws and wall mounting bracket that
comply with the VESA standard.
2 Screws which are longer than the standard
length may damage the inside of the monitor.
3 A non-VESA standard screw may damage the
product and cause the monitor to fall. LG Elec-
tronics is not liable for any accidents relating to
the use of non-standard screws.
4 The monitor is VESA standard compliant.
5 Use it according to the VESA standard as speci-
fied below.
y
784.8 mm or less
* Thickness of the wall mount plate: 2.6 mm
* Fastening screw: Diameter 4.0 mm x Pitch 0.7
mm x Length 10 mm
y
787.4 mm or greater
* Use the wall mount plate and screws that
conform to the VESA standard.
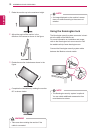
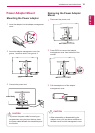
Installing to a wall
Install the monitor at least 10 cm away from the
wall and leave about 10 cm of space at each side
of the monitor to ensure sufficient ventilation. De-
tailed installation instructions can be obtained from
your local retail store. Please refer to the manual
to install and set up a tilting wall mounting bracket.
10 cm
10 cm
10 cm
10 cm