


39 -
Operating additional equipment
Connecting devices to the HDMI (DVI)
connections and playback
The HDMI connections (High Definition Multimedia In-
terface) permit digital video and audio transmission via
a connection cable from a player, e.g. from the Loewe
ViewVision DVD recorder.
The digital picture and sound data are transmitted without data compres-
sion and therefore lose none of their quality.
Your TV set automatically shows 24p movies (see glossary page 60)
output by a player connected via HDMI, e.g. Loewe BluTech Vision, in
the original 24p format. Film quality improvement (DMM) must be set
to on here (see page 21).
Using a DVI/HDMI adapter cable, the digital video signals of a DVI player
can also be played via the compatible HDMI connection. The sound must
be fed in additionally.
HDMI and DVI both use the same copy protection method HDCP.
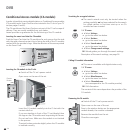
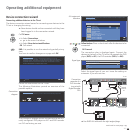
Connecting the device
Connect the device by an HDMI cable (type A, 19 pole) to the HDMI1/DVI
or HDMI2/DVI socket of the TV set.
If a DVI/HDMI adapter cable is used, the appropriate sound can be fed
in via the audio input socket AUDIO IN1 (analogue) or AUDIO DIGITAL IN
(digital) on the TV set. See also page 43.
It is not necessary to log in HDMI devices in the connection wizard.
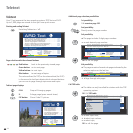
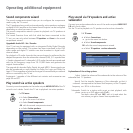
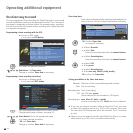
Playback from the device
Call AV selection.
Select HDMI1/DVI or HDMI2/DVI socket,
OK to switch over.
Start playback on the connected HDMI device.
The best possible format for the picture will be detected
and set automatically.
Digital Link HD in appropriately equipped HDMI devices
As long as HDMI is selected as a memory location, all remote control
commands which the connected HDMI unit can handle are passed on to
it. The HDMI unit can therefore be installed in a concealed position and
still be operated. Volume, Sound on/off, Sound adaptation and Picture
format affect the operation of the TV set.
Switch back to TV mode to the station last viewed with the TV button.
Switch Digital Link HD on/off temporarily: Press the TV button for a little
longer (approx. 1 second).
TV remote switch on via Digital Link HD
In the TV menu under Connections → Miscellaneous → Remote TV switch
on via Digital Link HD you can define that the TV set switches on auto-
matically from standby when a connected HDMI device displays a menu
or a disk is inserted.
Connecting devices to the PC IN connection
and playback
You can connect a PC or a SetTopBox (STB) to the PC IN
socket and thus use the screen of the TV set as an output
device.
When connecting the TV set to a PC, set one of the following screen
resolutions on the PC first:
800 x 600 60 Hz (SVGA) 1024 x 768 60 Hz (XGA)
1280 x 1024 60 Hz (SXGA) 1360 x 768 60 Hz (WXGA)
When connecting a SetTop box, set the following screen resolutions
according to the possibilities of the SetTop-Box:
SDTV: 720 x 576i 720 x 480i
720 x 576p 720 x 480p
HDTV: 1280 x 720p 1920 x 1080i
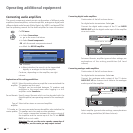
Connecting the device
Connect the device via a VGA cable to the PC IN socket
of the TV set (audio connection, see page 40).
A log-in in the connection wizard is unnecessary.
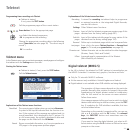
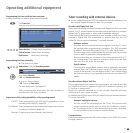
Playback from the device
Call AV selection.
Select PC IN socket,
OK to switch over.
Adapting the geometry (only possible with certain signals)
This is where the picture can be properly positioned and the position of the pic-
ture (horizontal and vertical) can be moved so that it fills the entire screen.
Call TV menu.
Selecting and adjusting the Geometry.
Setting the colour standard (only possible with certain signals)
Call TV menu.
Select Picture,
go to the menu line below.
Select and set colour standard:
for PCs: RGB,
für STB: Ycc (rare: Ypp or RGB)
If the wrong standard is set then the colours will not be
correctly displayed.
OK
DVD
HDMI1/DVI
AV selection
VGA HDMI2/DVI
VIDEOCOMP. IN VCR
OK
PC IN
AV selection
HDMI2/DVI
VIDEO
COMP. IN
AVS
HDMI1/DVI