4 5
Enjoying your Logitech
®
X-210 speakers
Access these controls on the wired remote control:
Power
Turns the speaker system on/off.
Volume
Adjusts the overall system volume.
Headphone Jack
When headphones are used with your X-210 system, the speakers will mute automatically for private
listening.
Specifications
• Total RMS Power: 25 watts
Subwoofer: 15 watts RMS
Satellites: 10 watts RMS (2 x 5 w)
• Total Peak Power: 50 watts
• Signal to noise ratio: >96dB
• Frequency response: 48 Hz - 20 kHz
• Drivers
Satellites: 2” high-excursion driver
Subwoofer: 4” ported driver
• Speaker dimensions:
Satellites: (H) 6” x (W) 2.5” x (D) 3”
Subwoofer: (H) 8.5” x (W) 6” x (D) 9”
Setting up your Logitech
®
X-210 speakers
Important: For your safety, set up the system before plugging it into a power source
1. Before attaching the cables to the subwoofer, position the two front satellite speakers on either side
of your monitor. Place the remote control within easy reach. Depending on where you place your speakers,
adjust them to direct the sound toward you. For best sound quality, place the subwoofer on the floor
beneath your desk. Be sure to maintain at least 6 inches of spacing around the subwoofer to allow for
adequate ventilation.
2. Connect two satellite speakers to the subwoofer as shown on the previous page. Make sure the plug is
inserted all the way.
3. A. If you have a PC:
• Plug the green audio input cable from the remote control into the speaker output on your PC.
B. If you have a video game console (PlayStation
®
, PlayStation
®
2, Xbox, or GameCube
®
):
• Connect the green plug from the audio input cable to the green jack on a game console adapter
(sold separately). Adapters can be purchased at www.logitech.com.
• Connect the red and white RCA audio cables from your video game console to the RCA audio jacks
on the game console adapter.
4. Plug the subwoofer’s power cord into an electrical outlet.
Mounting Your Speakers to a Wall
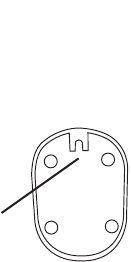
Your Logitech X-210 speaker satellites are wall mountable. Swivel the satellite base to desired position,
and use the notch to hang your speaker on appropriate wall anchors.
Notch
EnglishEnglish
623906-0914 x3jr (x210).indd Sec1:4-Sec1:5623906-0914 x3jr (x210).indd Sec1:4-Sec1:5 15.06.2005 17:48:3815.06.2005 17:48:38


