


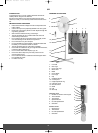


FITTING:
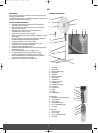
1. Place the rear cage on the fan head (3 pins on the fan head fit
into 3 holes on the rear cage).
2. Screw the rear cage lock (3) on so that it fits tightly to the fan
head (turn the lock clockwise).
3. Put the blade on the motor shaft (one pin on the motor shaft
fits into 2 holes on the rear of the blade).
4. Put the blade lock (6) on the motor shaft and tighten it so the
blade is tightly attached (turn the lock clockwise).
5. Place the front cage together with the rear cage by first
hooking it tight at the top. Attach the front cage by clicking the
clips down over the edge of the front and back cages. Then
tighten the back and front cages together with the small screw
and nut.
6. Make the 2 feet form a cross and then screw the stand firmly
to the feet with the 4 accompanying screws. Attach the base
cap down over the feet.
7. Tighten the height adjustment ring.
8. Place the top section on the stand and tighten the fastening
screw.
USE:
WARNING:
In order to reduce the risk of fire or electric shock, never use the
appliance together with an electronic timer.
Speed:
Select the speed using the on and speed button on the panel or
the remote control.
When the button is first pressed, the fan comes on.
It can be switched off again by pressing the off button.
Subsequent presses of the on and speed button will switch
between the 3 speeds.
Timer:
To use the timer function, first switch on the fan by selecting a
speed.
You can then press the timer button to choose whether the fan is
to switch off automatically after 1, 2 or 4 hours.
Rotation:
The fan can turn from side to side or can be locked in a specific
direction by using the oscillation button on top of the fan head.
Press the button to start the fan turning and pull it up against to
stop it turning.
In order to select a particular direction for the fan to blow in, lift the
oscillation button and turn the fan head.
Vertical (up/down) control of the fan head:
In order to adjust the angle of the fan head vertically, tilt the fan
head up and down.
Adjusting the height:
To adjust the height of the floor fan, loosen the height adjustment
ring and pull the fan up and down. When the required height is
reached, tighten the ring again.
Batteries:
To use the remote control, insert 2 AAA batteries (not included).
Push the battery cover off, insert the batteries and push the cover
back on again (the minus pole on the battery must be against the
spring).
If the remote control stops working, try replacing the batteries.
CLEANING
• Always switch the fan off and unplug it before cleaning.
• Clean the plastic parts using a damp cloth and a mild
detergent, and ensure that all detergent residue is removed.
• Never use abrasive cleaning agents or solvents.
• Do not immerse in any form of liquid.
THE GUARANTEE DOES NOT APPLY
• If the instructions given above are not observed.
• If the appliance has been mishandled, subjected to rough
treatment, or has suffered any other form of damage.
• For faults that may have arisen as a result of faults in your
electricity supply.
• If the appliance has been subject to unauthorised repairs.
Due to the constant development of our products in terms of
function and design, we reserve the right to make changes to the
product without prior warning.
IMPORTER
Adexi Group
We cannot be held responsible for any printing errors.
11
FS40G_IM6 22/12/04 14:02 Side 11