


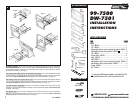

99-7500
DW-7501
INSTALLATION
INSTRUCTIONS
TOOLS REQUIRED
Cutting tool
Phillips screwdriver
Socket wrench
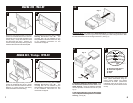
KIT COMPONENTS
rev. 300801
Radio
Housing #1
Radio
Housing #2
Trimplate
Bracket Set #1
(6) 3/8" Hex-head Screws
(6) ¾" Hex-head Screws
(4) ½" Hex-head
Screws
(8) 3/8" Phillips
Screws
Filler Bar
Equalizer
Dummy
Plate
APPLICATIONS
CAR PAGE
MAZDA
323 1986-89*...............................................................................1
323 1990-94*...............................................................................1
626 (models w/factory receiver/tape deck/eq/pocket) 1986-92....2
626 (models w/factory receiver/pocket) 1986-92* ......................2
929 1988-91.................................................................................3
B-Series Pickup 1986-93................................................................3
Miata 1990-99..............................................................................4
MPV 1989-95*.............................................................................. 4
MX6 (models w/factory receiver/tape deck/eq/pocket) 1986-92...2
MX6 (models w/factory receiver/pocket) 1986-92*....................... 2
Protege 1990-94*......................................................................... 1
RX-7 1986-91............................................................................... 5
* For aftermarket DIN head unit installations, order Metra's 99-7501
For models with pockets 3¾" or taller, order Metra's 99-7501
7
INST 7500
6
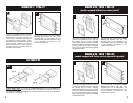
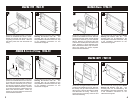
B-SERIES PICKUP: Re-connect the battery terminal and test the unit for proper operation.
Mount Bracket Set #1 to the Housing with (4) ½" Hex-head Screws supplied. Mount the
head unit/kit assembly to the back of the dash trim bezel with (4) screws removed in step #1
and re-attach the bezel. (see Fig. A)
323 1986-89, 626 / MX6 (models using Radio Housing #2): Re-connect the battery terminal
and test the unit for proper operation. Mount the head unit/kit assembly to the back of the dash
trim bezel with (4) 3/8" Phillips Screws supplied and re-attach the bezel. (see Fig. B)
626 / MX6 (models using Radio Housing #1: Re-connect the battery terminal and test the
unit for proper operation. Mount the head unit/kit assembly to the back of the dash trim bezel
with (8) 3/8" Phillips Screws supplied and re-attach the bezel. (see Fig. C)
323 1990-94, MPV, PROTEGE: Re-connect the battery terminal and test the unit for proper
operation. Mount the head unit/kit assembly to the sub-dash with (4) ¾" Hex-head Screws
supplied. (see Fig. D)
929, MIATA, RX-7: Re-connect the battery terminal and test the unit for proper operation.
Mount the head unit/kit assembly to the back of the dash trim bezel with (6) 3/8" Hex-head
Screws supplied and re-attach the bezel. (see Fig. E)
Fig. B
Fig. D
Fig. E
Fig. C
Fig. A
1-800-221-0932 www.metraonline.com
© COPYRIGHT 2001 METRA ELECTRONICS CORPORATION