


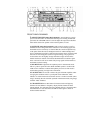


9
16. SC INDICATOR. LCD indicator showing when the scan mode is
activated.
17. MIC INDICATOR. LCD indicator showing when the low power
microphone mode has been selected.
18. LOC INDICATOR. Indicates the local mode of receive has been
selected.
19. FRQ BUTTON. Pressing this button causes the LCD to switch between
channel and 5 digit frequency display.
20. CH 9 BUTTON. Pressing this button causes instant selection of
emergency channel 9. The LCD display of channel/frequency will flash
when instant channel 9 is activated. Other keypad and selectors are disabled
when instant channel 9 is selected.
21. CHANNEL/FREQUENCY INDICATOR. Displays either the selected
channel (CB or weather)or frequency in Mhz (CB only). The indicator is
toggled between channel number or frequency by pressing the “FRQ”
button.
22. DW BUTTON. Pressing this button allows you to monitor 2 channels at
the same time. To use this feature select the first channel you wish to
receive, adjust the squelch until background noise is muted, and press the
DW (dual watch) button. While the DW is still flashing on the LCD screen
select the second channel you wish to monitor and press the DW button
again. Your radio now toggles between the 2 selected channels until a signal
is heard. When a signal is heard the radio will stop on the channel to allow
you to listen, and will remain on the channel 10 seconds after the signal
disappears to allow answering of the received call. To exit the dual watch
mode press the “DW” button again.
23. SRF METER DISPLAY. In the receive mode the LCD indicator shows
the relative incoming signal strength (“s” units). The stronger the received
signal the more segments will light. In the transmit mode the display will
activate according to the transmitter power. If the meter activates less than
half scale it can indicate an antenna problem.
24. SC BUTTON. This button activates the scan operation. To operate scan
adjust the squelch until the background noise is muted. Presss the “SC”
button, the unit will begin rapidly scrolling through the channels until a
signal is heard. The unit will remain stoppped on the last active channel 10
seconds after the signal disappears to allow time for the user to answer the
message. To exit scan press the “SC” button again.
25. MICROPHONE CONNECTOR. Connection for the microphone. Plug
the microphone into the connector and securely tighten the outer threaded
sleeve.