


Before Starting
MTX recommends that you have your new Thunder amplifi ers installed by an authorized MTX retailer, preferably
MECP certifi ed. If you do decide to do it yourself, make sure you have read the instructions carefully and have
the following tools:
• Electric drill
• Phillips bit or screwdriver
• 1/8” bit
• Wire cutters/crimpers
• Safety glasses
• X-Acto knife
Disconnect the vehicle’s negative battery connection. Any deviation from the recommended connection
procedures may cause serious damage to the amplifi er, speakers, and/or vehicle electrical system. Please
double check the connections before turning the system on.
Installation
Mounting
Place your Thunder amplifi er at the predetermined mounting location. Use a felt pen to mark the exact position
of the mounting holes on the mounting surface. Set the amplifi er aside. Then with a sharp precise blade, cut
small circles in the carpet and padding around the four marks denoting your mounting holes to expose the
metal underneath. Use a center punch to make an indentation in the metal to ensure that you drill the exact
position for the screws.
Note: Please use common sense and make sure that all vehicle wires, gas lines, brake lines, etc. are clear and will
not interfere with the installation. ALWAYS WEAR PROPER SAFETY GLASSES.
Connections
1. Bi-Level Inputs (Low/High Level Input) with Smart Engage™ –
Both a low and high level signal can be used. Be sure to lay the signal wire away from all power cables and
vehicle computers. Use high quality twisted pair interconnect cables to decrease the possibility of radiated
noise entering the system (left input should be used for high level Smart Engage™).
• Using RCA Connections: If the source unit has RCA outputs, simply attach a signal cable from source unit to
amps RCA input. This will provide signal to the amp.
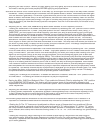
• Using Speaker Level Connections: If the source unit does not have RCA outputs, a high level signal can be
used instead by taking the supplied high level RCA adapter cables and connecting the bare wire ends to the
vehicle’s rear speaker wiring. Connect the left negative speaker wire to the green with black stripe wire on the
supplied high level RCA adapter. Connect the left positive speaker wire to the solid green wire. Do the same
for the right speaker connection using the purple wire. Now plug the RCA connectors, located on opposite
end of the supplied high level RCA cables, into the amp’s inputs.
2. Speaker Wire Connections – When installing the speaker wires, please take proper measures to protect them.
For example, when connecting the door speakers, the speaker wire should run from the amplifi er’s output
terminals, under the carpet, and through the factory rubber boot (loom) that protects the wires in the inner
door jam. If the factory boot cannot be used, take other measures to protect these wires. Sometimes the door
has to be completely removed to use the factory boot. If this is something that you do not feel comfortable
doing, please ask a professional to help you.
When connecting the speaker wires to the amplifi er please observe the printed polarity markings on the
amplifi er’s StreetWires connector. Failing to wire the speakers in proper phase could result in a loss of bass
response or poor overall sound quality.
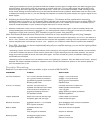
2-channel Amplifi ers- These amps will have four speaker terminals: left positive, left negative, right positive, and
right negative.
• Stereo (2-channel) Connection: This confi guration is typically used with full range or high frequency
speakers. Each channel can drive a minimum of a 1 ohm load.
• Bridged (1-channel) Connection: This confi guration is typically used with subwoofers. Both channels
combined can drive a minimum of a 2 ohm mono load for max power.
Note: Please pay attention and make sure the speakers or woofers are the correct IMPEDANCE (OHMS) BEFORE
attaching to the amplifi er. Also, observe the proper speaker polarity.