


4
Quick Start –continued
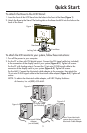
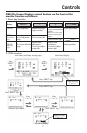
3. Connect all cables to the appropriate connectors on the back of the monitor (Figure
B.1). Headphones may be connected to the “Headphones” output, “ “ on the front
of the monitor. While headphones are connected, the sound from the speakers will be
disabled.
NOTE: If you use this monitor at AC125-240V, please refer to Recommended Use
section of this manual for proper selection of power cord.
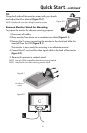
4. Attach the Cable Holder onto the Base (Figure C.1). Place all cables together between
holes at the back of the stand. Insert the hooks on the Cable Holder into the holes at the
back of the Stand and slide the Cable Holder downward into place. Adjust the position
of cables between the holder too avoid damage.
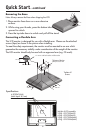
5. Turn on the monitor with the front power button. (Figure D.1)
6. No-touch Auto Adjust automatically adjusts the monitor to optimal settings upon initial
setup for most timings. For further adjustments, use the following OSD controls:
• Auto Adjust Contrast • Auto Adjust
Refer to the Controls section of this User’s Manual for a full description of these OSD controls.
NOTE: For download information on the Windows
®
INF fi le for your NEC monitor, visit
www.necdisplay.com.
NOTE: If you have any problems, please refer to the Troubleshooting section of this
User’s Manual.
Power button
Figure C.1
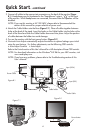
Figure B.1
Power Cable
Audio Cable
Input (VGA)
Input (DVI)
Cable holder
Figure D.1