


Pacic Accessory Corporation - Santa Ana, CA 92705
866-931-8021 • www.pac-audio.com
DISCLAIMER: Under no circumstances shall the manufacturer or the distributors of the TATO be held liable for consequential damages sustained in
connection with the TATO. The manufacture and it’s distributors will not, nor will they authorize any representative or any other individual to assume
obligation or liability in relation to the TATO other than its replacement.
06-29-10
J1850
Class 2
VPW
Class 2
J1850
100011101111001001101100
111010000110110111001100
Arbitration
EOD
CRC
100011101111001001101100
111010000110110111001100
Class 2
Class 2
J1850
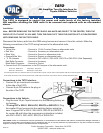
TATO
JBL Amplier Turn-On Interface for
Toyota CANbus Vehicles
The TATO is designed to control the power and audio levels of the factory installed
JBL amplier allowing the OEM radio to be removed and replaced with an aftermarket
stereo.
Installation:
Note: BEFORE REMOVING THE FACTORY RADIO: BALANCE AND FADE IT TO THE CENTER, TURN THE
RADIO UP TO AT LEAST 3/4 VOLUME, TURN THE RADIO OFF, TURN THE IGNITION OFF & THEN PROCEED
WITH REMOVING THE FACTORY RADIO
Disconnect the factory radio from the OEM wiring harness and remove it from the vehicle. Make the
following connections of the TATO wiring harness to the aftermarket radio:
Connections:
Yellow Wire - Connect to 12 Volt Constant Power on aftermarket radio•
Red Wire - Connect to Accessory on aftermarket radio•
Black Wire - Connect to Ground on aftermarket radio•
Orange/White Wire - Connect to Dimmer on aftermarket radio•
*11 Pin Harness - Connect to PAC’s SWI-X, SWI-JACK, SWI-PS or SWI-ECL2 (Sold Separately) •
Red Bullet Connector - Connect to Accessory
Black Bullet Connector - Connect to Ground
Connect the 4 RCA connectors to the RCA outputs of the aftermarket radio •
Front Left - White RCA Front Right - Grey RCA
Rear Left - Green RCA Rear Right - Purple RCA
If connecting the TATO to a head unit with only 2 Channel RCA outputs, use two pairs of RCA splitters (1M-2F) to split the signal. Failure to connect all 4 inputs
of the TATO will result in loss of audio performance. Fade audio controls will only function with a 4 channel aftermarket deck.
Connections to the TATO Interface:
Connect 24-pin translucent connector •
to the side of the TATO.
Connect 8-pin DIN cable to the plug on •
the side of the TATO.
Connections to the Vehicle:
Plug the main 20-pin Toyota harness into the matching factory wir-•
ing harness.
*• If using PAC’s SWI-X, SWI-JACK, SWI-PS or SWI-ECL2, Plug
the smaller 20-pin harness into the matching factory wiring har-
ness. Program PAC’s SWI-X, SWI-JACK, SWI-PS or SWI-ECL2
for version #8 and follow the programming instructions included
with PAC’s SWI-X, SWI-JACK, SWI-PS or SWI-ECL2.