


6 7
5
E
N
G
L
I
S
H
6
E
N
G
L
I
S
H
CQ-C3401WCQ-C3401W
SEL
SRC
BAND MUTE
2 31
5
8
0
64
97
#
VOL
DISP
DISP
CAR AUDIO
MENU
SEL
POWER
SOURCE
SRC
SET
BAND MUTE
231
5
8
0
64
97
#
VOL
RANDOM
NUMBER
TUNE TUNE
SCAN REPEAT
DISP
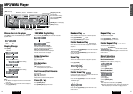
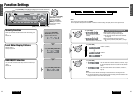
Preparation
¡ This instruction manual explains operations for use with the buttons on the main unit. (Different operations excluded)
[0] to [9]
Menu
Select
Tune
Track/file selection
Fast forward/fast reverse
Display
Volume/audio setting
Track/folder/file/disc
number input
Power
Source
Mute/attenuation
Random
Scan
Repeat
Folder/disc selection
Function setting
Set
Band
Pause
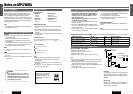
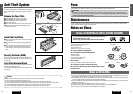
Power
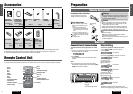
Connector
(YEAJ02877)
Q’ty: 1
Lock Cancel
Plate
Q’ty: 2
Mounting
Bolt
Q’ty: 1
Rubber
Bushing
Q’ty: 1
Mounting
Collar
(YEFX0217263)
Q’ty: 1
Note:
¡ The number in parentheses underneath each accessory part name is the part number for maintenance and service.
¡ Accessories and their parts numbers are subject to modification without prior notice due to improvements.
¡ Trim Plate and Mounting Collar are mounted on the main unit at shipment.
Removable
Face Plate Case
(YEFA131839)
Q’ty: 1
SEL
SRC
BAND MUTE
2 31
5
8
0
64
97
#
VOL
DISP
CAR AUDIO
MENU
SEL
POWER
SOURCE
SRC
SET
BAND MUTE
231
5
8
0
64
97
#
VOL
RANDOM
NUMBER
TUNE TUNE
SCAN REPEAT
DISP
Remote
Control Unit
(includes a battery)
(EUR7641010)
Q’ty: 1
Trim Plate
(YEFC051003)
Q’ty: 1
XXXXXXXXXXXXXXX
XXXXXXXXXXXXXXXXX
XXXXXXXXXXXXXX
XXXXXXXXXXXXXXXX
OO-OOOOO
Operating
Instructions
(YEFM285617)
Q’ty: 1
Installation
Instructions
(YEFM293960)
(YEFM293961)
Q’ty: 2
Accessories
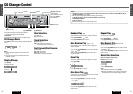
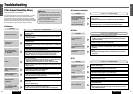
Remote Control Unit
Warning
¡Keep batteries away from children to avoid the risk of
accidents. If an infant ingests a battery, please seek
immediate medical attention.
Caution
¡Remove and dispose of an old battery immediately.
¡Do not disassemble, heat or short a battery. Do not
throw a battery into a fire or water.
¡Follow local regulations when disposing of a battery.
¡Improper use of a battery may cause overheating, an
explosion or ignition, resulting in injury or a fire.
Note:
¡Battery Information:
Battery Type: Panasonic lithium battery (CR2025)
(Included in the remote control)
Battery Life: Approximately 6 months under normal use
(at room temperature)
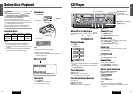
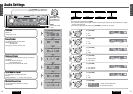
The demonstration message appears for initial
use.
q Set your car’s ignition switch to the ACC or ON position.
The demonstration screen appears.
w Press [DISP].
The demonstration screen is canceled, and no more
appears.
Note:
¡
If you would like to turn on the power and make the
demonstration message appear, press and hold [SRC]
(PWR) for more than 4 seconds.
Remote Control Unit
Main Unit
The 24-hour system is used for the clock.
q Press [SRC] (PWR) to turn on the power.
w Press [DISP].
Clock display
e Press and hold [DISP] for more than 2 seconds.
Hour blinks
r Adjust the hour.
[[]: put forward hour.
[]]: put back hour.
Hour entered
t Press [DISP].
Minute blinks
y Adjust the minute.
[[]: put forward minute.
[]]: put back minute.
Minute entered
u Press [DISP].
Completed
Note:
¡“ADJUST” is displayed before adjusting the clock.
¡Press and hold [[] or []] to change numbers rapidly.
Cancellation of demonstration Clock Setting
Installation kit (YEP0FZ5698)Instruction kit
OPEN
DISC
SCROLL
PWR
MUTE
RANDOM SCAN REPEAT CLOCK
F
O
L
D
E
R
V
O
L
U
M
E
P
U
S
H
S
E
L
T
U
N
E
/
T
R
A
C
K
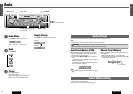
CQ-C3401W
213
SRC
SQ
456
DISP
BAND
APM
SRC
DISP
[SRC] (PWR: Power)
[DISP] (Display)
[]][[]
(Hour/minute adjustment)
Preparation Before Initial Use
Pull the insulation film out from the
backside of the remote control gently.
Battery Replacement
q
w
q Remove the battery holder with the
remote control unit placed on a flat
surface.
q Stick your thumbnail into the
groove and push the holder in the
direction of the arrow at the same
time.
w Pull it out in the direction of the
arrow using a tough pointed object.
w Put a battery in the case with (+) side
facing up.
e Put the case back.
2
3
Tough pointed
object
Back side