


3 Pull
out.
CQ-DFX683/DF583/DF203U CQ-DFX683/DF583/DF203U
E
N
G
L
I
S
H
51
E
N
G
L
I
S
H
35
50
E
N
G
L
I
S
H
36
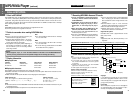
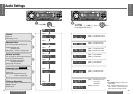
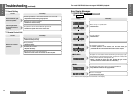
Anti-Theft System
Security Indicator
The security indicator blinks when the removable
face plate is removed from the unit.
This function is activated when the security function
is on. (page 36)
Panel Removal Alarm
This alarm sounds to warn you not to forget to re-
move the panel before leaving your car.
This function is activated when the security function
is on. (page 36)
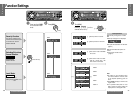
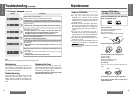
Install Removable Face Plate
1 Fit the face plate with its left hole on one of the
pins provided on the main unit.
2 Fit the other hole on the other pin applying
slight pressure.
3 Move the face plate up and down a few times to
make sure it is secure. Then close the front
panel and press down the right side of the face
plate until it clicks into plate.
Caution:
≥ This face plate is not waterproof. Do not expose
it to water or excessive moisture.
≥ Do not remove the face plate while driving your
car.
≥ Do not place the face plate on the dashboard or
nearby areas where the temperature rises to
high level.
≥ Do not touch the contacts on the face plate or
on the main unit, since this may result in poor
electrical contacts.
≥ If dirt or other foreign substances get on the
contacts, wipe them off with a clean and dry
cloth.
≥ To avoid damaging the front panel, do not push
it down or place objects on it while it is open.
This unit is equipped with a removable face plate.
Removing this face plate makes the radio totally in-
operable. The security indicator will blink.
Place the Removable Face Plate
into Case
1 Switch off the power of the unit.
2 Remove the removable face plate. (page 50)
3 Gently press the bottom of the case and open
the cover. Place the face plate into the case and
take it with you when you leave the car.
1
2
3
7 Removable face plate case
Security indicator
Contact
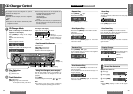
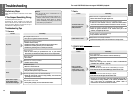
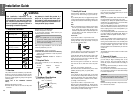
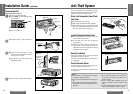
Installation Guide (continued)
Remove the removable face plate.
1 Press [OPEN]. The removable face plate
will be opened.
2 Push the face plate to the left.
3 Pull it out toward you.
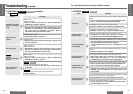
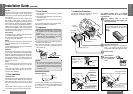
Remove the Unit
Switch off the power of the unit.
Screwdriver
8 Trim plate
Remove the trim plate 8 with a screwdriver.
1 Insert the lock cancel plates 9 along
the grooves on both sides of the main
unit until “click” is heard.
2 Pull out the unit while pushing the
plates further inside.
Remove the unit by pulling with both hands.
1
2
3
4
1 Open.
2 Push.
Contact
9 Lock cancel plate
“Click”
2 Pull out.
1 Insert.
Insert the tab
end in the
outer groove.
[OPEN]