


32 54
Part names
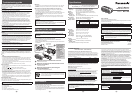
Front of the unit
LIGHT / SIREN
switch
Power button
(Glow in the dark button making it easy to turn on)
Speaker (
∗
)
VOL button
FM/AM button
TUNING button
HOLD switch
CHARGE lamp
Battery selector
switch
Display panel
Low battery
indicator
FM/AM band indicator Received frequency / volume / hold display
• If you attempt to operate the [VOL], [FM/AM] or [TUNING] button or the
[HOLD] switch when the power is on or when the power has been turned
on, the display panel light comes on. After a little while, it goes off.
Rear of the unit
Handle for charging FM rod antenna
Headphone jack
(
∗
)
Light
Strap hole Dry-cell battery
box lid
Mobile phone charging jack
• USB (Type A) connector
(
∗
) The unit’s output is monaural. The right / left speakers and
headphones play the same sound.
The product illustrations may differ from the actual product.
■
Headphone (commercial) listening
Plug type:
Φ 3.5 mm (
1
/8 in.) mini-plug
Plug in all the way!
• Do not use SIREN while using headphones. Otherwise, it sounds
louder and stimulates your ears.
• Connecting your headphones prevents sounds from coming out of the
speakers.
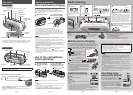
Battery preparations
Hand crank battery charging
The unit can operate on the power from the built-in rechargeable batteries
that you have charged by cranking the handle for charging.
The rechargeable batteries built into the unit are charged irrespective of
whether the battery selector switch is in [RECHARGEABLE BATTERY] or
[DRY BATTERY] position.
1
Pull out the handle
2
Crank the handle to
charge the batteries
CHARGE lamp
Handle
• Crank in either direction. The CHARGE lamp is lit.
• It is recommended to crank at a rate of 2 revolutions per second
(120 revolutions per minute). (For battery runtime, see page 8.)
The power generation amount depends on your speed while cranking
the handle. Cranking at a slower speed than the above may keep the
CHARGE lamp lit, but results in a shorter battery runtime because of a
smaller power generation amount.
Notice
• Retract the FM rod antenna in place before cranking the handle.
• Do not crank the handle too fast. Doing so can cause your wrist to hurt or the unit to
malfunction.
• Prolonged, continuous cranking operation may cause the unit to malfunction, so
when you keep operating the handle for a prolonged time, have about 1 minute of
pause for every 2 or 3 minutes of operation.
• If the rechargeable battery is not used for a long time, the rechargeable battery
performance may degrade. Charge the batteries once every 6 months by
cranking at a rate of about 120 revolutions per minute for 2 to 3 minutes, and
make sure the unit is entirely operational.
Note
• With the battery selector switch in the [RECHARGEABLE BATTERY] position, when
the unit runs out of the rechargeable batteries, “
” starts blinking.
Crank the handle to charge them.
• The rechargeable batteries can be charged during radio reception, but noise may
interfere with radio broadcasting. So it is recommended to keep the unit turned off
while charging them.
Use of dry-cell batteries
(sold separately)
1
Pull out the handle
and open the battery
box lid
2
Put 3 LR03 (AAA
size) alkaline dry-cell
batteries in the box
Insert the dry-cell batteries
negative end first
Dry-cell battery
box lid
Handle
Notice
• Keep the batteries out of reach of children to prevent swallowing.
Note
• Due to their extremely short battery runtime, the use of manganese dry-cell batteries
is discouraged.
• With the battery selector switch in the [DRY BATTERY] position, when the unit runs
out of the dry-cell batteries, “
” starts blinking.
When replacing the dry-cell batteries, replace all of the three with new ones.
• It is advisable to turn the unit off before replacing the dry-cell batteries.
• If the unit will not be used for a long time, remove the dry-cell batteries from it.
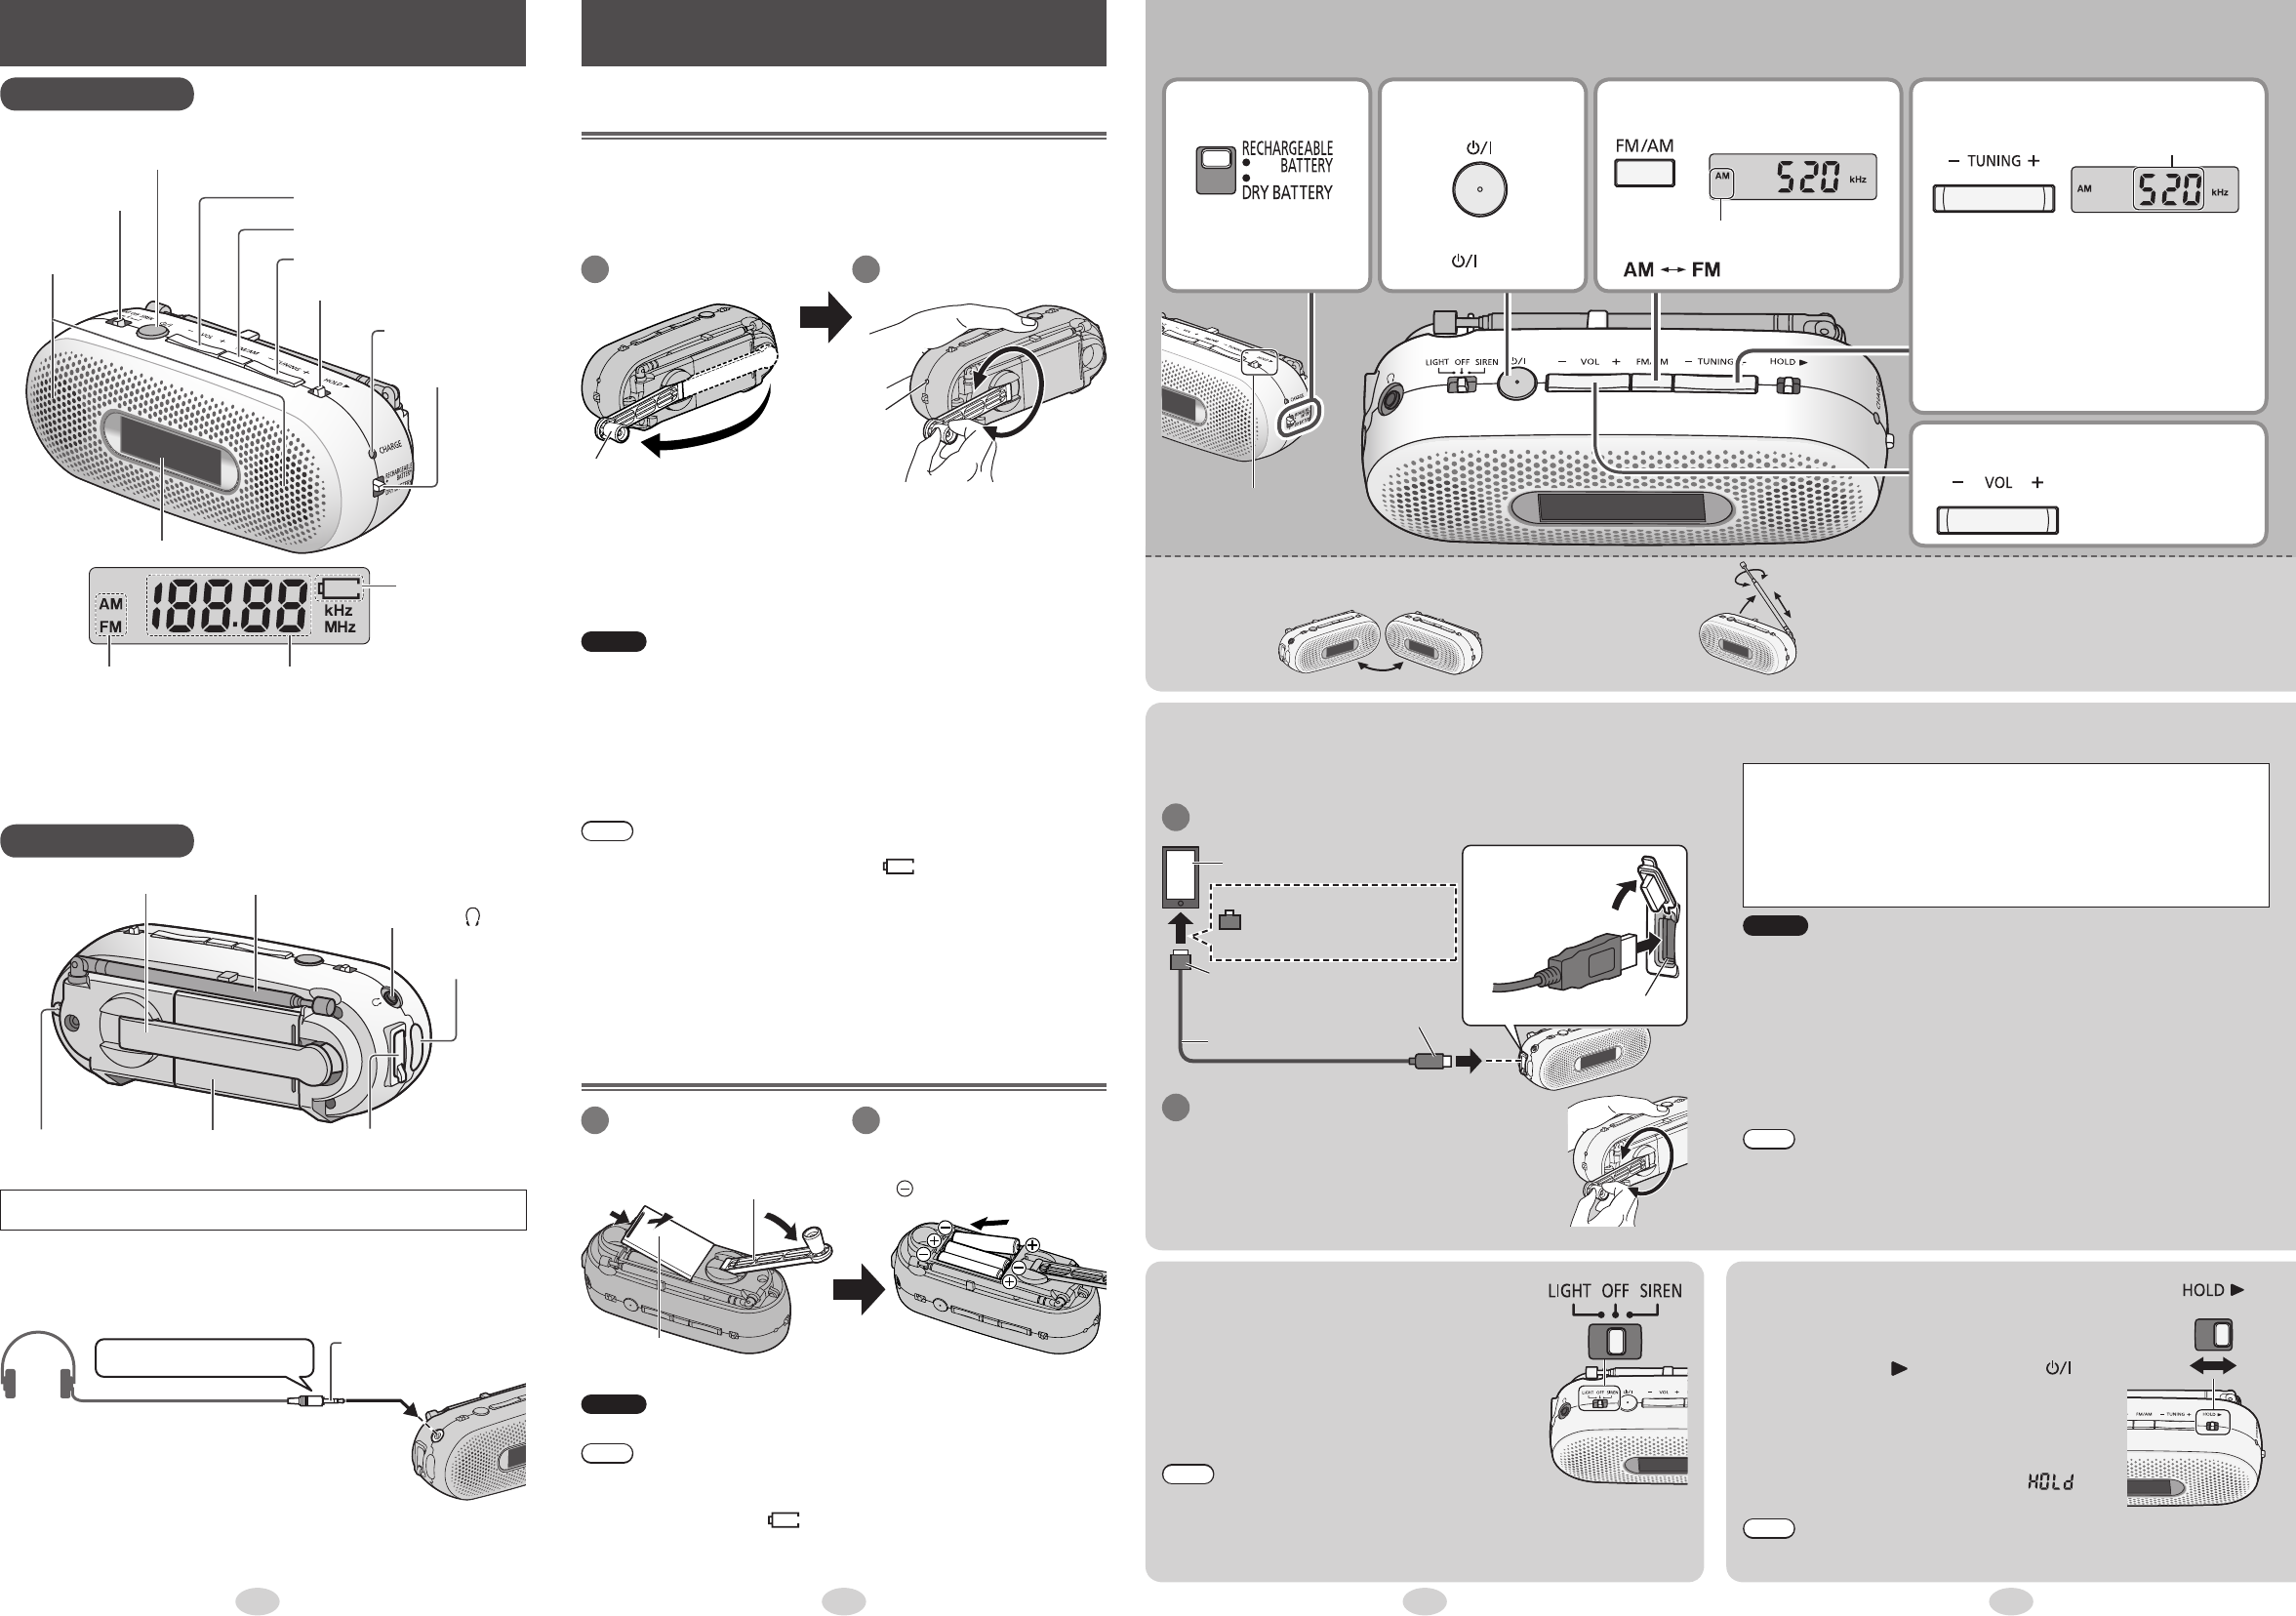
Radio listening
1
Select the power
source
• Set the battery selector
switch to a power source
to be used.
2
Power on the
unit
• To power off the unit,
press [ ] again.
• Check if HOLD is
deactivated.
3
Choose either AM or FM
• Each time you press the button, the
display is switched between
“ ” “ ”.
4
Tune in the desired station
Frequency
• Each time you press the button, the frequency
changes.
• When the TUNING button, [−] or [+], is held
down for at least 1 second, automatic station
selection is started, and it is stopped as the
radio is tuned to the first station to be received.
•
Depending on the particular reception status,
you may not be able to use automatic station
selection. When automatic station selection is not
stopped, press either TUNING [
−
] or [+] to quit.
5
Adjust the volume
• It can be adjusted
from 0 to 20.
■
Hint for improving reception status
AM
Adjust the unit’s
orientation.
FM
Raise the rod antenna to
adjust its length, orientation
and reception angle.
■
FM frequency step
The step is factory-set to 0.2 MHz, but you can change it to
receive broadcasts allocated to 0.1 MHz steps.
1. Press [FM/AM] to “FM” mode.
2. Press and hold [FM/AM].
• When “87.5” is displayed, frequency step will be set to
“0.1 MHz”,or when “87.9”, it will be set to “0.2 MHz”.
Useful functions
Set the LIGHT / SIREN switch to a function you want to use.
■
SIREN
An audible alarm is generated.
■
LIGHT
The light turns on.
• To stop an audible alarm or turn off the light, set the
switch to “OFF”.
Note
• SIREN or LIGHT can be used irrespective of whether the radio is powered on / off.
• The audible alarm starts out soft and then becomes louder.
• The volume of the audible alarm or the brightness of the light is unadjustable.
• The audible alarm volume or the light brightness may vary depending on the type of
the batteries used or the remaining battery level.
• Some surrounding conditions may keep you from hearing the audible alarm.
Personal equipment like a mobile phone can be charged by connecting via a
charging cable to the unit. It is charged only when the handle is being cranked.
1
Connect a charging cable (not supplied) between
your smart-phone or mobile phone and the unit
Use an appropriate adapter
(commercial) for your
model as necessary.
Smart-phone / mobile phone
Charging cable (not supplied)
Insert all
the way
Open the mobile phone
charging jack lid
USB (Type A) connector
USB (Type A) plug
Plug appropriate for your
mobile phone
2
Crank the handle to charge the batteries
• The charge lamp is lit while charging is in progress.
Crank at a speed that allows the lamp to stay lit.
(The built-in rechargeable batteries are also charged)
• Crank in either direction.
• It can be charged even when the battery selector
switch is either in [RECHARGEABLE BATTERY] or
[DRY BATTERY] position.
Mobile phone charging
Guideline for the runtime that a fully-charged mobile phone battery
provides for
(For smart-phone measured by Panasonic and charged by cranking at a
rate of about 120 revolutions per minute for 1 minute
∗
)
Continuous standby time: Approx. 1 h. and 50 min.
Continuous talk time: Approx. 2 min.
∗
If your mobile phone has run out of the battery to such an extent that it cannot be
even powered on, it requires a longer recharging time.
Notice
• Close the mobile phone charging jack lid when you are not using the mobile phone
charging jack.
• Do not apply any external voltage to the mobile phone charging jack. Otherwise, it
may cause a malfunction.
• When the handle is cranked at a rate of less than 120 revolutions per minute, a
warning message may be displayed on the mobile phone connected to the unit
because of an insufficient amount of power generation.
In such case, temporarily stop rotating the handle and then try to crank it at a rate of
120 revolutions per minute.
• Charging status displayed on some smart-phones or mobile phones may be
switched between the ON / OFF states repeatedly.
In such case, crank the handle at a rate of more than 120 revolutions per minute.
Note
• Even if the dry-cell battery has a certain amount of its power remaining, it cannot be
used to recharge a mobile phone.
• The rechargeable batteries can be charged during radio reception, but noise may
interfere with radio broadcasting. So it is recommended to keep the unit turned off
while charging them.
• Note that some mobile phone models cannot be recharged.
Operating error
prevention (HOLD)
OFF ON
Sliding HOLD to the [
] side disables the [ ],
[VOL], [FM/AM] and [TUNING] buttons.
The function prevents such an operation error as the
one that could occur while the unit is put on charge.
In addition, while the unit is carried in a bag with you,
it blocks the unit from powering up even when the
button is inadvertently pressed. (Display: )
•
To deactivate HOLD, slide the switch left back in “OFF”.
Note
• SIREN or LIGHT can be used even while HOLD is on.
•
The unit or a mobile phone can be charged with a hand crank even during HOLD in use.
VQT5J80