


8
Using the Media Player
Media Player allows you to enjoy photo, music or video
recorded on a USB Flash Memory.
Ɣ
The picture may not appear correctly on this TV
depending on the digital cameras used.
Ɣ
Display may take some time when there are many files
and folders in the USB Flash Memory
.
Ɣ
Partly degraded files might be displayed at a reduced
resolution.
Ɣ
The folder and file names may be different depending on
the digital camera used.
Ɣ
If a non-standard file is played, the TV might misoperate.
T
o recover, switch the Mains Power Off, then On again.
1 Insert the USB Flash Memory
USB
U
SB
TV
Ɣ
Insert or remove
straightly and completely.
2 Start Media Player
MEDIA
PLAYER
3 Select the mode
MovieMusicPhoto
Contents Select
USB
EXIT
Select
RETURN
Access
[Photo]: Displays the thumbnail of all photos in the
USB device.
[Music]: Displays the thumbnail of music folders in the
USB device.
[Movie]: Displays the thumbnail of video titles in the
USB device.
[Contents Select]
Switching between modes
When you are in the thumbnail view of any mode, you
change to the other mode by returning to the [Contents
Select] screen.
B
Photo mode
EXIT
Select
RETURN
Slideshow View Select Drive Select Contents Select
Info
View
Option Menu
USB
Media Player Photo All photos
Operation guide
: Error display
Using the TV controls
CH
INPUT
/
HOLD
for
MENU
VOL
OK
/
1
2
3
4
Indicators on the TV
56 7
1 Displays [Input Selection] screen
Ɣ
On first press, the [Input Selection] screen for
control panel is displayed. Pressing the button again
will toggle cursor movement.
Displays [Main Menu] when press and hold for
3 seconds
Confirms selection (OK button) while in the menu
system
2 Channel Up / Down
Cursor Up / Down
Ɣ
Makes selections or adjustments when in the menu
system
3
Volume Up / Down
Cursor Left / Right
Ɣ
Makes selections or adjustments when in the menu
system
4
Switches TV On or Standby
Ɣ
To completely turn Off the TV, remove the mains
plug from the wall socket.
5
Remote control signal receiver
6 C.A.T.S. (Contrast Automatic Tracking System)
sensor
Ɣ
Senses brightness to adjust picture quality when
[Eco Mode] in the Picture Menu is set to [On].
(p. 10)
7 Power LED
Ɣ
Red: Standby
Green: On
Watching External
Inputs
Connect the external equipment
(p. 5 - 6), then select the input
corresponds to the connected terminal.
Input Selection
TV
AV1
AV2
HDMI 1
HDMI 2
USB
Note
Ɣ
[USB] : Switches to Media Player
(p. 8)
Ɣ
You can label or skip each input mode (except [USB]).
“Input Labels” (p. 11)
Skipped inputs will not be displayed when the AV button
is pressed.
TH-32_39_50B6_68_69GKMX_EN.indd 8 3/27/2013 9:50:03 AM
9
To playback the selected file only
Select the folder Select the file Play
OK
OK
R
[Option Menu]
Contains [Music Setup] menu to set up play mode.
Ŷ Repeat
[Folder]: Playback repeat within the selected folder
[One]: Playback repeat on the selected one file
[Off]: Playback repeat off
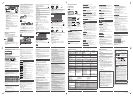
Movie mode
OPTION
Title view
Media Player
Movie
Trip1
Nature2
2010_9
Trip2
Nature3
Trip3
Nature4
Trip4
Nature5
Trip5
Nature6
Room
2010_4
Nature1
2010_7
USB
EXIT
Select
RETURN
Play Folder Contents Select
Info
Access
Option Menu
Drive Select
Operation guide
: Error display
Follow the operation guide to perform available
operations in Movie mode.
To display / hide the operation guide and
information banner during playback
INFO
To playback all movies in the selected title folder
R
To playback the selected file in the title folder
Select the title Select the file Play
OK
OK
R
[Option Menu]
Contains [Video Setup] menus to set up Movie mode.
While in thumbnail view:
Ŷ Repeat
Playback repeat within the title [Off] / [On]
– Only the selected folder will be repeated.
During movie playback:
Ŷ Multi Audio
Selects the sound tracks (if available)
Ŷ Subtitle
Selects the subtitle (if available)
[Off] / [Subtitle1] (/ [Subtitle2] ...)
Ŷ Aspect Change
[16:9] / [14:9] / [Just] / [4:3] / [4:3 Full] / [Zoom1] /
[Zoom2] / [Zoom3]
– You can also change the aspect using the ASPECT
button.
Follow the operation guide to perform available
operations in Photo mode.
To display / hide the operation guide during
[Single View] and [Slideshow]
INFO
[View]
Enters Single view mode to view photo one at a time
[Slideshow]
Lets you view all photos in the slideshow mode
[View Select]
Lets you toggle between thumbnail view and folder view.
[Option Menu]
Contains [Slideshow Settings] menus to set up slideshow.
Ŷ Transition Effect
Effect for photo switching during slideshow
[None] / [Dissolve] / [Wipe right] / [Wipe left] /
[Wipe up] / [Wipe down] / [Box in] / [Box out] /
[Random]
Ŷ Screen Mode
Screen mode for Single view and Slideshow
[Normal] / [Zoom]
– Depending on the photo size, it may not be fully
enlarged to ¿ ll the screen, e.g. portrait style picture.
Ŷ Interval
Slideshow interval [5] / [10] / [15] / [30] / [60] / [90] / [120]
(seconds)
Ŷ Repeat
Slideshow repeat [Off] / [On]
Ŷ Back Ground Music
Background music during photo viewing
[Off] / [Type1] / [Type2] / [Type3]
Note
Ɣ
Picture quality may suffer depending on the slideshow
settings.
Ɣ
Picture setting may not work depending on the slideshow
settings.
Music mode
My Music_1 My Music_2 My Music_3
Media Player Music Folder view
USB
EXIT
Select
RETURN
Play Folder Contents Select
Info
Access
Option Menu
Drive Select
Operation guide
Follow the operation guide to perform available
operations in Music mode.
To display / hide the operation guide during
playback
INFO
To playback all music in the selected folder
R
TH-32_39_50B6_68_69GKMX_EN.indd 9 3/27/2013 9:50:03 AM
10
[Colour Balance]
Sets the overall colour tone of the picture.
[Cool] / [Normal] / [Warm]
Ɣ
Not valid when [Viewing Mode] is set to [True Cinema]
[Channel Colour Set]
Adjusts the suitable colour density from 3 levels for each
channel.
Ɣ
Select the channel to adjust and set this function.
[ Eco Mode]
Automatic Brightness Control function
Adjusts picture settings automatically depending on ambient
lighting conditions [Off] / [On]
[P-NR] (Picture Noise Reduction)
Reduces unwanted picture noise and flicker noise in the
contoured parts of a picture [Off] / [Min] / [Mid] / [Max]
[3D-COMB]
Makes still or slow moving pictures more vivid [Off] / [On]
Ɣ
Occasionally, while viewing still or slow moving pictures,
colour patterning may be seen. Set to [On] to display
sharper and more accurate colours.
Ɣ
For PAL or NTSC signal reception only.
Ɣ
Not valid on Component, HDMI and Media Player.
[Reset to Defaults]
Press OK to reset the present picture [Viewing Mode] of the
selected input to the default settings.
Sound Menu
[Mode]
Sets preset sound mode. The selected mode affects all
input signals.
[Music]
: Improves sound quality for watching music
videos, etc.
[Speech]
: Improves sound quality for watching news,
drama, etc.
[User]: Adjusts the sounds manually by using the
equaliser
– For the User mode, [Equaliser] will appear on the Sound
Menu instead of [Bass] and [Treble]. Select [Equaliser]
and adjust the frequency (below).
In Music and Speech modes, you can adjust [Bass] and
[Treble] settings, and those settings will be stored for
each mode.
[Bass] / [Treble]
Adjusts the effect to your preference.
[Equaliser]
Select the frequency and change the frequency level by
using the cursor buttons.
Ɣ
This function is available when [Mode] is set to [User].
Ɣ
To enhance the bass sound, raise the level of the lower
frequency. To enhance the treble sound, raise the level of
the higher frequency.
Ɣ
To reset the levels of each frequency to the default
settings, select [Reset to Defaults] by using the cursor
button, and then press the OK button.
[Balance]
Adjusts volume level of right and left speakers
[ Surround]
Surround sound settings [Off] / [On]
[Auto Gain Control]
Automatically regulates large sound level differences
between channels and inputs [Off] / [On]
[ Volume Correction]
Adjusts the volume of individual channel or input mode
Using the Menu
Functions
1 Display the menu
MENU
2 Select the menu
Main Menu
Picture
Sound
Setup
OK
3 Select the item you want, then change /
adjust or access
Example:
1/2
Picture Menu
Viewing Mode
Backlight
100
Contrast
50
Brightness
0
Colour
50
Dynamic
OK
Select
Ɣ
Change the setting option
Viewing Mode
Dynamic
OK
Change /
adjust
Ɣ
Adjust the intensity bar
Contrast
50
Ɣ
Access the submenu
Child Lock
Access
OK
Access
Note
Ɣ
A different menu will be displayed in the mode of Media
Player (p. 8 - 9).
Ɣ
Only available items can be selected.
Picture Menu
[ Viewing Mode]
Sets preset picture mode for each input.
[Dynamic]: Improves contrast and sharpness.
[Normal]: For viewing in a normal lighting condition.
[Cinema]: Improves the performance of contrast, black
and colour reproduction.
[True Cinema]: Reproduces the original image quality
precisely without any revision.
[Game]: For viewing when playing games
– Not valid on TV mode.
– To display a continuous record of time spent using
Game mode [Playing Time Display] (p. 11).
In each Viewing Mode, [Contrast], [Brightness], [Colour],
[Sharpness], [Tint], [Colour Balance], [Eco Mode], [P-NR]
and [3D-COMB] can be adjusted and stored for each input.
[Backlight] / [Contrast] / [Brightness] / [Colour] /
[Sharpness]
Adjusts the levels of these options to your preference.
[Tint]
Adjusts the picture hue.
Ɣ
For NTSC signal, Component or HDMI input
TH-32_39_50B6_68_69GKMX_EN.indd 10 1/31/2013 12:20:21 PM
11
[System Menu]
Ŷ [Shipping Condition]
Resets all settings to the original condition.
– Access this function and follow the on-screen
instructions to complete the procedures.
– Initial Setup will automatically start after [Shipping
Condition] completes (p. 6).
Ŷ [Software Licence]
Displays the software licence information of the TV.
Ŷ [System Information]
Displays the system information of the TV.
Ŷ [Software Update]
Downloads new software to this TV.
– This function is only available when the TV detects
software via USB.
[Other Settings]
Ŷ [AV Colour System]
Selects optimum colour system based on video signals in
AV mode [Auto / PAL / SECAM / M.NTSC / NTSC]
Ŷ [Auto Standby]
Sets the duration of time that the TV will remain on when
no operation is performed [Off] / [2] / [4] (hours)
– Automatic input switching with the connected
equipment affects this function and time-count will be
reset.
– The noti¿ cation message will appear 3 minutes before
going into Standby mode.
Ŷ [Power Save]
Reduces brightness of picture to economise on power
consumption [Off] / [On]
Ŷ [16:9 Overscan]
Selects the screen area displaying the image
– [On]: Enlarges the image to hide the edge of the
image.
– [Off]: Displays the image in the original size.
•
Set to [On] if noise is generated on the edge of the
screen.
•
This function is available when aspect is set to [16:9].
•
This function can be memorised separately for SD
(Standard definition) and HD (High definition) signals.
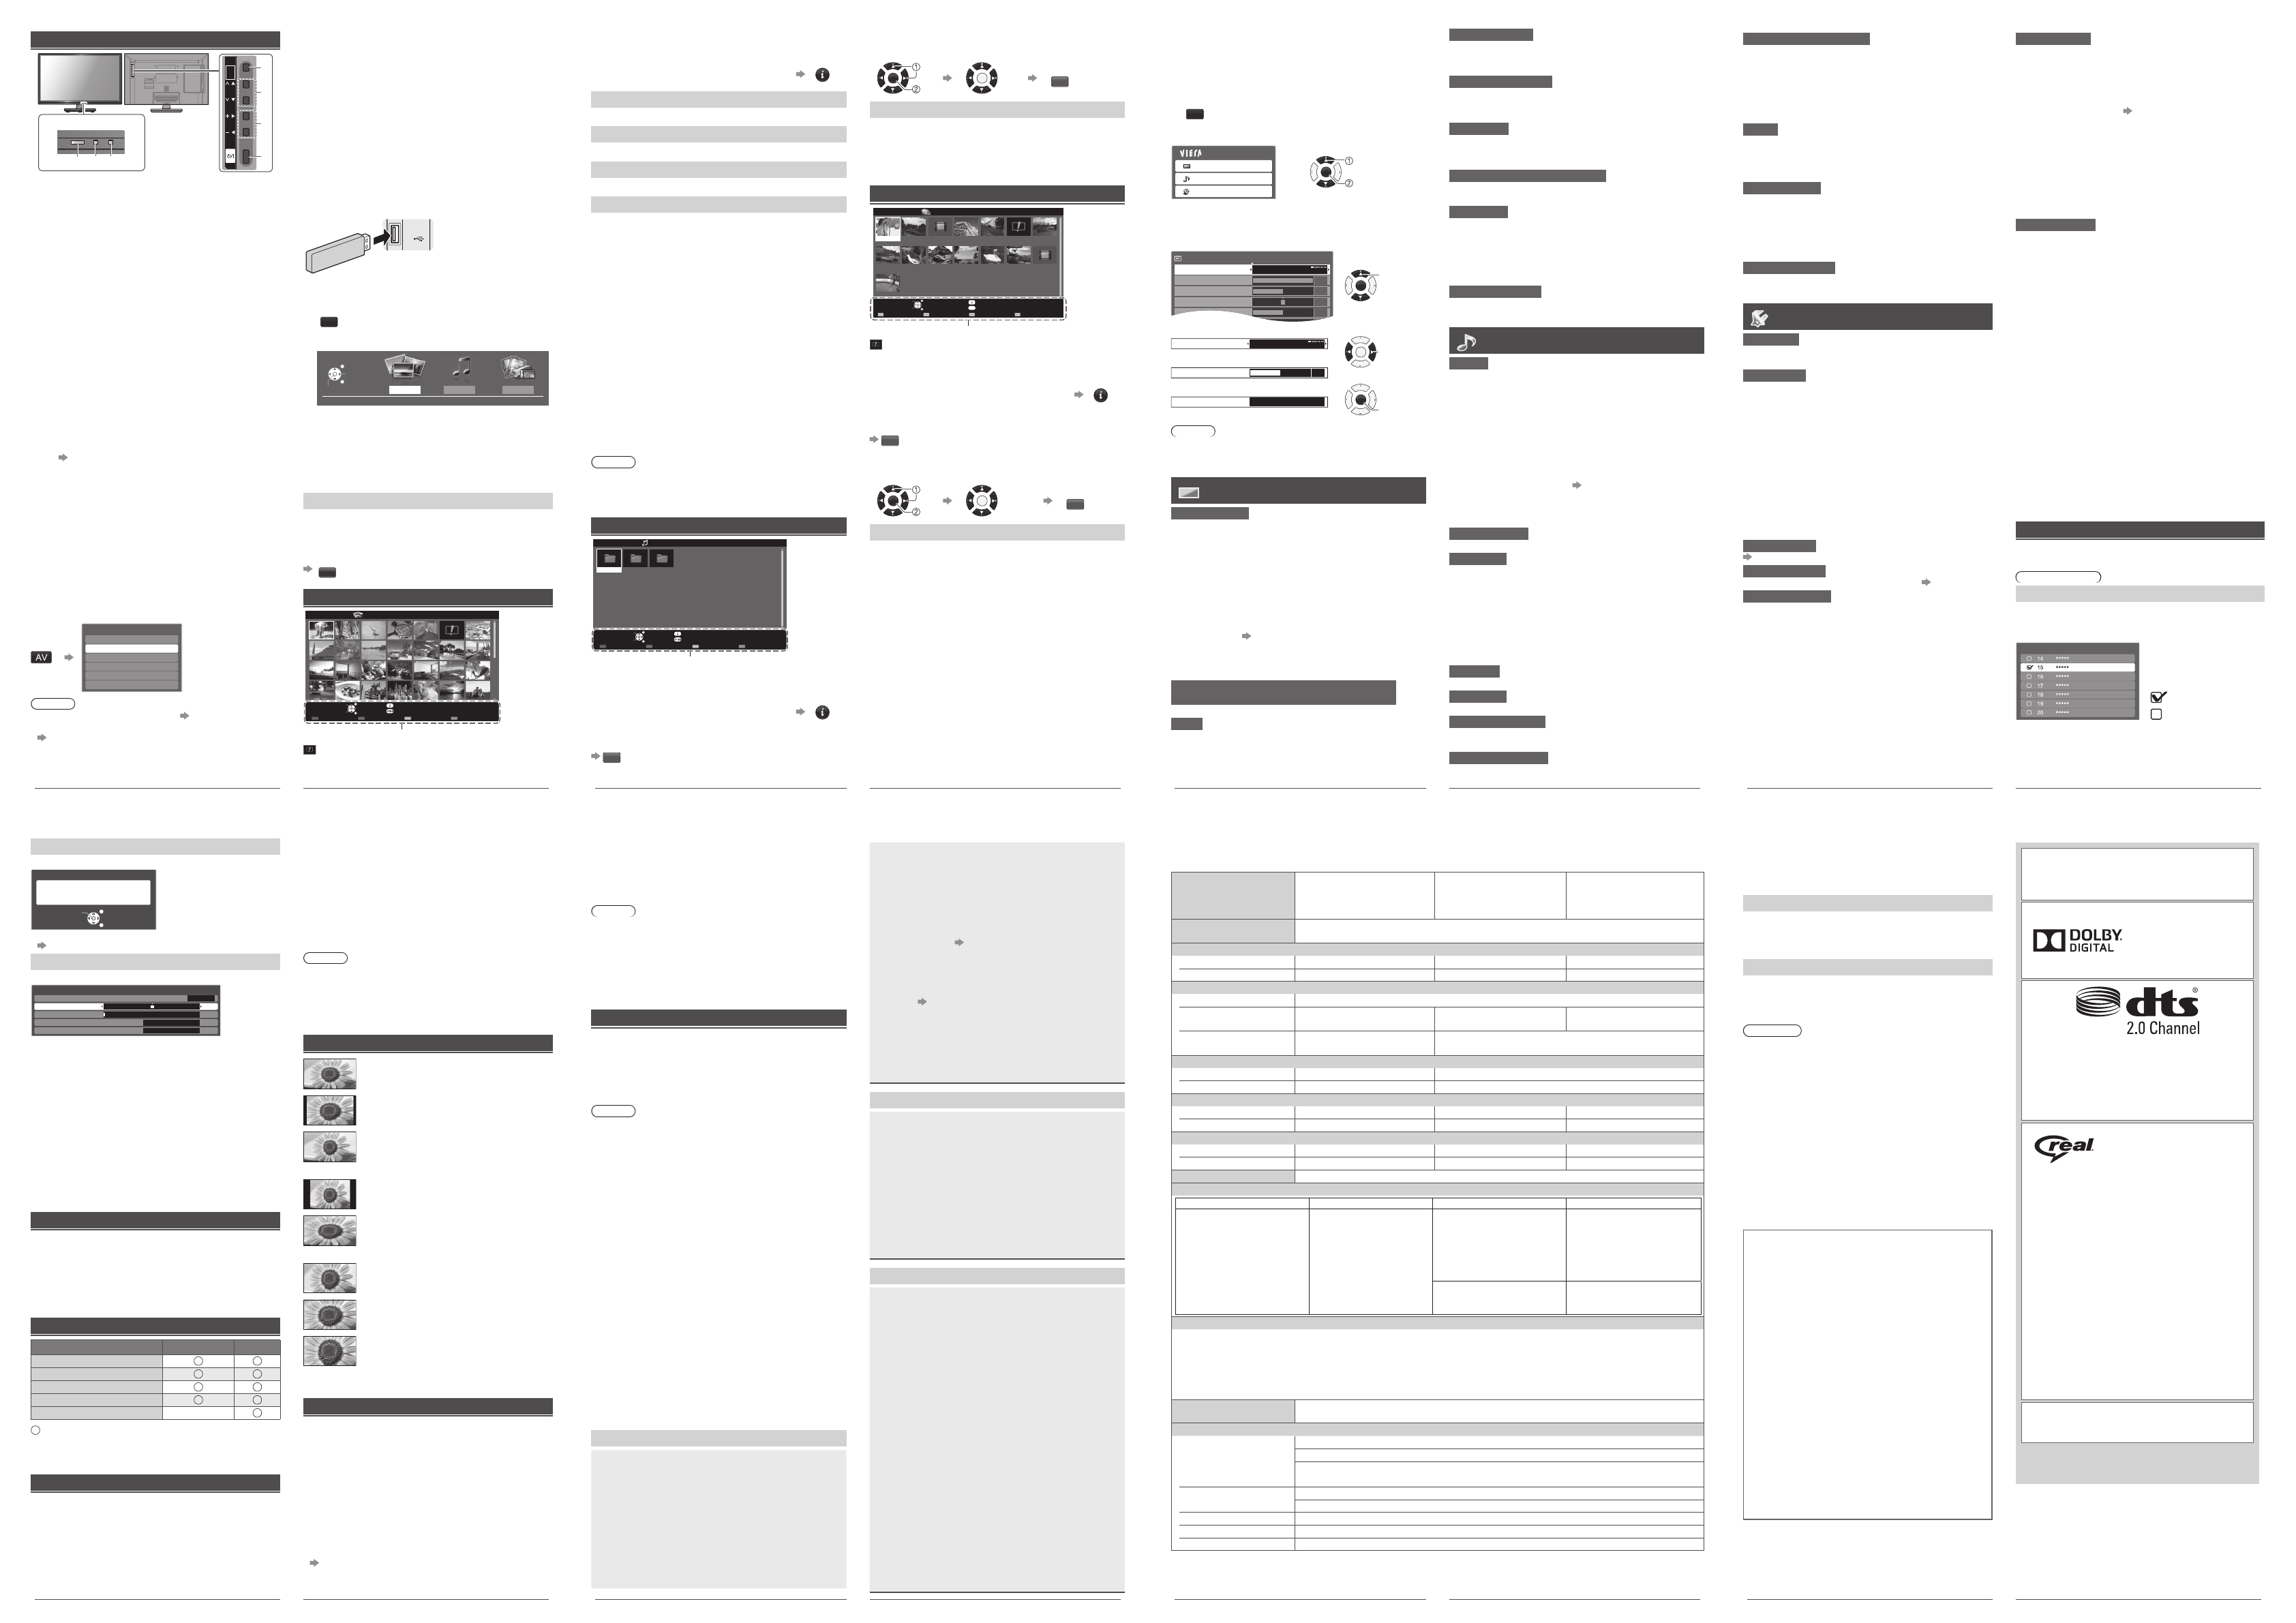
Using the [Tuning Menu]
[Tuning Menu] lets you retune your TV, skip unwanted
channels, etc.
TV mode only
[Channel List Edit]
Hides unwanted channels. The hidden channels cannot be
displayed except in this function.
Select a channel, then reveal / hide
Channel List Editor
: [reveal]
: [hide] (skip)
Ŷ [Tune]
Retunes each channel (Manual Tuning).
Ŷ [Reveal all]
Reveals all hidden channels.
[Speaker Distance to Wall]
Compensates for the low frequency sound due to the
distance between the speakers and the wall
[Over 30cm] / [Up to 30cm]
Ɣ
If the back space between the TV and wall is over 30 cm,
[Over 30cm] is recommended.
Ɣ
If the back space between the TV and wall is within
30 cm, [Up to 30cm] is recommended.
[ MPX]
Selects multiplex sound mode (if available)
[Stereo]: Use this normally
[Mono]: When stereo signal cannot be received
[M1] / [M2]: Available while mono signal is transmitted
[HDMI1/2 Input]
Selects to fit the input signal (p. 12)
[Digital]: When sound is carried via the HDMI cable
connection
[Analogue]: When sound is not carried via the HDMI-DVI
adaptor cable connection
Ɣ
For HDMI input
[Reset to Defaults]
Press OK to reset the present settings of [Mode], [Balance]
and [Surround] to the default.
Setup Menu
[Off Timer]
Sets the time until the TV automatically goes to Standby
mode [Off] / [15] / [30] / [45] / [60] / [75] / [90] (minutes)
[Child Lock]
Locks channels / AV input modes
Enter the PIN number (4 digits) to access.
First setting:
On the [Child Lock-PIN Entry] screen, enter your preferred
number twice to create the PIN.
Ŷ [Change PIN]
Lets you change your PIN number.
– Enter a new PIN number twice.
– Performing [Shipping Condition] erases the PIN
number and all settings.
Ŷ [Child Lock List]
Displays the Child Lock List.
– From the list, selects the channel / input to be locked.
[Tuning Menu]
(p. 11)
[OSD Language]
Changes language for on-screen displays (p. 6)
[Display Settings]
Ŷ [Input Labels]
Accesses the input labels list to select the label of each
input mode or set to skip unconnected one for easier
identification and selection in [Input Selection] (p. 8)
or banner
– To skip the input mode, select [Skip].
Ŷ [Banner Display Timeout]
Sets how long the Information banner stays on screen
(p. 7) [0 (No display)] / [1] / [2] / [3] / [4] / [5] / [6] /
[7] / [8] / [9] / [10] (seconds)]
Ŷ [Playing Time Display]
Set to [On] to display a continuous record of time spent
using Game mode every 30 minutes [Off] / [On]
– This function is available when [Viewing Mode] is set
to [Game].
TH-32_39_50B6_68_69GKMX_EN.indd 11 1/31/2013 12:20:21 PM
12
[Auto Tuning]
Scans and stores all channels automatically.
Auto Tuning
All tuning data will be erased
Start Auto Tuning
EXIT
RETURN
Ɣ
If tuning has not been done completely
[Manual Tuning] (below)
[Manual Tuning]
Scans and stores channels manually.
1
Fine Tuning
Manual Tuning
Sound System
AV Colour System
CH57
B/G
Auto
Manual Tuning
0%
100%
1 Set [Sound System] and [AV Colour System].
•
Normally set [AV Colour System] to [Auto].
2 Select a channel position to store the channel.
•
If a VCR is connected only with the RF cable, select
channel position [0].
3 Start tuning.
•
Tuning stops when a channel is found.
4 Press OK to store the channel or press the cursor
button to continue tuning.
Ŷ [Fine Tuning]
Refines the tuning of a channel.
Additional Information
Auto power standby function
The TV will automatically go into Standby mode in the
following conditions:
Ɣ
No signal is received and no operation is performed for
30 minutes in Analogue TV mode.
Ɣ
[Off Timer] is active in the Setup Menu.
Ɣ
No operation is performed for the period selected in [Auto
Standby] (p. 11).
Input signal that can be displayed
Signal name COMPONENT HDMI
525 (480) / 60i, 60p
625 (576) / 50i, 50p
750 (720) / 60p, 50p
1,125 (1,080) / 60i, 50i
1,125 (1,080) / 60p, 50p, 24p
Mark : Applicable input signal
Ɣ
Signals other than above may not be displayed properly.
Ɣ
The above signals are reformatted for optimal viewing on
your display.
Supported file format in Media Player
Ŷ Photo:
JPEG (.jpg, .jpeg)
– Supported image resolution: 8 × 8 to 30,719 × 17,279
– DCF and EXIF standards
– Sub-sampling: 4:4:4, 4:2:2, 4:2:0
– Progressive JPEG is not supported.
Ŷ Music:
MP3 (.mp3) / AAC (.m4a)
/ WMA (.wma)
Ŷ Video
AVI (.avi) / MKV (.mkv)
/
ASF (.asf, .wmv) / MP4 (.mp4) /
FLV (.flv) / 3GPP (.3gp, .3g2) / TS (.ts) / PS (.vob, .vro) /
RMVB
Copy-protected files cannot be played back.
WMA Pro and WMA Lossless are not supported.
RMVB files are only supported by TH-L32B6K/
TH-L32B68K/TH-L39B6K/TH-L39B68K/TH-L50B6K
models.
Note
Ɣ
Even if these conditions are fullfilled, some files may not
be played back depending on how they are encoded.
Ɣ
Do not use two-byte characters or other special codes
for data.
Ɣ
The device may become unusable with this TV if the file
or folder names are changed.
Aspect
Ŷ [16:9]
Directly displays the image at 16:9 without
distortion (anamorphic).
Ŷ [14:9]
Displays the image at the standard 14:9
without distortion.
Ŷ [Just]
Displays a 4:3 image full-screen.
Stretching is only noticeable at the left and
right edges.
Ŷ [4:3]
Displays the image at the standard 4:3
without distortion.
Ŷ [4:3 Full]
Displays a 4:3 image enlarged horizontally
to fit the screen.
Ɣ
HD signal only
Ŷ [Zoom1]
Displays a 16:9 letterbox or 4:3 image
without distortion.
Ŷ [Zoom2]
Displays a 16:9 letterbox (anamorphic)
image full-screen without distortion.
Ŷ [Zoom3]
Displays a 2.35:1 letterbox (anamorphic)
image full-screen without distortion.
At 16:9, displays the image at its maximum
(with slight enlargement).
HDMI connection
This TV incorporates HDMI™ technology. HDMI (high-
definition multimedia interface) is the world’s first complete
digital consumer AV interface complying with a non-
compression standard.
HDMI allows you to enjoy high-definition digital images
and high-quality sound by connecting the TV and the
equipment.
Ŷ Applicable HDMI features
Ɣ
Input audio signal:
2ch Linear PCM (sampling frequencies - 48 kHz, 44.1
kHz, 32 kHz)
Ɣ
Input video signal:
“Input signal that can be displayed” (p. 12)
Match the output setting of the digital equipment.
TH-32_39_50B6_68_69GKMX_EN.indd 12 1/31/2013 12:20:21 PM
13
Ŷ DVI connection
If the external equipment has only a DVI output, connect to
the HDMI terminal via a DVI to HDMI adaptor cable. When
the DVI to HDMI adaptor cable is used, connect the audio
cable to the audio input terminal (use AV1 audio terminals).
Note
Ɣ
Audio settings can be made on [HDMI1 / 2 Input] in the
Sound Menu (p. 11).
Ɣ
These HDMI connectors are “type A”.
Ɣ
These HDMI connectors are compatible with HDCP (High-
Bandwidth Digital Content Protection) copyright protection.
Ɣ
Equipment having no digital output terminal may be
connected to the input terminal of component or video to
receive analogue signals.
USB Flash Memory
For playing back in Media Player
Format: FAT16, FAT32
Compliance:
Supports only USB1.1 or USB2.0 standard.
Maximum USB capacity supported is 16GB.
USB Hub or card adapter is not supported.
Note
Ɣ
Data modified with a PC may not be displayed.
Ɣ
Do not remove the device while the TV is accessing data.
Otherwise this can damage the device or TV.
Ɣ
Do not touch the pins on the device.
Ɣ
Insert the device in the correct direction. Otherwise this
can damage device or TV.
Ɣ
Electrical interference, static electricity, or erroneous
operation may damage the data or device. Panasonic is
not liable for any deterioration or damage of data or device
during operations with the TV.
Ɣ
It is recommended to connect the USB Flash Memory
directly to the TV’s USB port.
Ɣ
Some USB devices or USB HUB may not be used with
this TV.
Ɣ
You cannot connect any devices by using USB card
reader.
Ɣ
Additional information for USB devices may be on the
following website. (English only)
http://panasonic.jp/support/global/cs/tv/
Troubleshooting
Before requesting service or assistance, please follow these
simple guides to resolve the problem.
If an error message appears, follow the message’s
instructions.
If the problem still persists, please contact your local
Panasonic dealer for assistance.
Screen
Red, blue, green or black spots on the screen
Î
This is the characteristic of liquid crystal panels. The
liquid crystal panel is built with very high precision
technology. Occasionally, a few non-active pixels may
appear on the screen as points of red, green, blue or
black. This does not affect the performance of your TV
and it is not a quality problem.
Chaotic image, noisy
Î
Set [P-NR] in the Picture Menu to remove noise
(p. 10).
Î
Check nearby electrical products (car, motorcycle,
fluorescent lamp).
No image is displayed
Î
Check the settings of [Contrast], [Brightness] or [Colour]
in the Picture Menu (p. 10).
Î
Check the TV is in AV mode. If the TV is in AV mode,
check the selected input mode match the output of the
external equipment (p. 8).
Blurry or distorted image
(no sound or low volume)
Î
Resets channels [Auto Tuning] or [Manual Tuning]
(p. 12)
Unusual image is displayed
Î
Turn the TV off with Mains power On / Off switch, then
turn it on again. If the problem persists, initialise all
settings
[Shipping Condition] (p. 11)
Pictures from equipment connected via HDMI
are unusual
Î
Check the HDMI cable is connected properly.
Î
Turn the TV and equipment off, then turn them on again.
Î
Check an input signal from the equipment (p. 12).
Î
Use equipment compliant with EIA/CEA-861/861D.
Sound
No sound is produced
Î
Check the sound mute setting (p. 7) and volume.
Low level or distorted sound
Î
Sound signal reception may be deteriorated.
Î
Set [MPX] (p. 11) in the Sound Menu to [Mono].
Sound output via HDMI connection is unusual
Î
Set the sound setting of the connected equipment to “2ch
L.PCM”.
Î
Check the [HDMI1 / 2 Input] setting in the Sound Menu
(p. 11).
Î
If digital sound connection has a problem, select
analogue sound connection (p. 13).
General
The TV goes into Standby mode
Î
This TV is equipped with auto power standby function
(p. 12)
The remote control does not work or is
intermittent
Î
Replace the batteries (p. 3).
Î
Point the remote control directly at the remote control signal
receiver of the TV (within about 7 m and 30 degree angle).
Î
Situate the TV away from sunshine or block sources
of bright light from shining on the remote control signal
receiver of the TV.
Parts of the TV become hot
Î
Even if the temperature of parts of the front, top and rear
panels has risen, these temperature rises do not cause
any problems in terms of performance or quality.
The LCD panel moves slightly when it is
pushed with a finger
Clattered sound might be heard
Î
There is some flexibility around the panel to prevent
damage. This is not a malfunction.
Overcurrent error message appears
Î
The connected USB device might cause this error.
Remove the device and turn the TV off with Mains power
On / Off switch, then turn it on again.
Î
Check foreign objects are not inside the USB port.
TH-32_39_50B6_68_69GKMX_EN.indd 13 1/31/2013 12:20:21 PM
14
Specifications
Model No. TH-L32B6G TH-L32B68G
TH-L32B6K TH-L32B68K
TH-L32B6M TH-L32B69K
TH-L32B6X
TH-L39B6G TH-L39B68K
TH-L39B6K TH-L39B69K
TH-L39B6M
TH-L39B6X
TH-L50B6G
TH-L50B6K
TH-L50B6M
Power source TH-L32B6K/TH-L32B68K/TH-L32B69K: AC 220 - 240 V, 50/60 Hz
Other models: AC Auto 110 - 240 V, 50/60 Hz
Power consumption
Power rating 63 W 87 W 136 W
Standby Condition 0.35 W 0.2 W 0.2 W
Display panel
Panel TFT LCD Module with LED Backlight
Visible screen size
(diagonal)
80 cm (32 inches) 98 cm (39 inches) 126 cm (50 inches)
Number of pixels 1,049,088
(1,366 (W) × 768 (H))
2,073,600
(1,920 (W) × 1,080 (H))
Sound
Speaker (90 mm × 25 mm) × 2 pcs, 8 (100 mm × 30 mm) × 2 pcs, 8
Audio output 10 W (5 W + 5 W), 10% THD 20 W (10 W + 10 W), 10% THD
Dimensions (W × H × D)
With Pedestal (mm) 741 × 515 × 184 896 × 602 × 217 1,139 × 739 × 275
TV only (mm) 741 × 450 × 78 896 × 537 × 85 1,139 × 674 × 89
Mass (Net)
With Pedestal (kg) 7 10 18
TV only (kg) 6 9 15
Aerial - Rear VHF / UHF
Receiving systems / Band name
17 Systems Function 17 Systems Function
1 PAL B, G, H
Reception of broadcast
transmissions and Playback
from Video Cassette Tape
Recorders
8 NTSC 4.43/5.5 MHz
Playback from Special VCR’s
or DVD
2 PAL I 9 NTSC 4.43/6.0 MHz
3 PAL D, K 10 NTSC 4.43/6.5 MHz
4 SECAM B, G 11 NTSC 3.58/5.5 MHz
5 SECAM D, K 12 NTSC 3.58/6.0 MHz
6 SECAM K1 13 NTSC 3.58/6.5 MHz
7 NTSC M (NTSC 3.58/4.5 MHz) 14 SECAM I
15 PAL 60 Hz/5.5 MHz
Playback from Special Disc
Players and Special VCR’s or DVD
16 PAL 60 Hz/6.0 MHz
17 PAL 60 Hz/6.5 MHz
Receiving channels
VHF BAND
2-12 (PAL/SECAM B, K1)
0-12 (PAL B AUST.)
1-9 (PAL B N.Z.)
1-12 (PAL/SECAM D)
1-12 (NTSC M Japan)
2-13 (NTSC M USA)
UHF BAND
21-69 (PAL G, H, I/SECAM G, K, K1)
28-69 (PAL B AUST.)
13-57 (PAL D, K)
13-62 (NTSC M Japan)
14-69 (NTSC M USA)
CATV
S1-S20 (OSCAR)
1-125 (USA CATV)
C13-C49 (JAPAN)
S21-S41 (HYPER)
Z1-Z37 (CHINA)
5A, 9A (AUST.)
Operating Conditions Temperature : 0 °C - 40 °C,
Humidity : 20 % - 80 % RH (non-condensing)
Connection terminals
AV1 IN AUDIO L - R RCA PIN Type × 2 0.5 V[rms]
VIDEO RCA PIN Type × 1 1.0 V[p-p] (75 ȍ)
COMPONENT Y 1.0 V[p-p] (including synchronization)
P
B/CB, PR/CR ±0.35 V[p-p]
AV2 IN AUDIO L - R RCA PIN Type × 2 0.5 V[rms]
VIDEO RCA PIN Type × 1 1.0 V[p-p] (75 ȍ)
AUDIO OUT AUDIO L - R RCA PIN Type × 2 0.5 V[rms]
HDMI AV IN TYPE A Connectors × 2
USB USB 2.0 TYPE A Connectors × 1 DC 5 V, Max. 500 mA
Design and Specifications are subject to change without notice. Mass and Dimensions shown are approximate.
TH-32_39_50B6_68_69GKMX_EN.indd 14 1/31/2013 12:20:21 PM
15
Maintenance
First, remove the mains plug from the socket
outlet.
Regular care
Ɣ
Gently wipe the surface of the display panel, cabinet and
pedestal by using a soft cloth.
Ɣ
Wipe the mains plug with a dry cloth at regular intervals.
Moisture and dust may lead to fire or electrical shock.
For stubborn dirt
First clean the dust on the surface. Dampen a soft cloth
with clean water or diluted neutral detergent (1 part
detergent to 100 parts water). Wring the cloth and wipe the
surface. Finally, wipe away all the moisture.
Caution
Ɣ
Do not use a hard cloth or rub the surface too hard as
this could scratch the surface.
Ɣ
Do not subject the TV’s surfaces to water or detergent.
Liquid inside the TV could lead to product failure.
Ɣ
Do not subject the surfaces to insect repellent, solvent,
thinner or other volatile substances. This may degrade
surface quality or cause peeling of the paint.
Ɣ
The surface of the display panel is specially treated and
may be easily damaged. Take care not to tap or scratch
the surface with your fingernail or other hard objects.
Ɣ
Do not allow the cabinet and pedestal to make contact
with a rubber or PVC substance for a long time. This may
degrade surface quality.
Licence
This product incorporates the following software:
(1) the software licensed under the GNU General
Public License, Version 2.0 (GPL V2.0) and/or,
(2) open sourced software other than the software
licensed under the GPL.
The software categorized as (1) - (2) are distributed
in the hope that it will be useful, but WITHOUT ANY
WARRANTY, without even the implied warranty of
MERCHANTABILITY or FITNESS FOR A PARTICULAR
PURPOSE. Please refer to the detailed terms and
conditions thereof shown in the “Software License”
menu on this product.
At least three (3) years from delivery of this product,
Panasonic Corporation will give to any third party
who contacts us at the contact information provided
below, for a charge no more than our cost of physically
performing source code distribution, a complete
machine-readable copy of the corresponding source
code covered under GPL V2.0 or the other licenses
with the obligation to do so, as well as the respective
copyright notice thereof.
Contact Information: cdrequest@unipf.jp
The source code and the copyright notice are also
available for free in our website below.
http://www.unipf.jp/dl/ATV13AM/
HDMI, the HDMI Logo, and High-Definition
Multimedia Interface are trademarks or registered
trademarks of HDMI Licensing LLC in the United
States and other countries.
Manufactured under
license from Dolby
Laboratories. Dolby and
the double-D symbol
are trademarks of Dolby
Laboratories.
Manufactured under license under U.S. Patent
Nos: 5,956,674; 5,974,380; 6,487,535 & other U.S.
and worldwide patents issued & pending. DTS,
the Symbol, & DTS and the Symbol together are
registered trademarks & DTS 2.0 Channel is a
trademark of DTS, Inc. Product includes software.
© DTS, Inc. All Rights Reserved.
RealMedia, RealVideo and
RealAudio are trademarks
or registered trademarks of
RealNetworks, Inc.
These statements are under the Licence Agreement
with RealNetworks, Inc.
4.4.2.1 Terms of use must prohibit the user from
modifying, translating, reverse engineering,
decompiling, disassembling or using other means
to discover the Source Code or otherwise replicate
the functionality of the Client Code, except to the
extent that this restriction is expressly prohibited by
applicable law.
4.4.2.2 Terms of use must effectively disclaim on
behalf of Real all warranties and conditions other
than those set forth in this Agreement, express and
implied, including implied warranties or conditions
of merchantability and fitness for a particular
purpose; and effectively exclude all liability for
indirect, special, incidental and consequential
damages, including but not limited to lost profits or
replacement systems.
(Only supported by TH-L32B6K/TH-L32B68K/
TH-L39B6K/TH-L39B68K/TH-L50B6K models)
Windows is a registered trademark of Microsoft
Corporation in the United States and other
countries.
Even if no special notation has been made of company
or product trademarks, these trademarks have been
fully respected.
TH-32_39_50B6_68_69GKMX_EN.indd 15 1/31/2013 12:20:21 PM
TH-32_39_50B6_68_69GKMX_EN-A2.indd 2TH-32_39_50B6_68_69GKMX_EN-A2.indd 2 3/28/2013 3:01:40 PM3/28/2013 3:01:40 PM