


9
When first turning on the sound system, switch on all upstream electronics first, then the PR
™
15P with its
volume control fully counterclockwise (all the way down). Begin checking levels with the mixer output
level controls all the way down, and bring them up slowly with the PR 15P volume control set to the
desired setting (halfway up recommended to start).
MMiicc//LLiinnee PPaadd AAddjjuussttmmeenntt
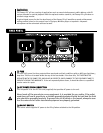
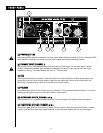
The mic/line pad (6) provides for the increased gain needed for microphone use into the primary input (5).
Use a straightened paperclip or small screwdriver to reach through the hole in the rear panel where the
recessed tab is to set its position. Set the Mic/Line Pad to “in,” or the white tab furthest from the panel,
for line-level signal use, and set it “out,” or closest to the panel, for mic-level use. The unit is shipped with
the tab in the line-level position. It is recessed behind the panel so that the gain can not be inadvertently
increased during transport or set-up.
Due to the 30 dB of extra gain that this switch provides, DO NOT leave it in the “out” position for line level
use! This will result in input-stage clipping of the PR 15P and cause unnecessary distortion.
MMiixxiinngg SSiiggnnaallss UUssiinngg tthhee VVoolluummee KKnnoobbss
The gain of all three channels can be adjusted independently from the other channels via the volume
knobs (7) and (9). Channel 1 can be used for either line-level signals or as a mic input, and mixed with two
other line-level signals.
The PR 15P has plenty of gain, so do not overload the speaker system preamp inputs by driving them with
a signal that is too hot. Full output mixer levels well in excess of 0 dB will not going to be necessary to
drive the unit to full power capacity.
TTRROOUUBBLLEESSHHOOOOTTIINNGG
NNoo OOuuttppuutt aatt AAllll
First, make sure the unit has AC power and is turned ON. Make sure the Power/Clip LED (4) is illuminated
Green. If not, make certain the ON/OFF switch (3) is in the ON position and check the IEC power cord
connection (2) by ensuring it is fully engaged and seated. Make certain the AC line cord is plugged into a
working AC outlet. Finally, check the fuse (1). (See the Rear Panel: Fuse section, for safety instructions.)
Once assured your unit is getting AC power, check that the PR 15P is getting a signal. Temporarily disconnect
the cable running to its inputs and connect it to some other device capable of reproducing the signal (i.e., a
power amp and speaker). If this produces a signal, make sure that all Volume controls being used have been
turned up to a satisfactory level (one-third to halfway).
If the PR 15P has been subjected to direct sunlight or excessive heat, the built-in thermal protection may have
been triggered. The power/clip LED will be illuminated RED if this is the case. If so, turn off the PR 15P and let it
cool for a sufficient amount of time.
If there is still no output, contact your authorized Peavey dealer or the Peavey International Service Center.