


Mounting Instructions:
Mounting Instructions:
As a helpful guide to assembling the bracket
onto the cabinet for hanging the cabinet
on a wall, the following assembly steps
are one example of the steps you might
take to prepare the bracket and attach the
cabinet to a drywall-covered 2x4 stud wall,
after consulting with a certified structural
engineer.
Remove the bracket from the cabinet by
unscrewing the shallow-head bolt from the
nominal bottom of the cabinet (small side),
noting how the bracket is mated with the slot
in the cabinet and saving all the hardware
supplied.
Now is a good time to set the input selector
to the proper input. Select one of the
transformer taps, or the 8 ohm input, since it
would otherwise require that the cabinet be
dis-mounted from the bracket to change the
setting.
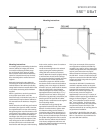
Decide where the unit will hang and in which
orientation (See Figures A and B). Note that
the supplied bracket can have the mounting
bolt go through the rear of the bracket or the
end opposite of the cabinet slot, so there are
two options to allow maximum flexibility in
mounting to the ceiling or the wall. With the
help of a certified structural engineer, find a
wall, ceiling stud or other suitable location
and select which hole on the bracket will
best interface with that spot. Both mounting
holes can be used in a corner for maximum
safety and reliability.
Locate the mounting hole on the selected
spot by placing the bracket against the
ceiling/wall in the desired pre-selected
location. Mark this location by lightly driving
a small nail into the wall surface through
the correct bracket hole (centered) and then
removing the nail. Pre-drill the fastener
hole with the proper size drill bit to allow
the fastener shaft to enter the stud without
splitting it, but not so large as to allow the
threads to strip out. Next install the bracket
onto the ceiling/wall in the orientation
selected, being sure to install it using the
appropriate fastener (nominally a 1/4” x 3”
lag bolt) into an inner wall or ceiling stud.
Never drive a lag bolt into just drywall or just
paneling as this will not hold the cabinet
safely. Consult a certified structural engineer
for all mounting details.
The wall fastener will go through the
appropriate bracket hole with a lock washer
between it and the bracket. Tighten down
this fastener making sure the bracket is
oriented as desired. Once the bracket is in
place and the fastener has been tightened
firmly, connect the cabinet input terminals to
the speaker wiring with the wires routed as
desired. Place the cabinet onto the bracket
in its factory configuration and insert and
tighten the shallow-head bracket mounting
bolt removed in the first step.
This is just one example of the steps that
one might take to install the SSE UB2T by
mounting it on a wall or ceiling. Other types
of walls/ceilings other than a dry-wall panel
and 2x4 stud construction may require
different fasteners and steps to safely hang
the SSE UB2T. Consult a certified structural
engineer to assure that the SSE UB2T will be
properly and safely hung under the specific
conditions present.
Note that the SSE UB2T is intended to be
used with a separate woofer, an electronic
crossover and two channels of amplification
to provide full-range performance. The
SSE UB2T is not a full-range system by
itself, and only covers the range from
approximately 200 Hz and up. A number of
suitable crossover options are available from
Peavey: the Peavey Digitool
™
, the Peavey
VSX
™
26 Loudspeaker Controller and the
SSE
™
Array Controller. The first two units
have pre-configured setup files that provide
an optimized crossover and EQ for a flat
response and level set as a starting place for
any permanent installation.
The woofers in the SSE line that mate well
with the SSE UB2T are the SSE 210 and the
SSE 110. One SSE 110 can provide bass for
up to two SSE UB2T cabinets.
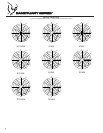
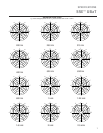
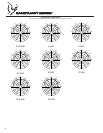
SPECIFICATIONS
SSE
™
UB2T
9