


5
EnglishFrançaisDeutsch
Italiano
SvenskaEspañolPortuguês
Nederlands
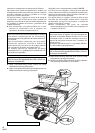
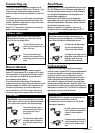
Raccordement
Le schéma ci-dessus montre la platine cassette raccordée au
récepteur CD, sans enregistreur MD ou enregistreur CD en option.
(Si vous avez acheté l’un de ces appareils ou les deux, consultez
son mode d’emploi pour les détails du raccordement de cette
platine cassette au reste du système.)
Si vous raccordez seulement le récepteur CD et cette platine
cassette, raccordez-les en utilisant le câble ruban attaché à l’arrière
de la platine cassette. (Voir les Câbles ruban ci-dessous pour les
informations importantes sur leur connexion/déconnexion.)
Voir le mode d’emploi du XC-L77 pour les informations sur le
raccordement des enceintes, antennes et câbles d’alimentation.
Collegamento
Il diagramma di cui sopra mostra la piastra nastri collegata al
ricevitore CD, senza il registratore MD o CD disponibile separatamente.
(In caso si siano acquistati uno o entrambi di questi sistemi, fare
riferimento ai manuali di istruzioni rispettivi per informazioni
dettagliate sul collegamento di questa piastra nastri a tali impianti.)
In caso di collegamento esclusivo del ricevitore CD a questa piastra
nastri, condurre il collegamento utilizzando il cavo a nastro fissato
sulla parte posteriore della piastra nastri. (Vedere Cavi a Nastro, di cui
sotto, per istruzioni importanti sul loro collegamento/scollegamento.)
Vedere le istruzioni del sistema XC-L77 per istruzioni sul collegamento
degli altoparlanti, antenne e cavi di alimentazione.
Connecting up
The diagram above shows the tape deck connected to the CD
receiver, without the optional MD recorder or CD recorder. (If you
bought either/both of these, see their respective instruction
manuals for details of connecting this tape deck to the rest of the
system.)
If you are connecting up only the CD receiver and this tape deck,
connect them using the ribbon cable attached to the rear of the
tape deck. (See Ribbon cables, below, for important information
on connecting/disconnecting these.)
See the XC–L77 instructions for information on connecting the
speakers, antennas, and power cables.
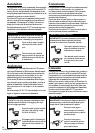
To insert, hold the connector and
push firmly into the socket until you
hear it click home.
Ribbon cables
IMPORTANT: Never connect or disconnect the system
ribbon cables while the power plug is connected to the wall
outlet. Doing so may damage the unit.
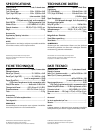
To remove, hold the connector
securely on either side with thumb
and forefinger and pull out from the
socket.
Anschlüsse
Das obige Diagramm zeigt, wie das Cassettendeck ohne optionalen
MD- oder CD-Recorder an den CD-Receiver anzuschließen ist (ist
einer oder sind beide Recorder vorhanden, so finden Sie Näheres
zum Anschluß des Cassettendecks an das übrige System in der
jeweiligen Bedienungsanleitung).
Werden lediglich der CD-Receiver und das Cassettendeck
angeschlossen, so erfolgt der Anschluß über das Bandkabel an der
Rückseite des Cassettendecks. (Näheres zum Verbinden/Abtrennen
der Bandkabel finden Sie weiter unten.)
Näheres zum Anschluß von Lautsprechern, Antennen und
Netzkabeln finden Sie in der Bedienungsanleitung von XC-L77.
En/Fr/Ge/It
IMPORTANT: Ne branchez et débranchez jamais le câble
ruban lorsque la fiche du cordon d’alimentation est branchée
sur une prise murale. L’appareil risque d’être endommagé.
Câble ruban
Pour brancher le câble, tenez le
connecteur et enfoncez-le à fond
dans la prise jusqu’à ce qu’il
s’encliquette.
Pour débrancher le câble, tenez le
connecteur des deux côtés avec le
pouce et l’index et sortez-le de la
prise.
WICHTIG: Keinesfalls die System-Bandkabel verbinden
oder abtrennen, solange der Netzstecker in der Netzsteckdose
steckt. Andernfalls kann es zu Geräteschäden kommen.
Bandkabel
Zum Verbinden den Stecker fassen
und fest in die Anschlußbuchse
drücken, bis er hörbar einrastet.
Zum Abtrennen den Stecker sicher an
beiden Seiten zwischen Daumen und
Zeigefinger fassen und aus der
Anschlußbuchse herausziehen.
IMPORTANTE: Non collegare e non scollegare mai i cavi
a nastro del sistema quando la spina del cavo di
alimentazione è inserita in una presa a muro. Ciò potrebbe
danneggiare l’apparecchio.
Cavi a nastro
Per inserire, afferrare il connettore e
inserirlo saldamente nella presa fino
a quando lo si sente scattare in
posizione.
Per staccare, afferrare saldamente il
connettore tenendolo per i lati con il
pollice e l’indice, ed estrarlo dalla
presa.