


Brightness (display brightness setting)
1 Push M.C. left or right to adjust the brightness
level.
0 to 15 is displayed as the level is increased or de-
creased.
! When dimmer is functioning, the brightness
level can be adjusted 0 to 10.
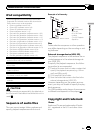
S/W control (rear output and subwoofer setting)
This unit’s rear output (rear speaker leads output and
RCA rear output) can be used for full-range speaker
(Rear SP:F.Range) or subwoofer (Rear SP:S/W) con-
nection. If you switch the rear output setting to Rear
SP :S/W, you can connect a rear speaker lead directly
to a subwoofer without using an auxiliary amp.
1 Press M.C. to switch the rear output setting.
! When no subwoofer is connected to the rear
output, select Rear SP:F.Range (full-range
speaker).
! When a subwoofer is connected to the rear
output, select Rear SP:S/W (subwoofer).
! Even if you change this setting, there will be no
output unless you turn the subwoofer output on
(refer to Sub W.1 (subwoofer on/off setting) on
page 14).
! If you change this setting, subwoofer output in
the audio menu will return to the factory settings.
! Both rear speaker lead outputs and RCA rear out-
put are switched simultaneously in this setting.
Mute (muting or attenuation setting)
1 Press M.C. to switch the telephone muting/at-
tenuation.
! The sound is muted or attenuated, MUTE or
ATT are displayed and no audio adjustment is
possible.
! Sound from this system returns to normal
when the muting or attenuation is canceled.
Demonstration (demo display setting)
1 Press M.C. to turn the demo display on or off.
! You can also turn on or off feature demo by
pressing DISP while this unit is turned off. For
more details, refer to Demo mode on page 3.
Reverse mode (reverse mode setting)
1 Press M.C. to turn the reverse mode on or off.
! You can also turn on or off reverse mode by
pressing BAND while this unit is turned off.
For more details, refer to Reverse mode on
page 4.
Ever-scroll (scroll mode setting)
When ever scroll is set to ON, recorded text informa-
tion scrolls continuously in the display. Set to OFF if
you prefer the information to scroll just once.
1 Press M.C. to turn the ever scroll on or off.
Other Functions
Using an AUX source
1 Insert the stereo mini plug into the
AUX input jack.
2 Press SRC/OFF to select AUX as the
source.
Note
AUX cannot be selected unless the auxiliary set-
ting is turned on. For more details, refer to AUX
(auxiliary input) on the previous page.
Clock display
% Press and hold MUTE/CLOCK to select
the desired setting.
Clock off—clock display—elapsed time dis-
play
Mute
1 Press MUTE/CLOCK to cut the sound.
2 To cancel it, press MUTE/CLOCK again.
Using different entertainment
displays
You can enjoy entertainment displays while lis-
tening to each sound source.
1 Press M.C. to display the main menu.
2 Turn M.C. to change the menu option
and press to select ENTERTAINMENT.
En
16
Section
02
Operating this unit