


Black plate (39,1)
<XRD7106-A/N>39
2 Press c or d to adjust the brightness
level.
Each press of c or d increases or decreases
the brightness level. 0 15 is displayed as the
level is increased or decreased.
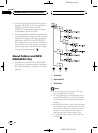
Setting the rear output and
subwoofer controller
This units rear output (rear speaker leads out-
put) can be used for full-range speaker
(REAR SP :FULL) or subwoofer (REAR SP :S/W)
connection. If you switch the rear output set-
ting to REAR SP :S/W, you can connect a rear
speaker lead directly to a subwoofer without
using an auxiliary amp.
Initially, the unit is set for rear full-range speak-
er connection (REAR SP :FULL). When rear
output is connected to full range speakers
(when REAR SP :FULL is selected), you can
connect the RCA subwoofer output to a sub-
woofer. In this case, you can select whether to
use the subwoofer controllers (low pass filter,
phase) built-in PREOUT:S/W or the auxiliary
PREOUT:FULL.
1 Press FUNCTION to select REAR SP.
Press FUNCTION repeatedly until REAR SP ap-
pears in the display.
2 Press a or b to switch the rear output
setting.
Pressing a or b will switch between
REAR SP :FULL (full-range speaker) and
REAR SP :S/W (subwoofer) and that status will
be displayed.
# When no subwoofer is connected to the rear
output, select REAR SP :FULL.
# When a subwoofer is connected to the rear
output, set for subwoofer REAR SP :S/W.
# When the rear output setting is
REAR SP :S/W, you cannot change the subwoofer
controller.
3 Press c or d to switch the subwoofer
output or non fading output.
Pressing c or d will switch between
PREOUT:S/W and PREOUT :FULL and that
status will be displayed.
Notes
! Even if you change this setting, there is no
output unless you turn the nonfading output
(refer to Using nonfading output on page 35)
or subwoofer output (refer to Using subwoofer
output on page 34) in the audio menu on.
! If you change the subwoofer controller, sub-
woofer output and nonfading output in the
audio menu return to the factory settings.
Switching the sound
muting/attenuation
Sound from this system is muted or attenu-
ated automatically when the signal from the
equipment with mute function is received.
! The sound is muted or attenuated, MUTE
or ATT are displayed and no audio adjust-
ment is possible.
! Sound from this system returns to normal
when the muting or attenuation is can-
celed.
1 Press FUNCTION to select Telephone.
Press FUNCTION repeatedly until Telephone
appears in the display.
2 Press c or d to switch the telephone
muting/attenuation.
Pressing c or d will switch between
Telephone: ATT (attenuation) and
Telephone: MUTE (muting) and that status
will be displayed.
Initial Settings
En
39
English
Section
09