


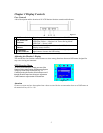


Chapter 1 Installation
Unpacking
Before unpacking the LCD Monitor, prepare a suitable workspace for your Monitor and computer. You need
a stable and clean surface near a wall power outlet. Make sure that LCD Monitor has enough space around it
for sufficient airflow. Though the LCD Monitor uses very little power, some ventilation is needed to ensure
that the Monitor does not become too hot.
After you unpack the LCD Monitor, make sure that the following items were included in the box:
*
*
*
LCD Monitor * User's Manual on CD
1.8M Monitor-to-PC VGA Cable * 1.8M Power Cord
Base
If you find that any of these items is missing or appears damaged, contact your dealer immediately.
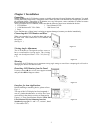
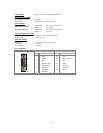
Connecting the LCD Monitor and Base
When you open the box to take the base and put on
the desk first. Then connect the LCD Monitor and
base please.
(See fig.1-1 )
Fi
g
ure 1-1
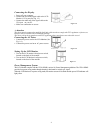
Viewing Angle Adjustment
The LCD Monitor is designed to allow users to
have a comfortable viewing angle. The viewing
angle can be adjusted from -5°to +30°.(See fig.
1-2)
Figure 1-2
Warning
Do not force the LCD Monitor over its maximum viewing angle settings as stated above. Attempting this will result in
damaging the Monitor and Monitor stand.
Detaching LCD Monitor from Its Stand
Unscrew screws n the swivel base support column
and pull downo the hinge to release.
Figure 1-3
Interface for Arm Applications
Before installing to mounting device, please refer to
Fig.1-3.
The rear of this LCD display has four integrated 4
mm, 0.7 pitches threaded nuts, as well as four 5 mm
access holes in the plastic covering as illustrated in
Figure 1-4. These specifications meet the VESA Flat
Panel Monitor Physical Mounting Interface
Standard (paragraphs 2.1 and 2.1.3, version 1, dated
13 November 1997).
Figure 1-4
3