


More Info @ www.polkaudio.com/car
7
DB6750, DB6500, DB5250 & DB1000
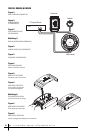
Figure 7
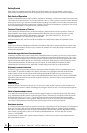
Flush Mounting Component Tweeter
INSTALLATION
PROCEDURES
1. Check for proper clearance: The flush mount kit is
d" (22.2mm) deep.
2. Mark the center of the spot and cut a 2" (50.8mm) diameter hole
using a hole saw, drill bit or razor knife.
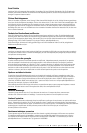
3. Assemble the cup, clamp and machine screws loosely as shown.
4. Route wires through the round opening in the bottom of the cup.
5. Press the assembly into the 2" diameter hole until the clamp edge
is below the mounting surface, then tighten the screw. The legs
of the clamp can be bent outward by inserting a screwdriver
through the holes in the cup while still mounted.
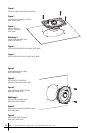
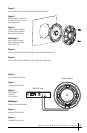
6. Connect wires from the tweeter terminals of the Crossover to the
tweeter itself using the faston connectors. Connect the red wire
from the (+) terminal of the Crossover tweeter output to the red
(+) wire from the tweeter.
7. Mount the tweeter by snapping it into the mounting cup.
Figura 7
Montaje De Tweeter Al Ras
PROCEDIMIENTOS DE INSTALACIÓN
1. Verifique que haya suficiente espacio: el juego de montaje
al ras tiene 22.2 mm (7/8 de plg.) de profundidad.
2. Marque el punto central del lugar y haga un agujero de
50.8 mm (2 plg.) con una sierra caladora, una broca
perforadora o un cuchillo utilitario.
3. Arme la copa, la prensa y los tornillos de máquina sin
apretarlos, tal como se muestra.
4. Encamine los cables a través de la abertura redonda que
hay en la base de la copa.
5. Presione la unidad en el agujero de 50.8 mm (2 plg.) hasta que
el borde de la prensa quede debajo de la superficie de montaje,
luego apriete los tornillos. Las patas de la prensa se pueden
doblar hacia afuera insertando un atornillador a través de los
agujeros de la tapa montada.
6. Conecte cables desde las terminales de tweeter del crossover
hasta el propio tweeter con conectores faston. Conecte el cable
rojo de la terminal (+) de la salida de tweeter del crossover al
cable rojo (+) del tweeter.
7. Monte el tweeter haciéndolo encajar a presión en
la copa de montaje.
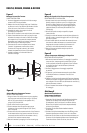
Figura 7
Tweeter Componente A Montaggio Incassato
PROCEDURA DI INSTALLAZIONE
1. Verificare che lo spazio sia adeguato: la profondità del
kit per il montaggio incassato è 22,2 mm.
2. Contrassegnare il centro e tagliare un foro di 50,8 mm di
diametro con una sega, con un trapano o con una lama di rasoio.
3. Montare l’alloggiamento, il morsetto e le viti come mostrato
in figura, senza serrare.
4. Instradare i cavi attraverso l’apertura circolare nel lato
inferiore dell’alloggiamento.
5. Premere l’assemblaggio attraverso il foro da 48 mm fino a
quando il bordo del morsetto si trova al di sotto della superficie
di montaggio, quindi serrare la vite. I lati del morsetto possono
essere allargati inserendo un cacciavite attraverso i fori
presenti nell’involucro mentre è ancora montato.
6. Collegare i cavi dai terminali tweeter del Crossover al tweeter
utilizzando i connettori ad aggancio rapido faston. Collegare il
cavo rosso dal terminale (+) dell'uscita tweeter crossover al
cavo rosso (+) del tweeter.
7. Fissare il tweeter bloccandolo nell'alloggiamento di montaggio.
Abbildung 7
Bündige Installation Von Komponenten-Hochtönern
INSTALLATIONSVERFAHREN
1. Prüfen Sie, ob genug Freiraum da ist: Der Kit zur bündigen
Installation ist 22,2 mm tief.
2. Markieren Sie den Mittelpunkt und schneiden Sie mit einer
Lochsäge, einem Bohrer oder einem Teppichmesser ein Loch mit
50,8 mm Durchmesser.
3. Kombinieren Sie den Becher, die Klammer und die Schrauben
lose, wie in der Abbildung gezeigt.
4. Führen Sie die Kabel durch die runde Öffnung unten am Becher.
5. Drücken Sie die Baugruppe in das Loch mit 2 Zoll (50,8 mm)
Durchmesser, bis die Kante der Klammer sich unter der
Montageebene befindet, und drehen Sie dann die Schraube fest.
Die Arme der Klammer können nach außen gebogen werden,
indem Sie einen Schraubenzieher durch die
Löcher im Becher einführen, während dieser noch montiert ist.
6. Verbinden Sie die Drähte von den Hochtöneranschlüssen am
Crossover mit dem Hochtöner selbst unter Verwendung der
Faston-Anschlüsse. Verbinden Sie den roten Draht vom (+)
Anschluss des Crossover-Hochtönerausgangs mit dem
roten (+) Draht am Hochtöner.
7. Befestigen Sie den Hochtöner, indem Sie ihn in den
Montagebecher einrasten lassen.
Figura 7
Instalação embutida do tweeter
PROCEDIMENTOS DE INSTALAÇÃO
1. Verifique se há espaço adequado: O kit de montagem embutida
tem 22,2 mm (7/8 pol.) de profundidade.
2. Marque o centro do local de instalação e corte um orifício com
diâmetro de 50,8 mm (2 pol.) usando uma serra copo, uma broca
ou um estilete.
3. Monte a base, a presilha e os parafusos sem apertar,
como ilustrado.
4. Passe os cabos através da abertura redonda situada na parte
inferior da base.
5. Pressione o conjunto no orifício de 50,8 mm (2 pol.) de diâmetro
até que a borda da presilha esteja abaixo da superfície de mon-
tagem e depois aperte o parafuso. Para dobrar as extremidades
da presilha para fora, basta inserir uma chave de fenda através
dos orifícios na base.
6. Conecte os cabos dos terminais do tweeter do crossover ao
próprio tweeter usando os conectores faston. Conecte o cabo
vermelho do terminal (+) da saída do tweeter do crossover
no cabo vermelho (+) do tweeter.
7. Monte o tweeter encaixando-o na base de montagem.