


INSTALLATION
The performance of your new PrecisionPower Component
Loudspeaker system is directly proportional to the quality of
installation. Care taken during the installation process will be
rewarded with years of satisfying performance. If you are un-
sure about your installation capabilities, please refer to your
local Authorized PrecisionPower Dealer for technical assis-
tance. If you decide to install the speaker system yourself,
please read the entire owner’s guide before beginning your
installation.
TOOLS OF THE TRADE
Listed below are tools you may wish to have on hand before
starting your installation. Having the proper tools will make the
installation much easier. Some of these tools are necessities,
some will just make the job easier.
• Marking Pen • Phillips Screwdriver
• Electric Drill • Volt/Ohm Meter (Optional)
• 1/4" Drill Bit • Assorted Tin Snips
• 1/8" Drill Bit • Wire Cutters
• 3/8" Drill Bit • Wire Crimpers
• Hole Saw Arbor • Wire Strippers
• 4¾" Hole Saw (5¼” woofer install.) • Razor Knife (Optional)
• 5¾" Hole Saw (6½" woofer install.)
• 1¾" Hole Saw (for flush mount tweeter install.)
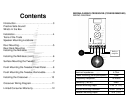
FINDING SPEAKER MOUNTING LOCATIONS
Choosing the correct speaker locations can have a significant
effect on the sound quality of the system. There are many dif-
ferent considerations for choosing the locations that best suit
your needs. The locations must be large enough for the
speakers to fit without interfering with other vehicle parts such
as window mechanisms, etc. Care is needed to ensure that
the location you have chosen will not affect any of the me-
chanical or electrical operations of the vehicle. If minimal intru-
sion in your vehicle is desired, factory speaker locations may
be the ticket for you. Placing the speaker in the factory loca-
tion can often give you very desirable results. Alternative loca-
tions to consider include mounting in customized kick panels,
rear decks, or side panels.
FLUSH MOUNTING THE TWEETER
FIXED PANELS
Step 1: Determine the tweeter mounting location, then route
the wires from the crossover to the tweeter location.
Step 2: Mark the center point of the tweeter location.
Step 3: If using a hole saw, first drill a pilot hole, then cut out
the hole using a standard 2-1/8" hole saw.
Step 4: If not using a hole saw, use either the cardboard
packaging for the tweeters or the surface mount trim ring as a
template to mark the proper size hole. Cut out the hole.
Step 5: Remove the tweeter from the flush mount housing
and insert the proper length machine bolt through the center
hole of the housing.
Step 6: Connect the speaker wires observing the correct po-
larity.
Step 7: Screw the bolts in until the tweeter housing is firmly
mounted to the panel. (Make sure the arrow at the rear of the
tweeter housing is pointing in the desired direction.)
Step 8: Insert the tweeter into the housing and attach trim
ring.