


Diagram 2
Diagram 3
Diagram 4
Diagram 5
Diagram 6
Diagram 7
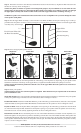
Step 2: Thread the end of the Lower Pillar (b) with the Base Nut down into the Base (a). Tighten the Base Nut down onto
the Base as necessary, shown in Diagram 2.
NOTE: The pillars are hollow for speaker wire management purposes. If you would like to use the stands for wire
management, run the speaker wire up through the Base and the Lower Pillar. Next continue to run the wire through
the upper pillar assembly and out the oval hole in the back of the Upper Pillar before continuing onto Step 3.
WARNING: Speaker wire should be disconnected from the receiver or amplifier when you run it through the center
of the speaker stand pillars.
Step 3: Slide the Upper Pillar Assembly (c) down into the Lower Pillar (b). Make sure the pole retaining ring is on the Up
-
per Pillar under the plastic connector as shown in Diagram 3. Turn the plastic connector clockwise to hold the Upper Pillar
Assembly at any desired height.
b Upper Pillar
End of Lower Pillar with Plastic Connector
the Base Nut attached
Pole Retaining Ring
b
a
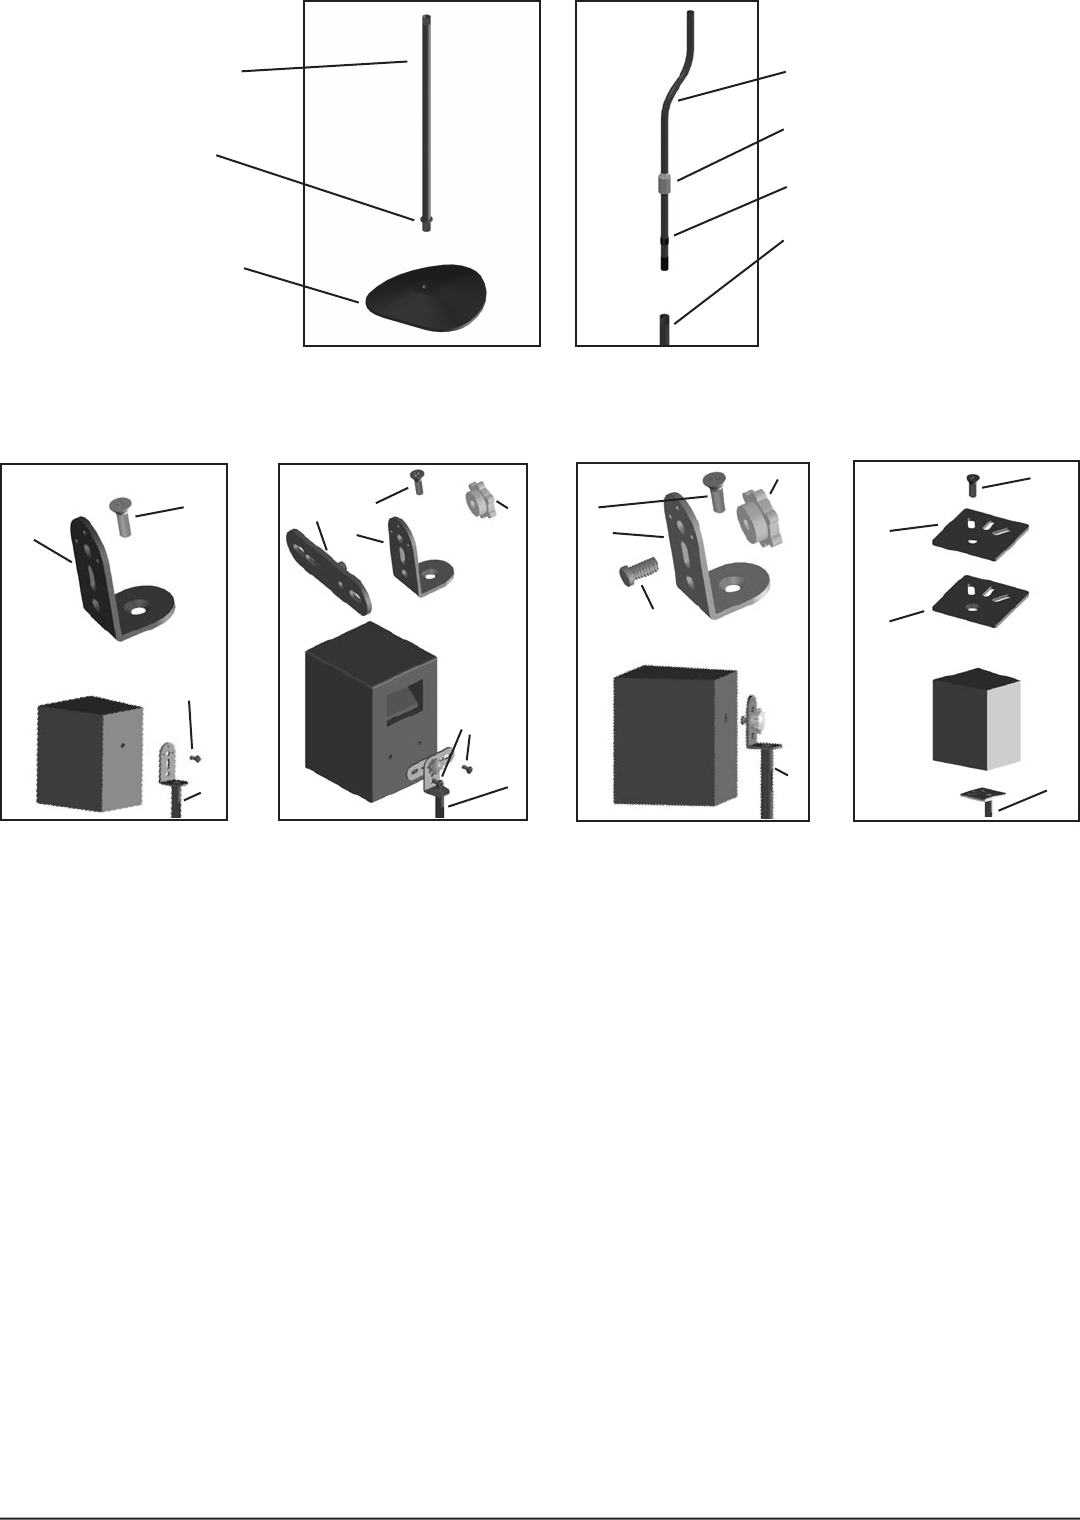
Step 4: Choose the appropriate speaker mount:
Single Bolt Double Bolt Keyhole Bottom Bolt
on Back on Back on Back / No Bolt
h d
d j d h d
g g g f
i e
k,l
k
c c c c
Place the Flat Head Bolt (d) down through either the L Bracket (g) or the Top Plate (e) depending on your speaker mount
attachment and thread it into the top of the Upper Pillar (c). Tighten the Flat Head Bolt with a philips screw driver.
NOTE: The bracket should be positioned so that the curve on the Upper Pillar allows the speaker to be centered over
the Lower Pillar.
Step 5: Attach your speakers.
NOTE: Hardware for the most common speakers is supplied. Other hardware may be required and can be found at
your local hardware store.
Single Bolt on Back: Place correct Speaker Attachment Bolts (k,l) through the L Bracket (g) and thread it into your speaker
so that your speaker hangs on the flat side of the L Bracket as Shown in Diagram 4 above.
Double Bolt on Back: Attach the Double Bolt Bracket (j) to the L Bracket (g) with the Knob (h). Place the correct Speaker
Attachment Bolts (k) through the Double Bolt Bracket and thread them into the speaker as shown in Diagram 5 above.
Keyhole on Back: Insert the Keyhole Bolt (i) through the narrow opening on the L Bracket (g) and thread it into the Knob
(h). The head of the Keyhole Bolt should fit into the keyhole opening on your speaker. Slide the speaker down on the Key
-
hole Bolt and secure it to the stand by tightening the Knob as shown in Diagram 6 above.
Bottom Bolt / No Bolt: Remove the backing from one side of the Double Stick Pad (f) and attach it to the Top Plate (e) so
that the hole patterns in each part line up. Remove the backing from the other side of the Double Stick Pad. If the speaker has
a bottom bolt attachment make sure the threaded hole lines up with one of the slots in the Top Plate and fasten the speaker
with a Speaker Attachment Bolt (k,l). Press the speaker onto the pad. The Double Stick Pad will hold your speaker securely
in place as shown in Diagram 7 above.
Sanus Systems 2221 Hwy 36 W, Saint Paul, MN 55113 04.15.05
Customer Service: 800.359.5520. See complimentary Sanus products at www.sanus.com