1-4(E)
AMS-100
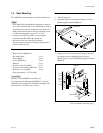
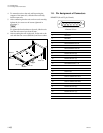
4. To mount the unit on the rack, while pressing the
stoppers of the inner rails, slide the inner rails fully
into the outer rails.
5. After confirming that the unit can be moved smoothly,
tighten the six screws run in but not tightened in
procedure 3.
n
To tighten the front brackets to the rack, slide the unit
from the rack toward you about 20 mm.
6. After mounting the unit on the rack, fix the unit to the
rack with the four screws (RK5x16) and four washers.
1-5. Pin Assignment of Connectors
REMOTE (D-sub 25-pin, Female)
_External View_
Pin No. Signal
1 REM-A IN
2 REM-B IN
3 REM-CH.SELECT L1 IN
4 REM-CH.SELECT L2 IN
5 REM-CH.SELECT R1 IN
6 REM-CH.SELECT R2 IN
7 GND
8 MONITOR OUT 2(H)
9 MONITOR OUT 2(C)
10 MONITOR OUT 1(H)
11 MONITOR OUT 1(C)
12 REM-GROUP SEL. 1 IN
13 REM-GROUP SEL. 2 IN
14 STS-A OUT
15 STS-B OUT
16 STS-CH. SELECT L1 OUT
17 STS-CH. SELECT L2 OUT
18 STS-CH. SELECT R1 OUT
19 STS-CH. SELECT R2 OUT
20 STS-GROUP SEL. 1 OUT
21 MONITOR OUT 2(G)
22 REM-ENABLE 2 IN
23 MONITOR OUT 1(G)
24 STS-GROUP SEL. 2 OUT
25 REM-ENABLE 1 IN
RK 5x16
RK 5x16
Washer
Washer
Inner rail
Stopper
Outer rail
13 1
25
14
1-4. Rack Mounting
1-5. Pin Assignment of Connectors


