


Installation InstalaciónInstallation ###
CDX- 91
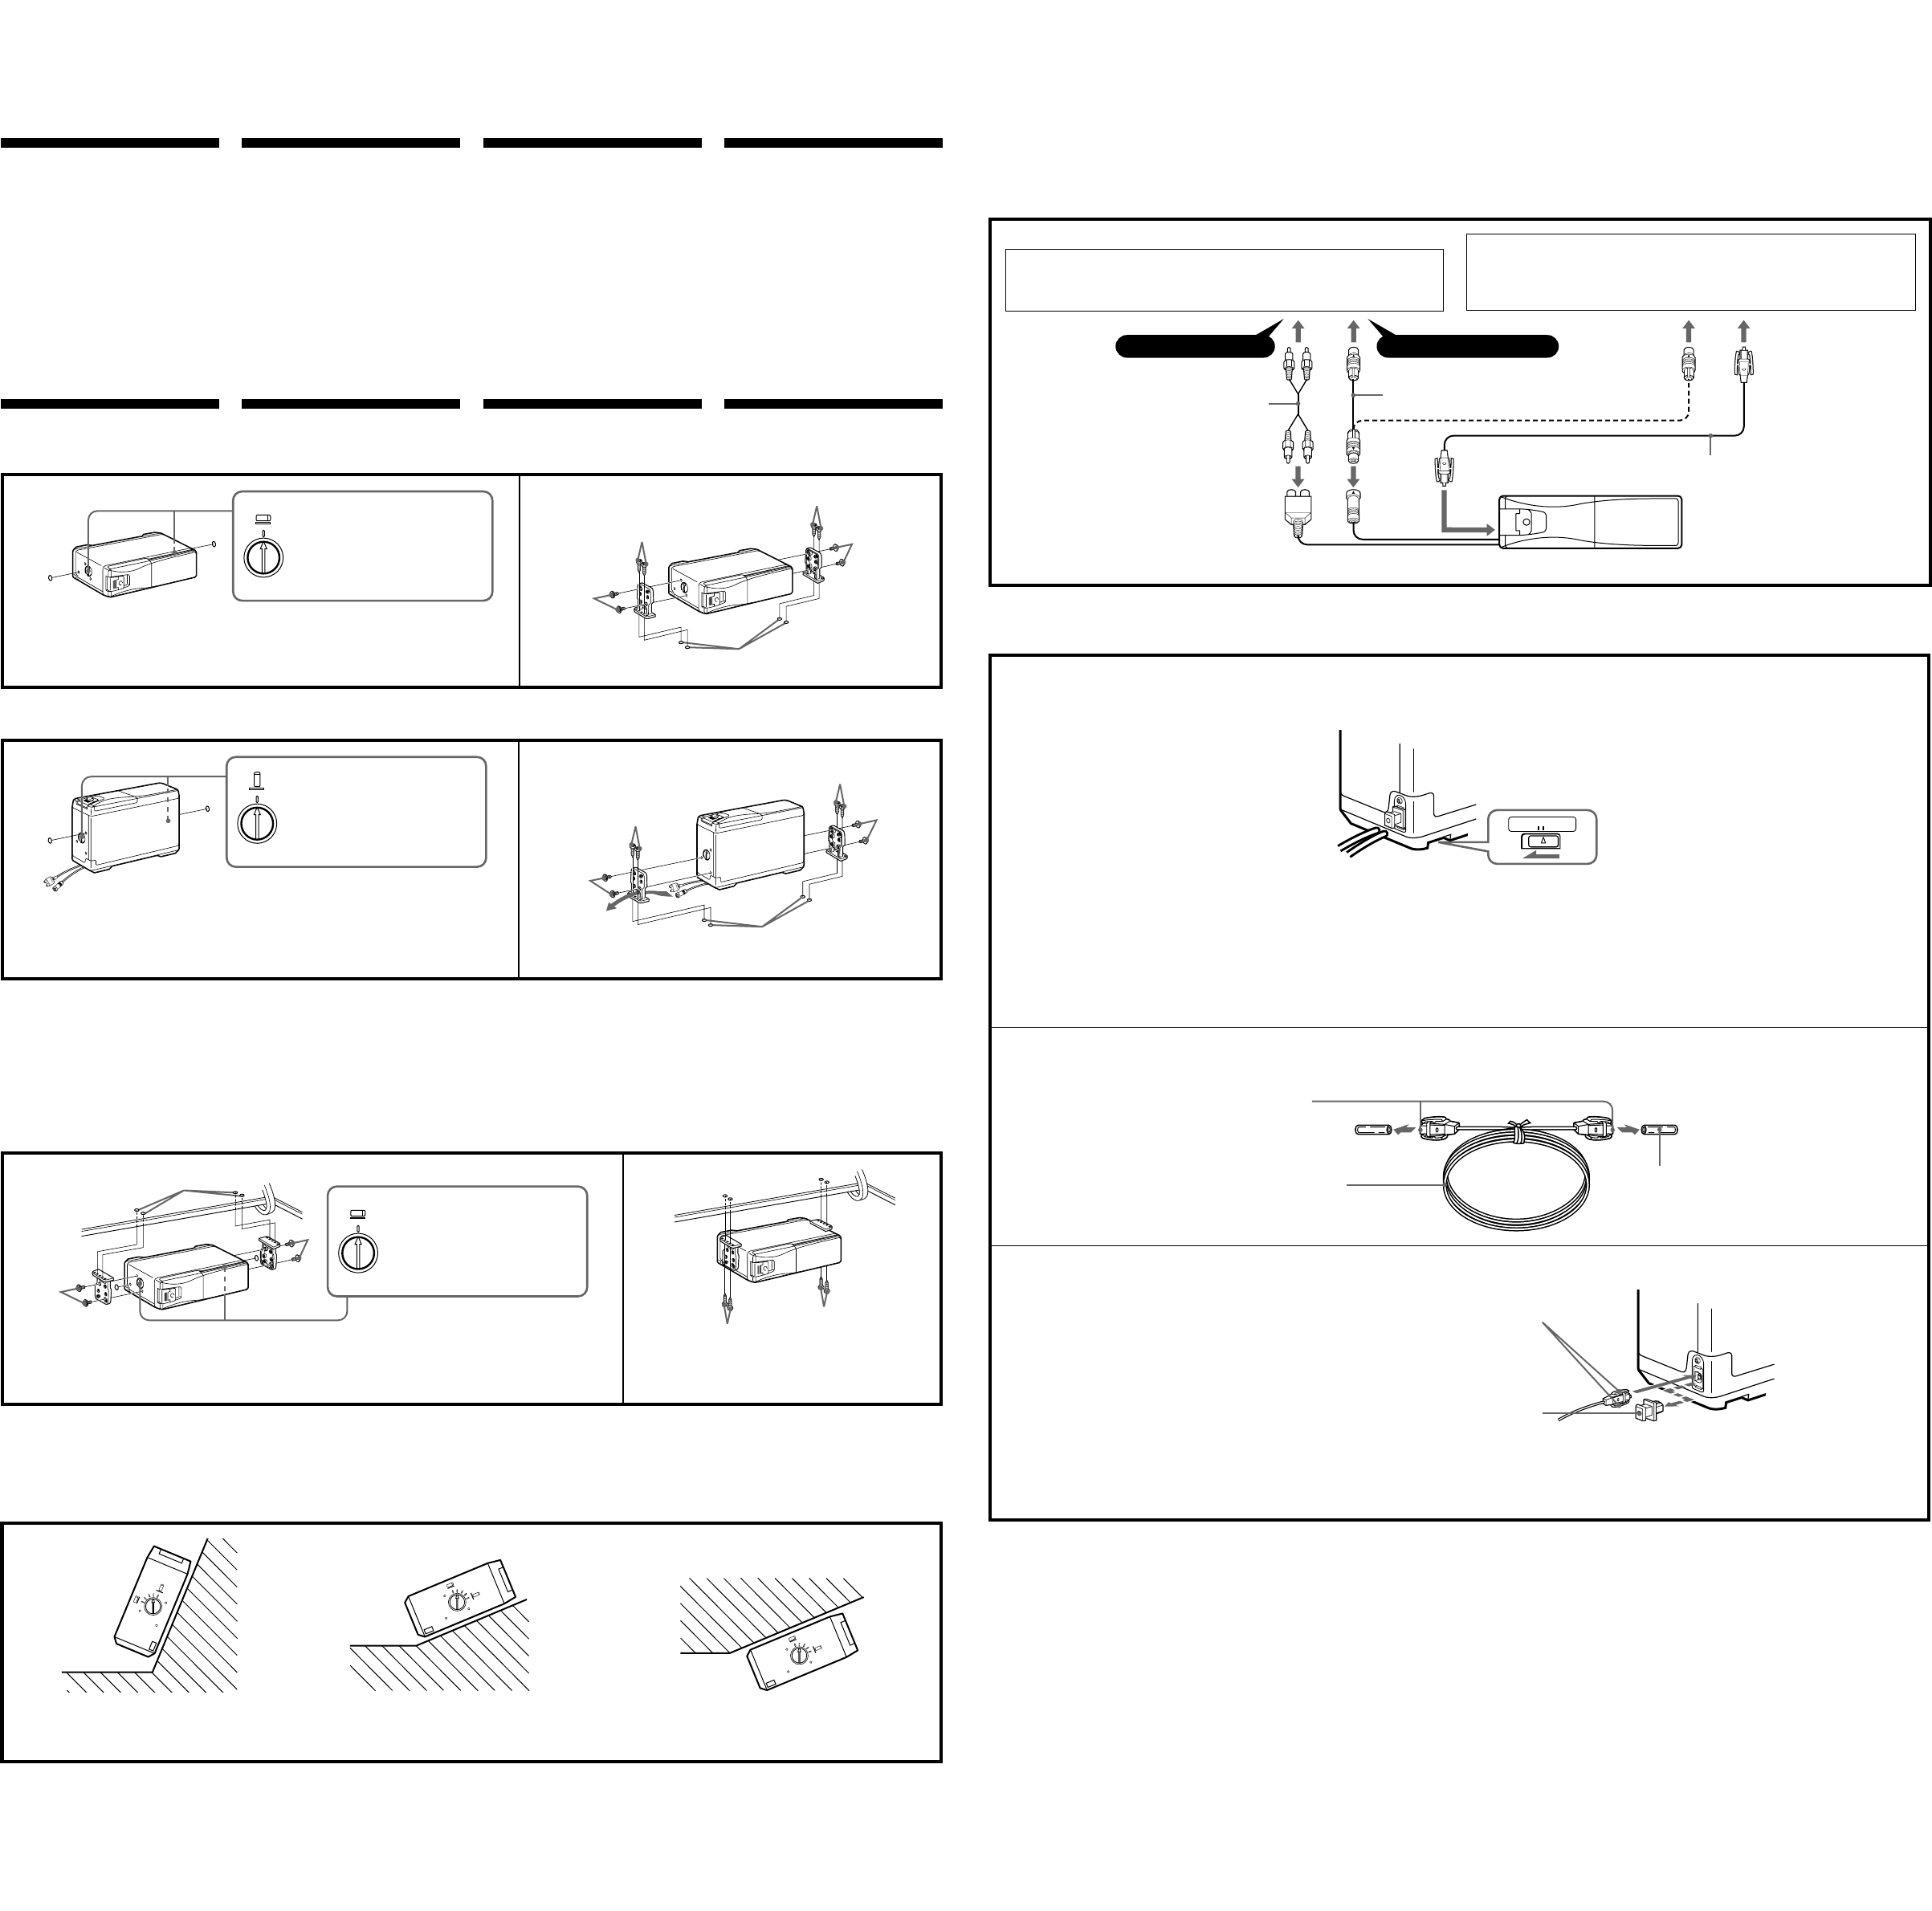
BUS cable (supplied)
Câble BUS (fourni)
Cable BUS (suministrado)
##
to car audio or source selector compatible with Sony BUS optical digital
transmission system
###
###
###
to car audio, TV tuner or source selector compatible with Sony BUS system
###
###
###
RCA pin cord (supplied)
Cordon à broche RCA (fourni)
Cable con clavijas RCA (suministrado)
##
Optical cable (not supplied)
Câble optique (non fourni)
Cable óptico (no suministrado)
##
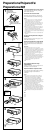
Connection of the Optional
Optical Cable (RC-98 etc.)
Connections Connexions Conexiones ###
For details, refer to the
Installation/Connections manual
of each product.
Pour plus de détails, consulter le
manuel d’installation/connexions
de chaque produit.
Con respecto a los detalles,
consulte el manual de
instalación/conexiones de cada
producto.
###/###
Connexion du câble optique
optionnes (RC-98 etc.)
Conexión de un cable óptico RC-
98, etc. (no suministrado)
### (###)
1
Set the DIGITAL/ANALOG switch on the rear of the CD changer to DIGITAL.
###
###
###
ANALOGDIGITAL
Notes
• This switch is factory-set to the ANALOG
position.
• After changing the position of the switch,
be sure to press the reset button on the
master unit.
• Improper setting of the switch may prevent
any sound to be reproduced even when the
CD changer is activated.
###
• ###
• ###
• ###
###
• ###
• ###
• ###
Remarques
• Ce sélecteur est préréglé en usine sur la
position ANALOG (analogique).
• Quand la position du sélecteur a été
changée, appuyer sur la touche de
réinitialisation sur l’appareil principal.
• Un réglage incorrect du sélecteur peut
empécher la reproduction du son méme
quand le changeur de CD fonctionne.
2
Optical cable (not supplied)
Câble optique (non fourni)
###
###
Do not touch the coupler parts.
Ne pas toucher les pièces du coupleur.
###
###
Protective tubes (to be removed)
Tubes de protection (à enlever)
###
###
3
When you wish to disconnect the cable, simply push both sides of the connector.
Pour débrancher le câble, appuyer simplement sur les deux côtés du connecteur.
###
###
Protective cap (Remove and retain it for future use.)
Cache de protection (L’enlever et le conserver en cas de besoin ultérieurement.)
###
###
##
##
Precauciones
• Elija cuidadosamente el lugar de montaje,
teniendo en cuenta lo siguiente:
— El depósito de combustible no deberá
dañarse con los tornillos autorroscantes.
— No deberá haber mazos de conductores
ni tubos debajo del lugar donde vaya a
instalar la unidad.
— La rueda de repuesto, las herramientas,
u otros equipos situados dentro o
debajo del portaequipajes no deberán
verse interferidos ni dañados por los
tornillos ni por la propia unidad.
• Para realizar una instalación segura,
emplee solamente la ferretería de montaje
suministrada.
Précautions
• Choisir l’emplacement de montage en
tenant compte des observations suivantes:
— Vérifier que le réservoir d’essence ne
risque pas d’être endommagé par les
vis taraudeuses.
— Il ne doit pas y avoir de faisceau de
fils ou de tuyaux à l’emplacement du
montage.
— Vérifier que l’appareil ou les vis ne
risquent pas d’endommager ou de
gêner la roue de secours, les outils, ou
tout autre objet dans le coffre.
• Pour garantir la sécurité de l’installation,
utiliser uniquement le matériel de
montage fourni.
Precautions
• Choose the mounting location carefully,
observing the following:
— The fuel tank should not be damaged
by the tapping screws.
— There should be no wire harnesses or
pipelines under the place where you
are going to install the unit.
— The spare tire, tools or other
equipment in or under the trunk
should not be interfered with or
damaged by the screws or the unit
itself.
• Be sure to use only the supplied
mounting hardware for a safe and secure
installation.
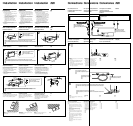
How to Install the Unit
Horizontal installation
Installation de l’appareil
Installation horizontale
Forma de instalar la unidad
Instalación horizontal
###
###
2
1
HORIZONTAL
D
Align with the marked position.
Aligner sur le repère.
Alinee en la posición marcada.
##
Before installing the unit in your car, cover the holes which are not to be used.
Avant d’installer l’appareil dans la voiture, recouvrir les orifices qui ne seront pas utilisés.
###
###
D
C
B
B
C
φ3.5 mm
A
A
Vertical installation
Instalación vertical ###Installation verticale
2
1
VERTICAL
D
Align with the marked position.
Aligner sur le repère.
Alinee en la posición marcada.
##
D
A
B
C
C
B
A
φ3.5 mm
##
##
Suspended installation
When the unit is to be installed under the rear
tray etc. in the trunk room, make sure that the
following provisions are made.
• Choose the mounting location carefully
so that the unit can be installed
horizontally.
• Make sure that the unit does not hinder
the movement of torsion bar spring etc. of
the trunk lid.
Installation suspendue
Si l’appareil doit être installé sous la plage
arrière dans le coffre par exemple, observer
les précautions suivantes.
• Bien choisir l’emplacement pour pouvoir
installer l’appareil à l’horizontale.
• Vérifier que l’appareil ne gêne pas les
mouvements du ressort de fermeture du
coffre, entre autres.
Instalación suspendida
Cuando desee instalar la unidad debajo de
la bandeja trasera, etc. en el interior del
portaequipajes, tenga en cuenta lo siguiente:
• Elija cuidadosamente el lugar de montaje
de forma que la unidad pueda instalarse
horizontalmente.
• Cerciórese de que la unidad no impida el
movimiento del resorte de la barra de
torsión, etc., de la tapa del portaequipajes.
2
1
C
C
HORIZONTAL
A
D
D
A
B
φ3.5 mm
Align with the marked position.
Aligner sur le repère.
Alinee en la posición marcada.
##
B
Before installing the unit in your car, cover the holes which are not to be used.
Avant d’installer l’appareil dans la voiture, recouvrir les orifices qui ne seront pas utilisés.
###
###
Before installing the unit in your car, cover the holes which are not to be used.
Avant d’installer l’appareil dans la voiture, recouvrir les orifices qui ne seront pas utilisés.
###
###
Inclined installation
After installing the unit, align the dial with
one of the marks so that the arrow comes as
close to a vertical position as possible.
Instalación sobre una
superficie inclinada
Después de instalar la unidad, alinee el dial
con una de las marcas, de forma que la flecha
quede orientada en posición vertical tanto
como sea posible.
##
##
Installation inclinée
Après avoir installé l’appareil, alignez le
disque sur l’un des repères afin que la
flèche soit aussi proche que possible de la
position verticale.
H
O
R
IZ
O
N
T
A
L
V
E
R
T
I
C
A
L
H
O
R
I
Z
O
N
T
A
L
VERTICAL
HO
R
IZO
N
T
A
L
V
E
R
TIC
A
L
Note
Be sure to align the left and right dials with
the same mark.
Remarque
Veillez à aligner les disques gauche et droite
sur le même repère.
Nota
Asegúrese de alinear los diales derecho e
izquierdo con la misma marca.
##
##
Note
Remove the protective cap, and firmly plug
in the connector.
###
###
###
###
Remarque
###
Notes on the optical cable
Observe the following when connecting the
cable:
— Do not force to bend the cable too much so
that the bent part (arc) becomes less than 5
cm in radius. If you do so, sound may not be
reproduced.
— Make sure that the cable does not get
squeezed or constricted in any way by
objects around it.
— Never let the coupler parts of the connectors
get scratched or become contaminated with
dirt.
— If not connected to a car audio compatible
with Sony BUS optical digital transmission
system, reinstall the protective cap to its
original position.
— Use an optical cable designed for Sony car
audio systems.
— Not all optical cables can be used with this
CD changer.
Remarques sur le câble optique
Lors de la connexion du câble:
— Ne pas forcer sur le câble en le pliant et
vérifier que l’arc (la partie courbée) ne fasse
pas monis de 5 cm de rayon, sinon le son
risque d’étre inaudible.
— Vérifier que le câble n’est pas coincé ni
écrasé par des objets.
— Protéger les pièces du coupleur des
égratignures eet de la saleté.
— ###
— ###
— ###
###
###
— ###
— ###
— ###
— ###
— ###
— ###
###
###
— ###
— ###
— ###
— ###
— ###
— ###
BUS AUDIO IN
BUS CONTROL IN