


13
G:\SONY\09 ME\844488S_CDX-
GT620U_EUR\0919\3275494221\327549422CDXGT620UEUR\01US02CD-EUR.fm
masterpage:RightG:\SONY\09 ME\844488S_CDX-
GT620U_EUR\0919\3275494221\327549422CDXGT620UEUR\01US02CD-EUR.fm
masterpage:Right
CDX-GT620U
3-275-494-22 (1)
Other functions
Changing the sound settings
Adjusting the sound
characteristics
1 Press the select button repeatedly
until the desired item appears.
2 Rotate the control dial to adjust the
selected item.
After 3 seconds, the setting is complete and
the display returns to normal play/reception
mode.
The following items can be set (follow the page
reference for details):
“
z” indicates the default settings.
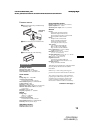
Customizing the equalizer curve
— EQ3
“CUSTOM” of EQ3 allows you to make your
own equalizer settings.
1 Select a source, then press the select
button repeatedly to select “EQ3.”
2 Rotate the control dial to select
“CUSTOM.”
3 Press the select button repeatedly
until “LOW,” “MID” or “HI” appears.
4 Rotate the control dial to adjust the
selected item.
The volume level is adjustable in 1 dB steps,
from –10 dB to +10 dB.
Repeat steps 3 and 4 to adjust the equalizer
curve.
To restore the factory-set equalizer curve,
press and hold the select button before the
setting is complete.
After 3 seconds, the setting is complete and
the display returns to normal play/reception
mode.
Tip
Other equalizer types are also adjustable.
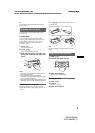
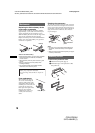
Adjusting setup items — SET
1 Press and hold the select button.
The setup display appears.
2 Press the select button repeatedly
until the desired item appears.
3 Rotate the control dial to select the
setting (example “ON” or “OFF”).
4 Press and hold the select button.
The setup is complete and the display returns
to normal play/reception mode.
Note
Displayed items will differ, depending on the source
and setting.
The following items can be set (follow the page
reference for details):
“
z” indicates the default settings.
EQ3
To select an equalizer type: “XPLOD,”
“VOCAL,” “EDGE,” “CRUISE,” “SPACE,”
“GRAVITY,” “CUSTOM” or “OFF (
z).”
DSO
To select the DSO mode: “1,” “2,” “3” or “OFF
(
z).” The larger the number, the more enhanced
the effect.
LOW*
1
, MID*
1
, HI*
1
(page 13)
To customize the equalizer curve.
BAL (Balance)
To adjust the balance between the right and left
speakers: “RIGHT-10” – “CENTER” (
z) –
“LEFT-10”
FAD (Fader)
To adjust the balance between the front and rear
speakers: “FRONT-10” – “CENTER” (
z) –
“REAR-10”
SUB (Subwoofer volume)
To adjust the subwoofer volume: “+10 dB” –
“0 dB” (
z) – “–10 dB”
(“ATT” is displayed at the lowest setting.)
AUX*
2
(AUX level)
To adjust the volume level for each connected
auxiliary equipment. This setting negates the
need to adjust the volume level between sources
(page 14).
Adjustable level: “+18 dB” – “0 dB” (
z) –
“–8 dB”
*1 When EQ3 is activated.
*2 When AUX source is activated.
CLOCK-ADJ (Clock Adjust) (page 4)
CT (Clock Time)
To set “CT-ON” or “CT-OFF” (z) (page 10, 11).
BEEP
To set “BEEP-ON” (z) or “BEEP-OFF.”
AUX-A*
1
(AUX Audio)
To turn the AUX source display “AUX-A-ON”
(
z) or “AUX-A-OFF” (page 14).
continue to next page t