


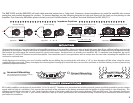
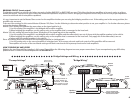

WIRING
Due to the power output and the low frequency bandwidth of the Class "D" amplifiers, Crossfire recommends using a minimum of high quality 12 gauge speaker wire.
Consult your local dealer for their recommendations.
SPEAKER OUTPUTS
SPEAKER OUTPUTS
As with the power wires, use caution around sharp corners or body parts that may easily cut through the insulation on the wire. To connect the wire to the speaker,
strip off approximately ½" (12mm) of the insulation and terminate the wires using insulated speaker terminals (not supplied) or by soldering the connection to the
loudspeaker. Be sure that the polarity at the loudspeaker is correct.
At this point, the power, ground, remote and speaker wires should be run to the general location of where the amplifier is to be mounted. If the wires are to be hidden
under the carpet, you now need to cut a slit for them to come through. To do this, place the amplifier in the location it is to be mounted to verify where the cuts need
to be made. Make sure that there will be not be a conflict with the mounting of the amplifier and the wires. Pull the wires through the slit to the terminals leaving
approximately 6" (150mm) of slack and cut the wires to an equal length. Strip off approximately ½" (12mm) of insulation from each wire. Insert the wires directly into
the terminal and tighten the set screw using a 3mm allen key. Make sure you have the polarity correct on both the power wires and the speaker wires. Check your
connections by giving the wires a slight tug.
CONNECTING THE WIRES
CONNECTING THE WIRES
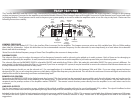
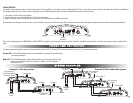
SIGNAL INPUTS
SIGNAL INPUTS
Getting a clear signal from the head unit to the amplifier is very important. To achieve this, the proper signal cables must be used. Estimate the length of the cables
necessary. Take note that the cable manufacturers will probably not be the exact length necessary for your vehicle. If you are between sizes, purchase the longer cable.
You can always hide the extra wire.
Be aware off the differences in cable. Better RCA's usually have multiple layers of shielding and/or twisted pair wiring for better noise rejection. Consult your local
dealer for their recommendations.
LINE LEVEL INPUTS
Car environments are notorious for poorly insulated wires. This means that hiss, engine noise, and fan noise can easily be picked up through RCA cables if ran
incorrectly. To avoid picking up noise, run the RCA's away from large wire looms and electric fans if possible. And always make sure to position your patch cables away
from the power wire, preferably on the opposite side of the vehicle. As with the power wire, use caution around sharp corners of body parts that may easily cut
through the cables.
Located on the opposite side of the power terminals are three sets of line level (RCA) receptacles. Marked "LOW IN", these receptacles accept signal from the outputs of
the source unit via RCA patch cables. When connecting the signal cables, be sure the balance (left and right) stays consistent between the amplifier and head unit. The
cables should be marked for easy installation: red is right and black or white is left.
Once you have finished connecting the signal cables to the source unit, slide the head unit back into the dash location. Make sure that the head unit is in securely.
4