


Instruction Manual
5
(Optional) Point to Point Hardware Installation without Gigabit LAN Network
NOTE: While range is reduced to a maximum of 330 feet (100 Meters) the
ST12MHDLAN HDMI® extender kit also allows for extending the signal without a
Gigabit LAN Network by connecting the Transmitter directly to the Receiver using
CAT5e/6 cabling. This also eliminates the ability to add additional Receivers.
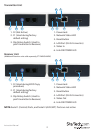
1. Install Transmitter Unit
d) Position the Transmitter Unit near the video source (i.e. Computer, Blu-ray Player).
e) Connect an HDMI® cable from the video source device (i.e. computer, Blu-ray
Player) to the “HDMI IN” on the Transmitter Unit.
f) Connect the provided Transmitter Unit power supply.
2. Install Receiver Unit(s)
e) Position the Receiver Unit(s) near the video display (i.e. television, projector).
f) Connect an HDMI® cable from the display Input to the “Video Out” port on the
Receiver Unit.
g) Connect the provided Receiver Unit power supply.
NOTE: The “Dip Rotary Switch” on the Extender and Receiver connected must be set in
the same position for the devices to communicate.
3. Install RJ-45 terminated Cat5e/6 Ethernet Cable
d) Connect an RJ-45 terminated Cat5e/6 Ethernet cable to the HDMI® Out Link
(RJ-45 Connector) on the Transmitter unit.
NOTE:
If you are using surface cabling, ensure you have enough Category 5e/6 unshielded
twisted pair (UTP) network cabling to connect the Transmitter Unit to the Receiver
Unit’s location, and that each end is terminated with a RJ45 connector.
OR
If you are using premises cabling, ensure that the Category 5e/6 unshielded twisted
pair (UTP) network cabling between the Transmitter and Receiver Units have been
properly terminated in a wall outlet in each location and there is a patch cable long
enough to connect the Remote Unit and the Host Unit to their respective outlets.
e) Connect the other end of the Cat5/6 cable run to the RJ45 connector on the
remote Unit Receiver Unit.
4. Your source video image will now appear on the remote unit(s) attached
video display.