


2
1
2
CAUTION:CAUTION:
CAUTION:CAUTION:
CAUTION:
Do NOT under any circumstances plug the
severed plug into any mains socket as this
could result in electric shock.
Do NOT make any connection to the terminal
in the plug which is marked by the letter E or
by the earth symbol or coloured green
and yellow.
A fuse plug must be fitted with a 3A fuse
approved by ASTA or BSI to BS 1362 and fuse
covers must always be securely replaced. If
your RR-200PLL/RR-200PLM does not work,
the fuse may be blown.
Connect the
power cord into
a mains power
socket
230V ~50Hz
MAINS CONNECTIONS (FOR UNITED KINGDOM ONLY)
. Do not use your set immediately after transport from a cold
place to a warm place: there may be condensation problems.
. This set uses a laser beam. To prevent any accident due to this
type of beam, the set should only be opened by properly-
trained personnel.
. Make sure that you keep your set away from water and high
temperatures.
. If you do not use your set on battery power for more than one
month, we advise you to take out all the batteries.
. To prevent personal injury, do not reverse any battery and do
not mix battery types.
USEFUL ADVICE
ECOLOGY
. Help protect the environment - we recommend that you dispose
of used batteries by putting them into specially designed
receptacles.
MAINTENANCE
. Clean the unit with a soft cloth, or a damp chamois leather.
Never use solvents.
THE DIGITAL TUNING CLOCK RADIO
SET
ALARM/
CLOCK
MEMO
HOUR ADJ MINUTE
[TUNING]
Digital Tuning Radio
M1/M6
M2/M7
M3/M8 M4/M9
M5/M10
SNOOZE
Press until and show
SET
WAKE/
CLOCK
1
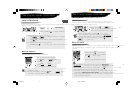
Press t o set minute
Press t o set hour
Setting time
Press t o complete the setting
SET
WAKE/
CLOCK
4
41
2
2
3
3
+
-
Press to select FM/LW
(RR-200PLL) or FM/MW (RR-200PLM)
BAND
2
• Press and hold or
to skip fast
+
-
WAKE 1
WAKE 2
NAP SLEEP
SET
ALARM/
CLOCK
MEMO
HOURADJ MINUTE
[TUNING]
Digital Tuning Radio
M1/M6
M2/M7
M3/M8 M4/M9
M5/M10
SNOOZE
min
max
VOLUME
BAND
INTRO-SCAN
RADIO on•off
ALARM off
HI DISPLAY LO
You may slide at the back of the unit to vary the LCD
display brightness.
Adjusting display brightness
Listening to radio
1
3
2
4
Press o r t o your desired
station
3
+
-
Adjust to your desired
listening level
min
max
VOLUME
4
Press to turn on the radio
1
RADIO on•off
ALARM stop
• To improve reception, you may try and reposition the unit or
extend the FM aerial wire
• Press and hold or for 2 sec to tune automatically
• If stations are in memory (see “Setting memory” for refer-
ence), you may skip and above and press the memory
buttons to access the corresponding memorised stations directly
• To turn off the radio, press again
2
3
-
+
RADIO on•off
ALARM stop
Untitled-3 7/17/01, 5:21 PM2