ViewSonic VX924 5
Quick Installation
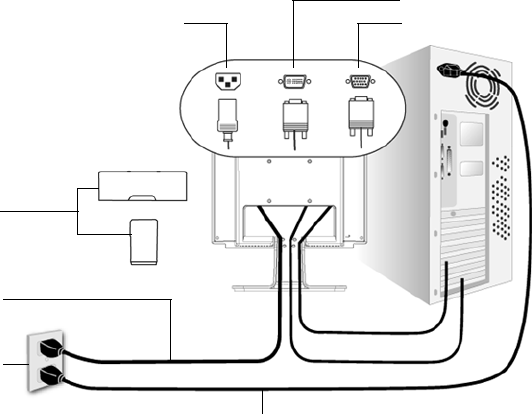
1. Remove two rear panel covers
2. Connect power cord (and AC/DC
adapter if required)
3. Connect video cable
• Make sure both the LCD display and
computer are turned OFF.
• Connect the video cable from the LCD
display to the computer.
Macintosh users: Models older than G3
require a Macintosh adapter. Attach the
adapter to the computer and plug the video
cable into the adapter.
To order a ViewSonic
®
Macintosh adapter,
contact ViewSonic Customer Support.
4. Turn ON LCD display and computer
Turn ON the LCD display, then turn ON
the computer. This sequence (LCD display
before computer) is important.
NOTE: Windows users may receive a
message asking them to install the INF
file. This is on the CD.
5. Insert the ViewSonic Wizard CD into
the computer’s CD drive.
Follow the on-screen instructions. If your
computer does not have a CD-ROM drive,
see “Customer Support” on page 16.
• Wait for the CD-ROM to auto-start.
NOTE: If the CD-ROM does not auto-
start: double-click on the CD-ROM icon in
the Windows Explorer, then double-click
on viewsonic.exe.
• Follow the on-screen instructions.
6. Windows users: Set the timing mode
(resolution and refresh rate)
Example: 1280 x 1024 @ 60 Hz.
For instructions on changing the resolution
and refresh rate, see the graphics card’s
user guide.
Installation is complete. Enjoy your new
ViewSonic LCD display.
To be best prepared for any future
customer service needs: print this user
guide and write the serial number in “For
Your Records” on page 3. (See back of
LCD display.)
You can register your product online at the
ViewSonic website for your region. See
the Customer Support table in this guide.
The ViewSonic Wizard CD-ROM also
provides an opportunity for you to print
the registration form which you may mail
or fax to ViewSonic.
AC IN
DVI
D-SUB
Power Code
AC Outlet
(Wall Socket)
Computer Power Cord
Rear panel
covers


