49
Limited Warranty
Terms of Warranty
TMI Products, Inc (Company) warrants to the original retail purchaser that the
automotive video product(s) purchased from a Company authorized installer,
within the first ninety (90) days after new vehicle delivery, are free from defects in
materials or workmanship under normal use and conditions for a period of three
(3) years from date of purchase or the first 36,000 miles as registered on the
vehicle’s odometer at time of installation, whichever occurs first, with exception of
remote control(s) which is warranted for a period of sixty (60) days from date of
purchase. Products purchased or installed more than ninety (90) after new
vehicle delivery are warranted for a period of one (1) year from date of purchase.
A sales receipt is required to provide proof of date of purchase.
Should the product(s) be determined defective during the applicable warranty
period, the defect(s) will be repaired or replaced with a new or reconditioned
part(s), at the Company’s option.
EXCEPT AS EXPRESSLY SET FORTH IN THIS WARRANTY, THE COMPANY MAKES
NO OTHER WARRANTIES, EXPRESSED OR IMPLIED, INCLUDING ANY IMPLIED
WARRANTIES OF MERCHANTABILITY AND FITNESS FOR A PARTICULAR
PURPOSE. THE COMPANY EXPRESSLY DISCLAIMS ALL WARRANTIES NOT
STATED IN THIS LIMITED WARRANTY. ANY IMPLIED WARRANTIES THAT MAY
BE IMPOSED BY LAW ARE LIMITED TO THE TERMS OF THIS EXPRESSED
LIMITED WARRANTY.
Controls
Remote Control:
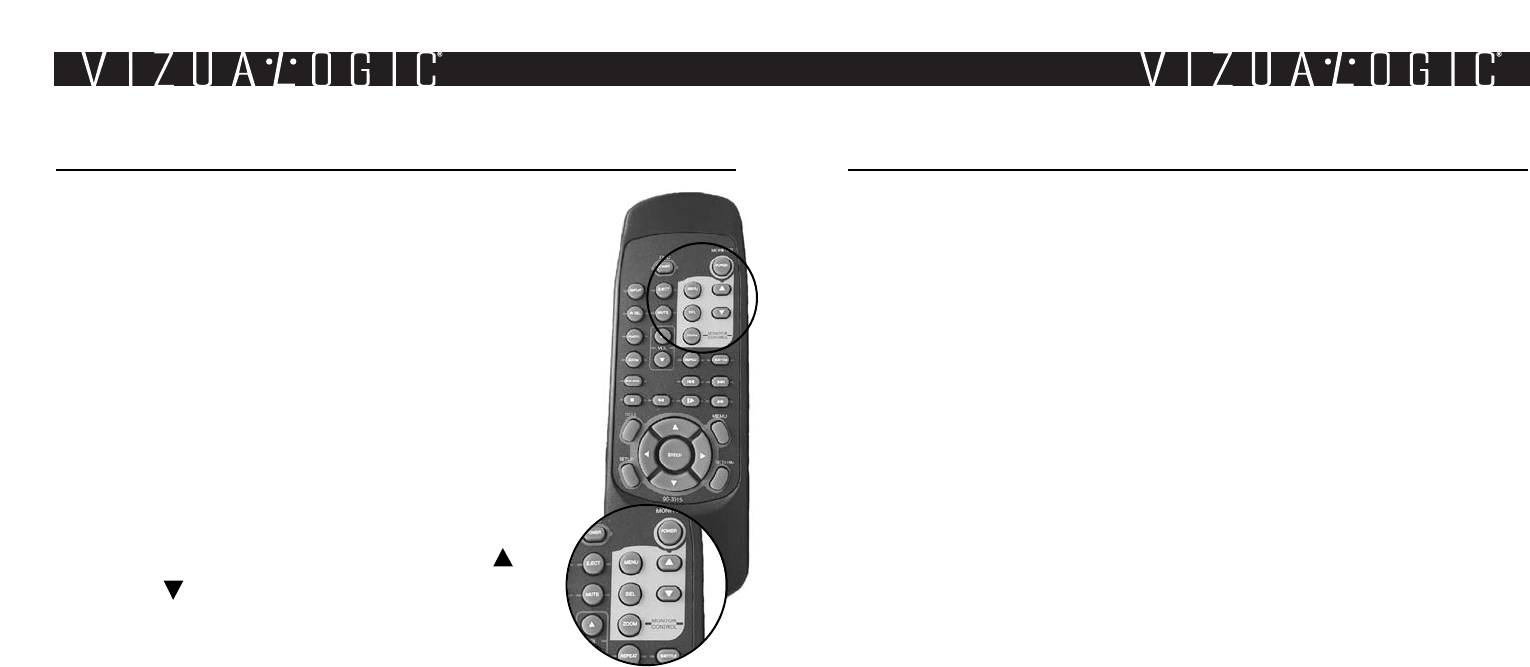
Please refer to the photo. The remote
control supplied with your VizuaLogic video system will also
operate the VizuaLogic DVD players listed below. VL5500*,
VL5700**, VL5800**
This section will describe the video system control functions of the
remote control. Please see your DVD Player Owner’s Manual for a
description of the DVD controls.
Note: Install (2) AAA batteries (included) into the remote control.
Monitor Power: Press the ‘Power’ button to illuminate the
LCD screen.
Screen Adjustments: Press the MENU button to select the
desired screen adjustment, then press the up arrow or
down arrow to change the setting. Each press of the
MENU button will cycle to the next adjustment.
Screen: Gives you three different options for turning the screen
power on and off. “Screen Off” means you will have to push the power button
to turn on the screen. “Screen Auto” means the screen will default to the same
power setting that it was left in. If the screen was left on, then the screen will
turn on. If the screen was turned off then the screen will stay off. “Screen On”
means the screen will always turn on when it receives power.
Contrast: Adjusts the differentiation between light and dark.
Brightness: Adjusts the overall brightness of the LCD display.
Color: Adjusts the intensity of the display colors.
Tint: Adjusts the overall red/green color balance.
Sharpness: Adjusts display sharpness.
Zoom: Changes the aspect ratio of the display. ‘Full’ is 16:9, Normal is 4:3,
‘Cinema’ is a zoom-in view of 16:9, ‘Wide’ is a zoom-out view of 16:9.
Input Select: Press the ‘SEL’ button to select Input 1, ‘AV1’ or Input 2, ‘AV2’.
Reset Default: Adjusts the screen settings to factory settings.
*except DVD Power function. **Available starting August 2003


