


Overhead Installation
Section I – Vehicle Preparation
NOTE: The Quantum Series Overhead Monitor requires adequate roof support for a solid, trouble-
free installation. Typically the Quantum Series Overhead will replace the domelight in the vehicle's
headliner. Before attempting the installation, remove the vehicle's domelight and verify that there is
sufficient clearance above the headliner and sufficient support from a roof beam availible. Ensure that
the placement of the Quantum Series Overhead Monitor does not interfere with or prevent the use of
any overhead climate controls. If the optimal location on the vehicle's headliner is contoured, an
optional Trim Ring will need to be modified and used.
Section II – Cable and Harness Routing
1. Starting at the headliner, route the main system cable down to the desired location in the vehicle.
Repeat for the wireless FM transmitter cable. NOTE: The cables are directional, ensure that the
marked ends have been observed and the cables are routed properly. Leave enough slack available
in the headliner to facilitate connections to the Quantum Series Overhead.
2. Using electrical tape or wire-ties secure the cables in the vehicle so that they will not interfere with
any vehicle functions, (i.e. Sunroof, Seatbelts, Airbags) and possibly cause squeaks or rattles.
3. Route the main system cable to the desired location in the vehicle and connect the 4 pin molex
connector to the supplied noise filter. If necessary connect the RCA input and output cables to
desired devices such as an external DVD player or game system.
4. Route the wireless FM transmitter cable to the desired location in the vehicle and connect the
wireless FM transmitter. Secure the FM transmitter to the vehicle and fully extend the
transmitting antenna.
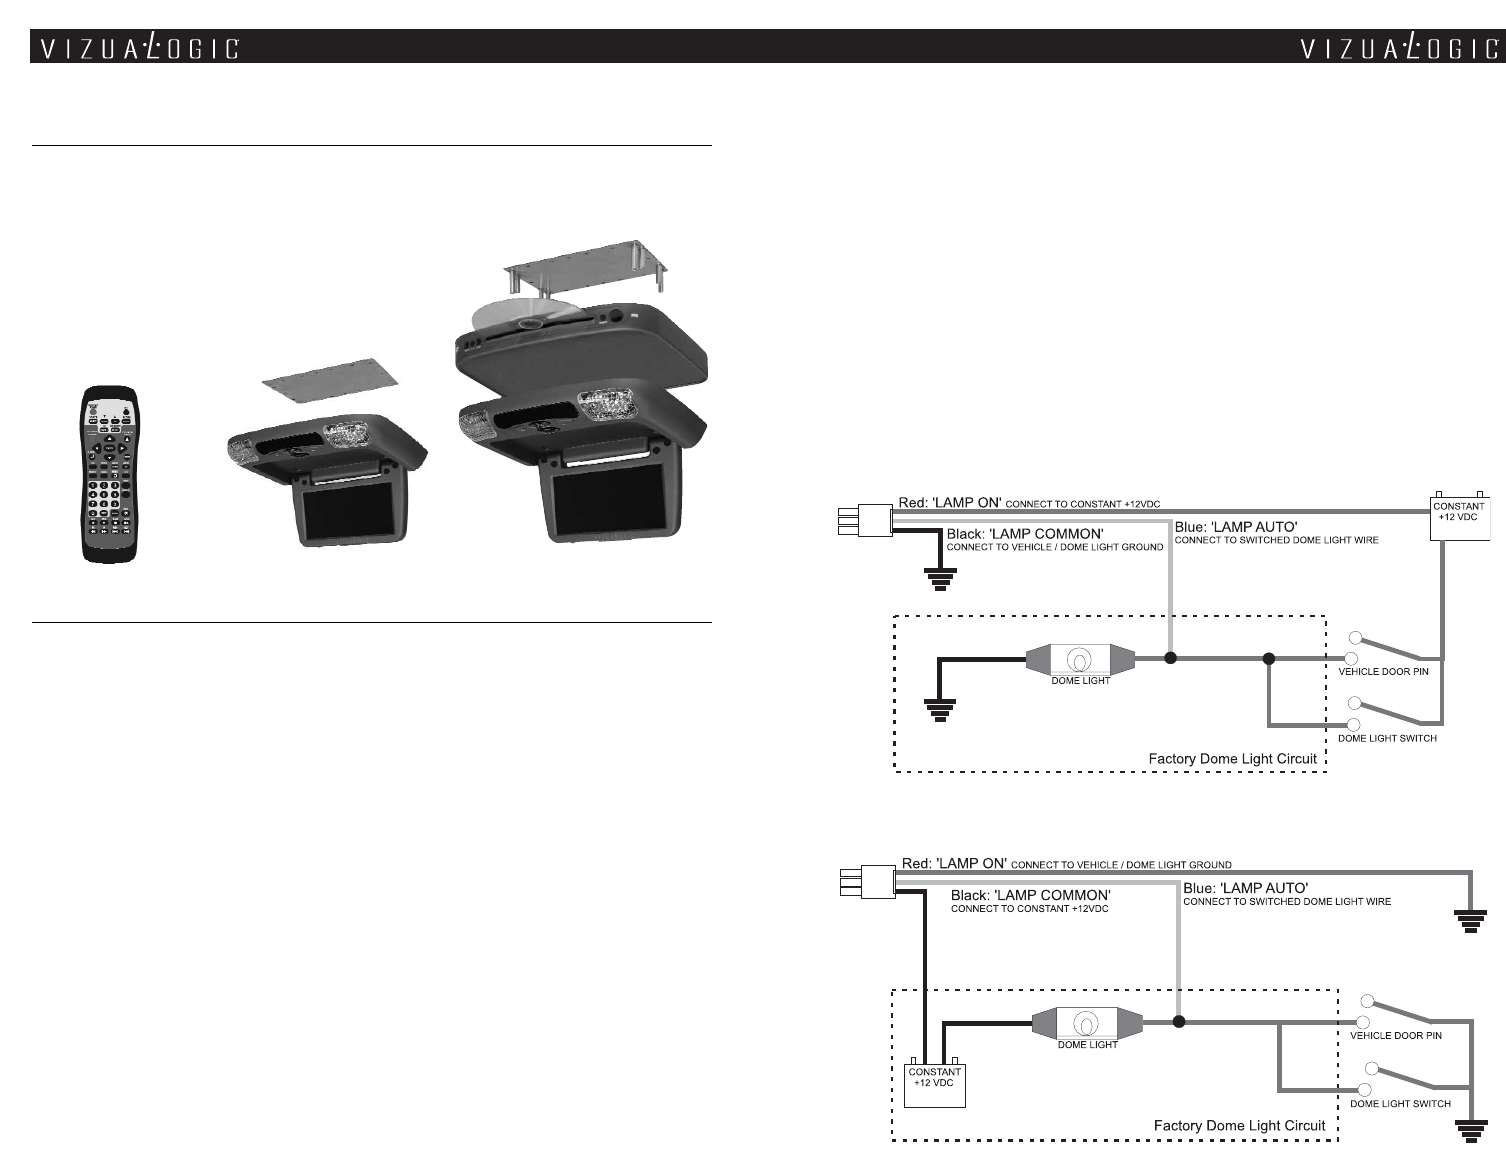
Section III – Dome Light Wiring
The Quantum Series Overhead has integrated dome lights that require three connections to the
vehicle’s dome light wiring. There are two common types of dome light circuits in today’s vehicles,
positive or negative switched. To determine which type of dome light circuit is present in the vehicle
you must first locate the wiring at the dome light. Most dome lights use three wires: a constant, a
switched, and a ground (some vehicles ground the dome light through a mounting screw). With a
digital multi-meter (DMM) test the dome light wiring while opening and closing the doors. On a
positive switched system the switched wire will rest at ground or show an open circuit. When a door
is opened the wire will switch from it's present state to +12VDC. On a negative switched system, the
switched wire will rest at +12VDC or show an open circuit. When a door is opened the wire will switch
from it's present state to ground.
For POSITIVE SWITCHED Systems connect the BLUE wire to the vehicle’s dome light switched wire.
Then connect the RED wire to a fused constant +12VDC source and the BLACK wire to a good ground.
For NEGATIVE SWITCHED Systems connect the BLUE wire to the vehicle’s dome light switched wire.
Then connect the BLACK wire to a fused constant +12VDC source and the RED wire to a good ground.
System Components
The Vizualogic
®
Quantum™ Series Overhead Video System is available in 7" and 10.2" as
well as with or without the optional ThinDVD player.
• Unified remote control. Controls monitor functions,
ThinDVD functions and A/V source input selection.
• Integrated wireless FM transmitter.
• Depending on the installation, additional wiring and
hardware may be required.