


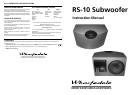


Pre Out - Main In Connections
There are two methods of connecting the subwoofer:
If you use a separate stereo pre and power amplifier, or an amplifier
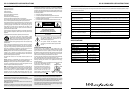
A: Ensure the Front loudspeakers are correctly connected.
where the pre and main amplifier can be separated, connect the sub-
Using one of the additional twin core cables, connect the Left Speaker
woofer as shown. There are two alternative methods.
Terminals on the sub bass unit to the Front Left speaker terminals on the
A: You will need two screened RCA ‘Y’ adaptors and two single RCA
amplifier. Connect the Red (+) speaker terminal on the amplifier to the
phono cables.
Red (+) terminal on the subwoofer. Connect the Black (-) speaker
terminal on the amplifier to the Black (-) terminal on the subwoofer. Now
Remove the Pre-Main links on your amplifier. Connect the socket
connect the Right Speaker terminals on the subwoofer to the Front Right
(common) of an RCA ‘Y’ adaptor to one of the mono cables. Connect one
leg of the ‘Y’ adaptor to the Left Channel Pre Out socket on the amplifier
speaker terminals on the amplifier.
and the other leg to the Left Channel Main In socket. Connect the
remaining plug on this combination to the Left Channel Line Level Input
on the subwoofer. Repeat this for the Right Channel.
B: You will need two stereo (or four single) screened RCA cables.
Connect a Stereo cable from the Line Level Inputs of the subwoofer to
the Pre Out sockets of the amplifier. Now connect a second Stereo cable
B: Alternatively you may connect the subwoofer to the Front speakers.
from the Line Level Outputs of the sub-woofer to the Main In sockets of
the amplifier. Make sure that the Right and Left Channels are not mixed
up! The sub-woofer is now inserted within the system loop.
Speaker Level Connections
The high level Speaker connections should be used only if your amplifier
does not have a line level subwoofer output. In this connection the
subwoofer is fed together with the Front loudspeakers. For this you will
If your speakers are bi-wired: You should ensure that you connect the
need two extra twin core cables.
subwoofer to the BASS terminals ONLY.
Choose a good quality audio speaker
cable of reasonable gauge. Avoid
using cheap ‘bell’ or ‘zip’ cables. Audio
speaker cable has a polarity stripe or
rib along one conductor to simplify
connecting your speakers.
Split the cable at each end to a depth of
25mm. Strip about 7mm of insulation
from each end and lightly twist to
gather the wire strands.
The Speaker Level connectors are
screw terminals located on the control
panel. Unscrew a terminal and insert
the cable into the hole at the base. Re-
tighten the terminal securely. Make
sure that the terminal grips the bare
wire and there are no loose strands
which could touch adjacent terminals.
When routing any cables to loudspeakers do not run them across open
floor spaces where they may cause danger to people and pets. Route
them safely, around room boundaries if necessary.
(x2)
LINE LEVEL
LEFT
INPUT
OUTPUT
RIGHT
SUBWOOFER
LEFTRIGHT
AMPLIFIER
L
R
PRE
OUT
MAIN
IN
LINE LEVEL
LEFT
INPUT
OUTPUT
RIGHT
SUBWOOFER
LEFTRIGHT
AMPLIFIER
LL
RR
PRE
OUT
MAIN
IN
LEFT
SPEAKER LEVEL INPUTS
RIGHT
SUBWOOFER
FRONT LEFT
AMPLIFIER
RIGHT
LEFT
FRONT
FRONT RIGHT
LEFT
SPEAKER LEVEL INPUTS
RIGHT
SUBWOOFER
AMPLIFIER
RIGHT
LEFT
FRONT
LEFT
SPEAKER LEVEL INPUTS
RIGHT
SUBWOOFER
FRONT LEFT
AMPLIFIER
RIGHT
LEFT
FRONT
FRONT RIGHT
FRONT LEFT
FRONT RIGHT
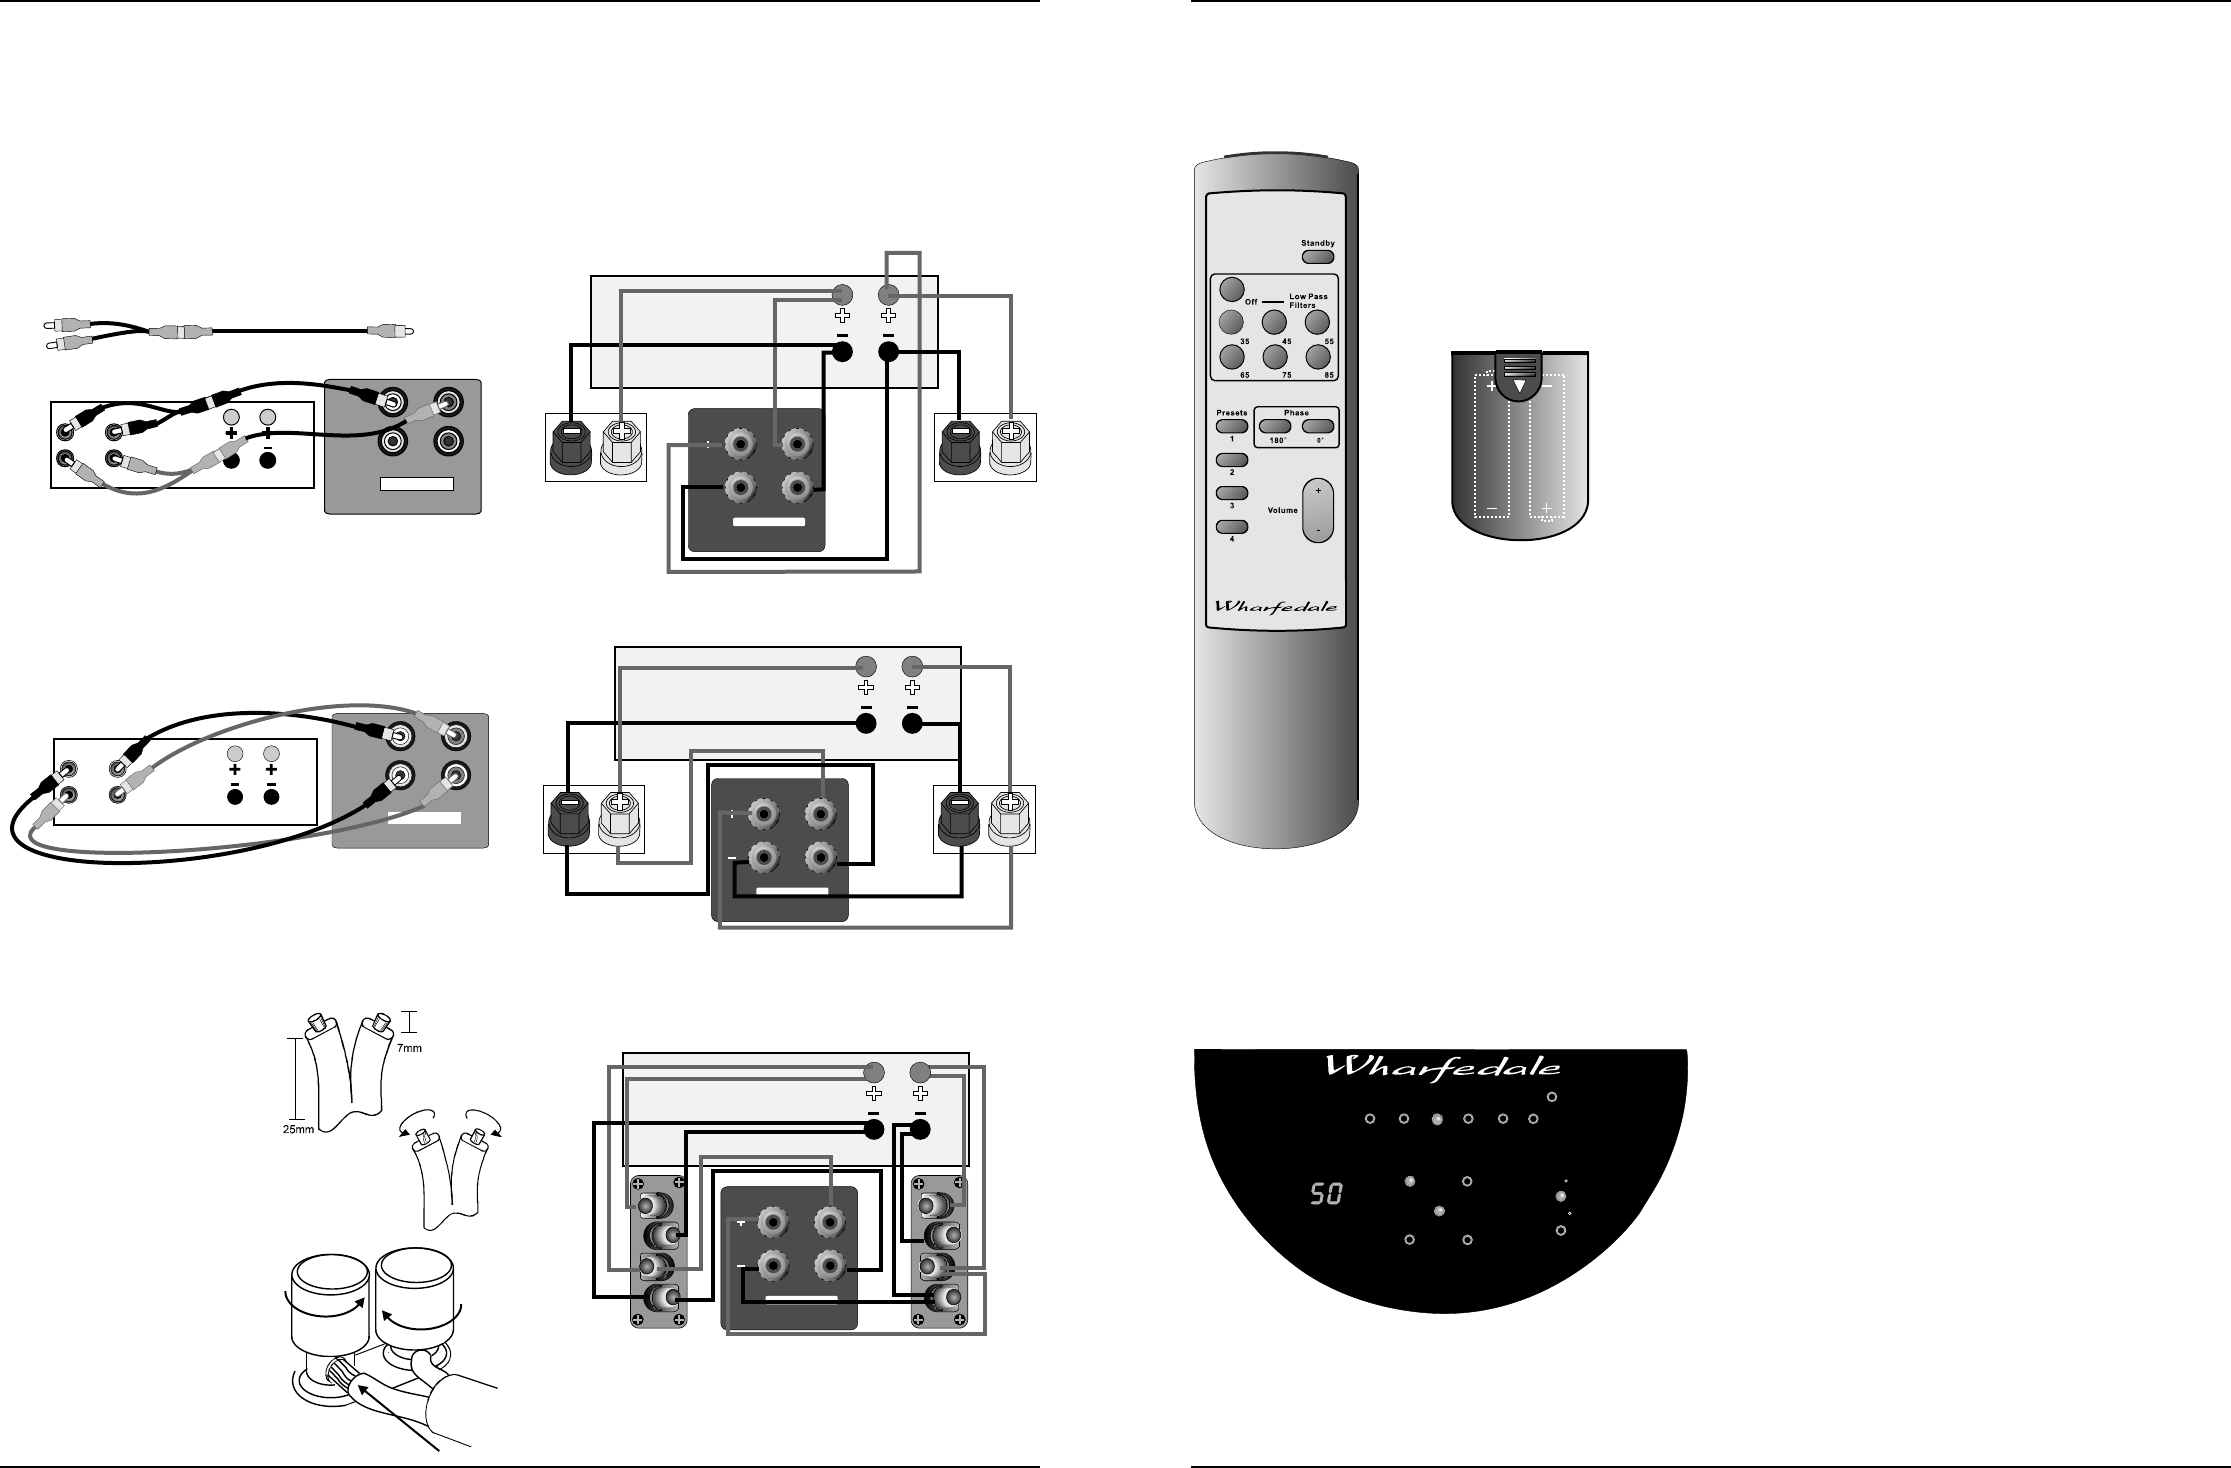
Volume: Press the Volume + key to increase the volume level. Press the
OPERATING YOUR SUBWOOFER
Volume - key to decrease the volume level of the subwoofer. The volume
Remote Handset
range on the front panel display varies from 00 (minimum) to 99
All control functions are carried out using the remote handset.
(maximum).
Installing batteries
Low Pass Filters: Pressing the appropriate filter key will select the
frequency at which the subwoofer rolls off. The filter has steps at Off and
The handset operates on two LR6 (AA)
35Hz-85Hz in 10 Hz increments. When ‘OFF’ is selected the subwoofer
batteries which are supplied The battery
operates over its full designed range. Pressing other keys lowers the
compartment is located at the rear of the
maximum operating frequency. The Low Pass Filter value should be
handset. Unwrap the batteries and slide the
chosen having regard to the nature of the Front speakers and
cover off the handset. Place the batteries in
programme material. Follow the Setup Notes on Page 6 and the
the handset, the correct orientation is shown
instruction manual of your AV processor (if used) for more guidance.
on the diagram. When the batteries are
installed, replace the cover.
Phase: This key toggles the subwoofer between 0º and 180º phase shift.
Presets: Four different settings of level, frequency and phase can be
stored. Pressing and holding any of the preset keys on the remote for 3
seconds will cause the current settings to be stored in that preset. The
display will show the preset number then flash the preset number once
to show it has stored the preset.
To change from one preset to another, press a preset key on the remote
for less than 3 seconds to recall the settings of that preset. The display
will show the preset number:
If you select a preset and then alter any aspect of the setup, the preset
light will extinguish (as the setup no longer matches the preset).
Switching on the Subwoofer
Note: When brought out of standby for the first time, the unit will display
Check that all the connections to the
the factory presets. Thereafter, bringing the unit out of standby will
subwoofer have been properly made and
revert it to the operational state last used. If you switch the power on and
that the system volume control is at
off at the rear panel while the unit is in standby, the unit will power up to a
minimum. Plug the supplied power cord into
normal operating state (i.e. not in standby). To enter standby, again
the mains socket on the rear panel. Plug the
press the Standby key.
mains plug into the wall socket and switch
the power on. Now switch the subwoofer on
SETTING UP YOUR SUBWOOFER
with the rest of your system. The subwoofer
General Notes
on/off switch has a rocker action; press the
Your subwoofer is most likely to be used with two typical programme
upper part to switch the equipment on and
sources, music and movies. The setup for these two very different
the lower part to switch it off. When switched
sources may be different if best results are to be achieved. Please read
on the light above the power switch will glow
these setup notes in conjunction with your processor and speaker
and the subwoofer will be operational.
manuals.
Operation - Controls and Functions
All setting up of the subwoofer should be performed with tone controls
and filters set ‘flat’.
Control functions are carried out using the remote handset. To operate,
Listening Rooms and Subwoofer Positioning:
the handset must be point at the subwoofer and be in direct line of sight.
Listening rooms are not ideal. Most rooms are reverberant with some
Standby: The Standby key brings the subwoofer in and out of Standby.
parallel walls. Because of room geometry and construction there will be
The drawing below shows a typical front panel display during operation.
areas with severe peaks at some frequencies and severe troughs at
others. These peaks and troughs are called ‘standing waves’ and if you
site loudspeakers in such areas the response will be highly non-linear.
With subwoofers this situation is exacerbated by the fact that it is easier
to treat high frequency irregularities by the use of drapes, soft
furnishings etc., but very hard to do the same at bass frequencies due to
the very long wavelengths - at 40 Hz the wavelength is almost 9 metres!
To help locate standing waves in your listening room, one idea is to sit in
the listening seat and recruit a friend with a deep voice to speak as he
moves around the area where you propose to site your subwoofer - you
will soon find out where not to site it! Where the voice sounds most
natural is a good place to start.
The low frequency response of the subwoofer and its blend with the main
loudspeakers is greatly affected by positioning. Although bass is
The preset light will not light if no preset has been set up or if a preset
enhanced by walls or corners, so often is coloration. As the drive unit
has been over-ridden.
faces rearward, the wall will influence the sound. The wall should be
In Standby mode all the lights on the subwoofer front panel are
smooth and solid and ideally, nonr-everberant. The surface under the
extinguished. The rear panel light remains on to show the unit is
subwoofer should be stable and unobstructed. I
powered.
SUBWOOFER CONTROL
AA AA
OFF
LOW PASS FILTER SELECT
85Hz75Hz65Hz55Hz
45Hz
35Hz
MEMORY
POWER
PHASE
0
180
1 2
3
4
VOLUME
RS-10 SUBWOOFER USER INSTRUCTIONS RS-10 SUBWOOFER USER INSTRUCTIONS
Page 4
Page 5