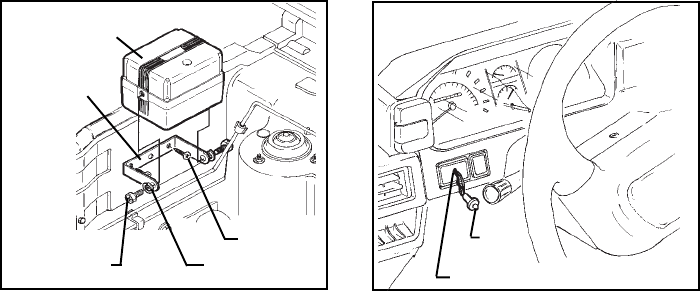
MOUNTING THE COMPONENTS
1. Mounting The Siren Con-
trol Module
Select a flat, metal surface
within the engine compartment,
but not on the engine, for
mounting the siren control mod-
ule. Keep in mind that the horn
end must be facing down to
prevent water from entering the
module.
A location on the firewall,
which is not easily accessible
from underneath the vehicle, is
preferred, This location will
provide optimum operation of
the shock sensor, and prevent
the potential thief from dis-
connecting the alarm from below
the vehicle.
You should also locate the
control module away from hot or
moving components within the
engine compartment, and avoid
areas where water will run off
or collect during heavy rain-
storms.
To mount the siren control
module;
A. Secure the module mounting
bracket to the selected loca-
tion using the (2) 3/4" long
screws provided. Carefully
drill a 1/8" diameter pilot
hole for starting the screws.
B. In most cases, if the
bracket has been secured to a
solid metal surface, you can
connect the BLACK wire from
the wiring harness to the
siren mounting bolt. Using a
BRACKET
SIREN MODULE
3/8" LG. HEX
BOLTS
SPLIT
LOCKWASHER
3/4" LG.
SCREWS
L.E.D.
DRILL A 1/4" DIAMETER
HOLE
Page 1
10 mm wrench or socket, secure
the siren module ( and eyelet
terminal on the end of the
BLACK wire) to the bracket
using the (2) 3/8" long hex
head bolts and (2) split lock
washers provided.
2. Mounting The Dash L.E.D.
Indicator
Select an area on the dashboard
or center console that will
provide the most visibility
from all angles outside the
vehicle ( driver’s window,
passenger’s window, rear win-
dow, etc. ).
IMPORTANT ! Make sure there is
adequate room for the body of
the L.E.D. behind the panel in
the selected location. You
should also be sure that the
drill will not pierce any wires,
or damage other components af-
ter passing through the panel.
It is always best to remove the
panel from the vehicle before
drilling the hole.
To mount the L.E.D.;
A. Drill a 1/4" diameter hole
at the selected mounting loca-
tion.


