IN1508 • Setup Guide
2
IN1508 — Setup Guide (cont'd)
Step 4 — RS-232
a. RS-232 —Connect a control system or
computer to the rear panel RS-232 port.
The IN1508 User's Manual, at www.extron.com
details Simple Instruction Set (SIS
™
) commands.
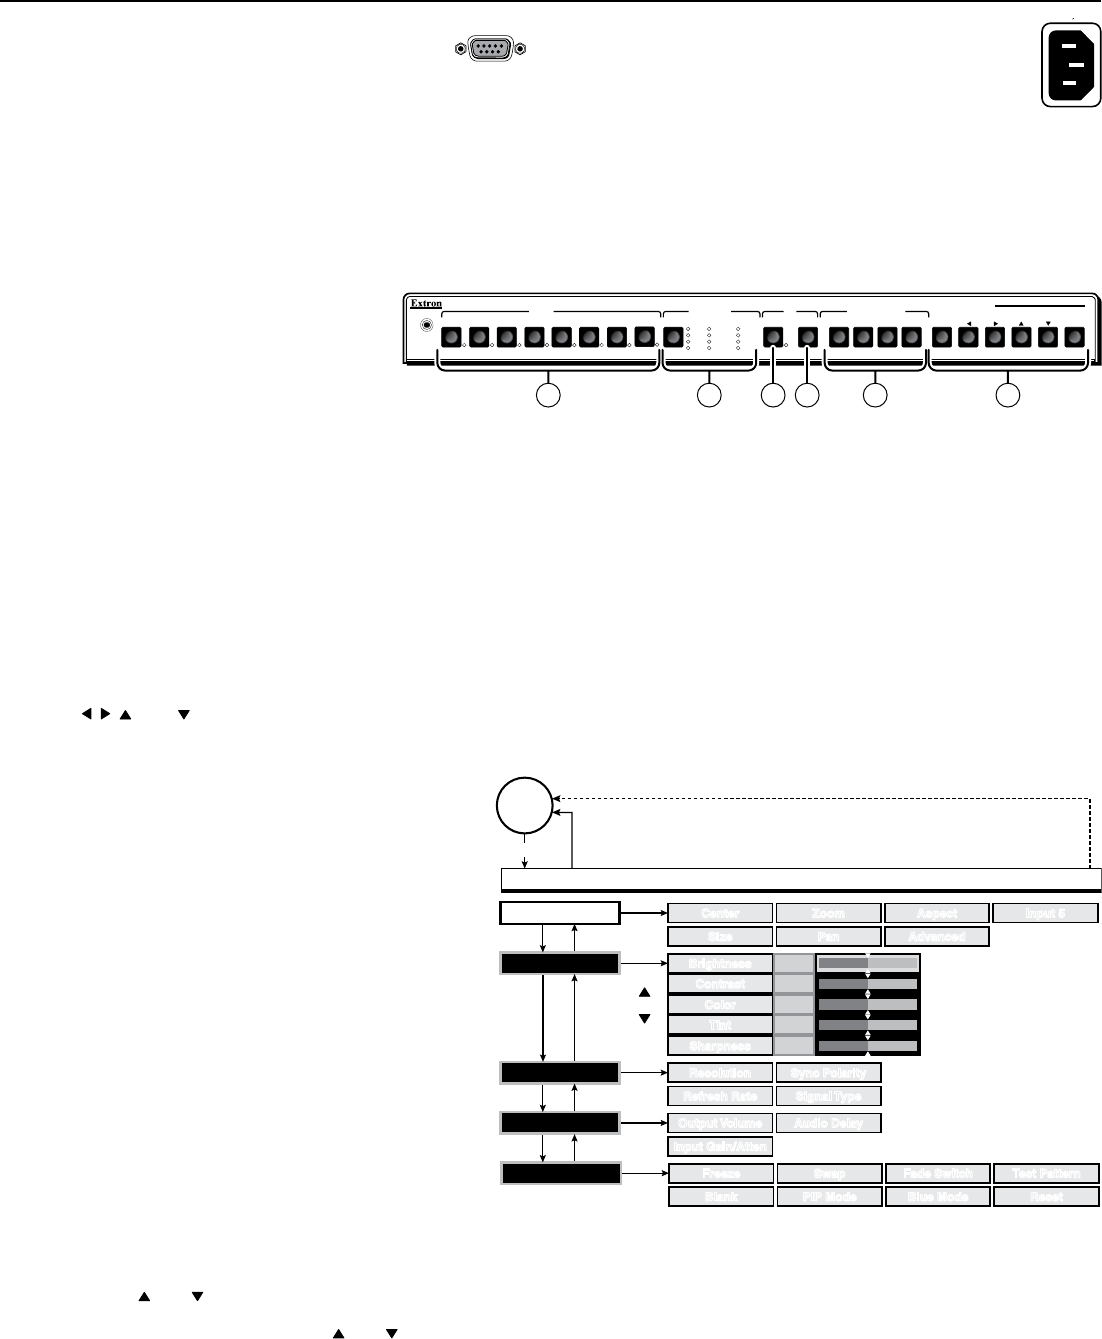
Front Panel and Remote Control Controls and Indicators
Many of the switcher’s functions are available via simple controls on the front panel. Front panel LEDs provide indications
of some of the basic system functions. For more complex tasks, such as system configuration, the switcher has a menu system
that is operated by using the front panel buttons. The menu system reports via an on-screen display on the connected output
device.
a
Input buttons and LEDs —
Press to select an input to scale and
output. The lit Input LED indicates
the selected input.
b
Output Rate button and LEDs —
Press to cycle through 12 common
resolutions at the 60 Hz refresh rate. The LEDs indicate the selected resolution.
N Some rates cannot be selected using this button. Use the menu system for additional rates.
c
PIP On (picture-in-picture) button and LED — Press to toggle the PIP feature on and off. The LED lights when PIP
mode is on.
d
PIP Swap button — Press when the PIP feature is on to swap the main and PIP images.
e
Picture Control buttons — Press to change the centering, size, contrast, brightness, color, or tint.
f
Menu control buttons
Menu button — Press to activate the on-screen display menu system (shown below) or to back up one level from the
currently selected menu or submenu.
, , , and buttons — Press to move the highlight bar over submenus or selections and to adjust selected settings.
Enter button — Press to select a highlighted submenu or selection.
Menu system operation
At right is a a flowchart of the submenus in the
main menu system. Each submenu leads to a series
of submenus or to a “slider” type status indicator
for individual settings.
Setup
Use the front panel menu controls and the
connected display's on-screen display to set up the
IN1508 using the following procedures.
N If no image can be seen on the display, use
the front panel Output Rate button to select
1024x768 or 720p.
You can toggle between an RGBHV and high
definition component video output by pressing
and holding the PIP On button while you
cycle the IN1508 power.
Set output signal settings
1. Navigate to the Output submenu selection boxes.
2. Press and to select among the Resolution, Refresh Rate, Signal Polarity, and Signal Type selection boxes.
3. For each selection box, press and to select the settings that match the display's native settings.
N Some resolutions such as 1920x1200 and 1080p Sharp are only available via SIS command; refer to the IN1508 User’s
Manual, available at www.extron.com, for the associated commands.
RS-232
Step 5 — Power
AC power connector — Plug in a standard IEC
power cord from a 100 to 240 VAC, 50-60 Hz
power source into this receptacle. Turn on the
input and output devices after you power up
the switcher.
50/60Hz
100-240V 50-60Hz
INPUT OUTPUT RATE PIP
SCALING PRESENTATION SWITCHER
IR
IN1508
PICTURE CONTROLS
VGA
SVGA
XGA
SXGA
ON 7 6 5 4 3 2 1 SWAP
8
CENTER SIZE
CONT/
BRT
COL/
TNT
MENU ENTER
1024x852
1024x1024
1366x768
1365x1024
UXGA
720p
1080i
1080p
1 2 43 5 6
SizeSize
CenterCenter
AspectAspect
ZoomZoom
PanPan
FreezeFreeze
BlankBlank PIP ModePIP Mode
SwapSwap
Fade SwitchFade Switch
Blue ModeBlue Mode
Test PatternTest Pattern
ResetReset
Menu
Enter
Enter
No
menu
display
Menu Timeout
EXTRON ELECTRONICS IN1508 SCALING PRESENTATION SWITCHER
INPUT
ADVANCED
AdvancedAdvanced
Input 5Input 5
Enter
PICTURE
+45
+64
+64
+64
SharpnessSharpness
ColorColor
TintTint
BrightnessBrightness
ContrastContrast
+64
ResolutionResolution
Refresh RateRefresh Rate
Sync PolaritySync Polarity
Signal TypeSignal Type
Enter
OUTPUT
Enter
AUDIO
Input Gain/AttenInput Gain/Atten
Output VolumeOutput Volume Audio DelayAudio Delay
Select


