Quick Check® 600/800 Series User’s Guide 5 - 3
2. Scan a bar code symbol.
- If the AutoPrint/Store feature is set to On, the results print.
- If the AutoPrint/Store feature is set to Off, press SELECT twice. After you
press SELECT the first time, a menu that begins with Print Results appears
and the cursor is on the asterisk next to Print Results. After you press
SELECT a second time, a message appears that asks if you want to print all
the stored results, print just the results of the last scan or if you want to clear
the buffer.
3. Press ↓ to move the cursor next to Latest Result Only.
4. Press SELECT.
The data prints.
♦ To print stored data:
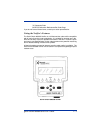
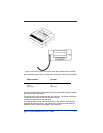
1. Connect the verifier and the printer and turn on both units. Be sure the
Printer type setting in the Output Options, Print Options menu matches the
type of printer the verifier is connected to. Refer to "Changing the Output
Options" on page 3-12 for instructions.
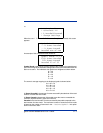
2. With any data displayed on the verifier, press SELECT three times. After
you press SELECT the first time, a menu that begins with Print Results
appears and the cursor is on the asterisk next to Print Results. After you
press SELECT a second time, a message appears that asks if you want to
print out all the stored results, print just the results of the last scan or if you
want to clear the buffer. The cursor appears next to All Stored Results. After
you press SELECT the third time, the stored data prints.
OR
1. Display the print buffer message. Refer to "Checking the Print Buffer During
Operation" on page 5-1 for instructions.
2. Use the arrow buttons to move the cursor to the asterisk next to Print.
The stored data prints and clears the records from the buffer, but the data
from the last scan remains in the verifier.
♦ To stop printing:
1. During printing, press and momentarily hold POWER on the verifier.
Printing stops when the printer’s internal buffer is clear.
OR
2. Wait until the printer stops automatically.
Deleting Stored Data
You can delete stored data from the verifier’s memory using the Print Buffer
menu or the Print Results menu.