Installation 8
Installation
In this section
Installing the TFT7600 RKM....................................................................................................................... 8
Kit contents.............................................................................................................................................. 8
Installing the HP TFT7600 RKM.................................................................................................................. 8
Accessing the TFT7600 RKM ................................................................................................................... 12
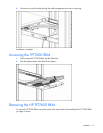
Removing the HP TFT7600 RKM .............................................................................................................. 12
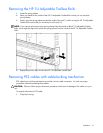
Removing the HP 1U Adjustable Toolless Rails ........................................................................................... 13
Removing PS2 cables with cable-locking mechanism .................................................................................. 13
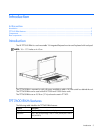
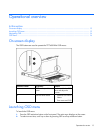
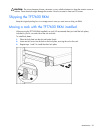
Installing the TFT7600 RKM
The following section covers the installation and setup procedure for installing the TFT7600 RKM.
Kit contents
The kit contains:
• TFT7600 RKM (1)
• M6 screws (4)
• 6-32 screws (5)
•
• Cable management arm, power adapter with brace rail (1)
• Lock plates (2)
• USB cables (2)
• PS2 cables (2)
• Video cable
• Power cords (2)
• USB cable labels
• Documentation
This kit contains extra hardware for your convenience.
Installing the HP TFT7600 RKM
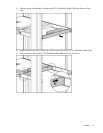
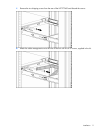
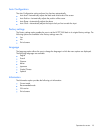
1. Align the HP 1U Adjustable Toolless Rails with the holes marked on the rack, and snap them into
place.
a. Snap one end of the HP 1U Adjustable Toolless Rails into the Retma rails.
b. Extend the other half of the HP 1U Adjustable Toolless Rails to meet the appropriate rack depth,
and snap them into place.
HP 1U Adjustable Toolless Rails (2)