12
MDS-NT1
SECTION 2
GENERAL
This section is extracted from
instruction manual.
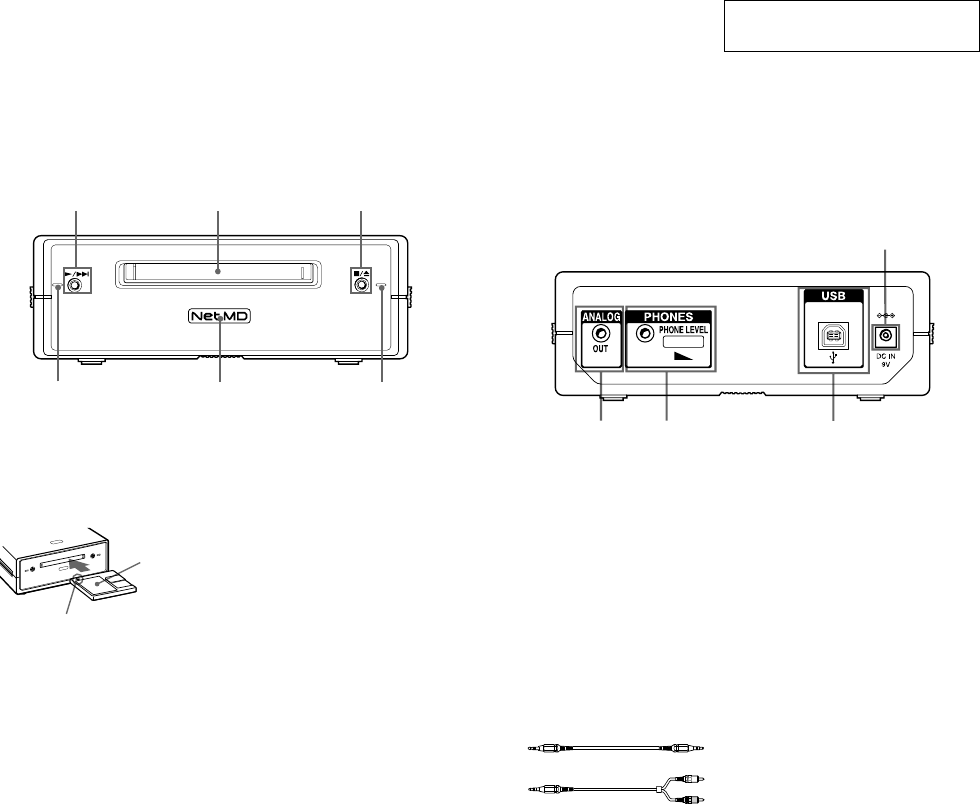
This chapter tells you about the location and function of the various buttons, controls on the MD deck.
132
5
4
6
1 N/> button
Press while the unit is stopped to start playback.
Press while the unit is playing to locate the
beginning of the next track.
2 MD insertion slot
Insert the MD as illustrated below.
3 x/Z button
Press while the unit is playing to stop playback.
Press while the unit is stopped to eject the MD.
4 Recording indicator
Lights up in the following cases:
While an audio file is being transferred from the
connected computer to the MD deck (check-out).
While an audio file is being transferred from the
MD deck to the connected computer (check-in).
When TOC information (such as track
information) has not been recorded to the MD.
Flashes when overwriting of the MD’s TOC by
the MD deck is started by pressing x/Z .
5 Net MD lamp
Indicates the USB connection status between the
unit and the computer.
Lights dimly when the unit is connected only to a
wall outlet with the supplied AC adaptor.
Lights brightly when the unit is connected to a
computer with its operating system running.
6 Playback indicator
Lights during playback.
Flashes while the MD's TOC is being loaded by
the MD deck.
Notes
• Except for operation of the x/Z button for ejecting
the MD, all other operations on the MD deck are
disabled while the Net MD is connected through the
supplied USB cable to a computer with its operating
system running.
Under these conditions, the Net MD lamp flashes
(the other indicators remain off) whenever you
attempt to do an operation that is disabled.
• The flashing of the Net MD lamp and flashing or
lighting up of the other indicators are indications
that the MD deck’s self-diagnosis function is active.
For details, see page 12.
With the labeled
side up
With the arrow pointing
towards the deck
1
2
3
4
1 DC IN 9V jack
Connect this jack to a wall outlet via the supplied
AC power adaptor to power the MD deck.
2 USB port
Connect this port to a USB port on your
computer with the supplied USB cable.
3 Headphones jack and PHONE LEVEL
control
Connect a headphones plug to this jack.
Turn the PHONE LEVEL control to adjust the
volume of the connected headphones.
4 ANALOG OUT jack
Connect active speakers, etc. to this jack with the
supplied audio connecting cord (stereo mini-plug
×1 y stereo mini-plug ×1) or optional audio
connecting cord (stereo mini-plug
×1 y phono
plug ×2).
or
• LOCATION OF CONTROLS
– Front View –
– Rear View –
